Let us now construct a more extensive project that will show how to use the Google mapping libraries to add new functionalities to that possible with the Android API alone. In this project we shall
In the process we shall use the modern approach to laying out Android content and display our maps in instances of MapFragment, which extends Fragment. This leads to flexibility in layout across devices with different formfactors because Fragments represent a piece of an application's user interface that can be placed inside an Activity (see the preceding Fragments project). We shall also learn how to implement the Runtime Permissions introduced with Android 6 (API 23).
The use of Google Maps in Android is somewhat more involved than mere Android programming because one must obtain access to additional libraries that are not part of the core Android installation, and also register the app with Google to receive permission to download maps. These additional complications concern only the initial setup; once we have registered the app to receive map updates, declared the permissions that will be required, and linked to the appropriate libraries, programming mapping and location services is much like any other Android programming.
This project will be concerned primarily with programming Google Maps in conjuction with location services. Since it will target Android 6 and will require location permissions, it will also implement the new runtime permissions introduced with Android 6 (API 23). Recommended reading includes
All three of these areas (maps, location services, and permissions) have changed substantially since ~2014, so even if you are familiar with Android programming from an earlier day, these overviews will be useful introduction to what follows. |
So after that rather long-winded introduction, let's get started!
The Google Maps Android API is distributed as part of the Google Play Services SDK. First, check the SDK manager for your installation of Android Studio and be certain that the Google Play services package (under the SDK Tools tab) is installed. If it isn't, check its box on the tab and install it. Maps will not work if your app does not have access to Google Play Services. Further information about insuring that you have access to the correct version of Google Play Services may be found at Setting Up Google Play Services.
Following the general procedure in Creating a New Project, either choose Start a new Android Studio project from the Android Studio homepage, or from the Android Studio interface choose File > New > New Project. Fill out the fields in the resulting screens as follows,
|
Application Name:
MapExample
Company Domain:< YourNamespace > Package Name: <YourNamespace> .mapexample Project Location: <ProjectPath> MapExample Target Devices: Phone and Tablet; Min SDK API 15 Add an Activity: Google Maps Activity Activity Name: MapsActivity Layout Name: activity_maps Title: Map |
where you should substitute your namespace for <YourNamespace> (com.lightcone in my case) and <ProjectPath> is the path to the directory where you will store this Android Studio Project (/home/guidry/StudioProjects/ in my case). When the build is complete Android Studio should open the google_maps_api.xml and the MapsActivity.java files in the editor. If you have chosen to use version control for your projects, go ahead and commit this project to version control.
Before beginning actual coding, we must take care of some permissions and authorization issues .
The first step in developing a mapping application is to obtain an API key that allows access to the Google Maps servers. The instructions for doing this are given in the app/res/values/google_maps_api.xml file created with the project, and also may be found in the Maps Getting Started document. When you have retrieved an API key using these instructions, insert it in the google_maps_api.xml file as instructed by comment statements in that file. Once the API key is inserted, you are ready to test the skeleton mapping app that Android Studio has created.
|
To keep things simple we shall register using the debug certificate associated with our development machine to obtain a temporary Maps API key. This is adequate for demonstration and development. However, when you publish an app (e.g., deployment through the Google Play Store) you must digitally sign it and (if you employ Google Maps) before you publish your application you must register for a new Key based on your release certificate, and update the references in your app to this new key. More detail may be found at
Sign Your App.
This maps API key is valid only under the debug certificate on a specific machine, for as long as that debug certificate is valid (typically 365 days).
|
It is strongly recommended that you use an actual device, with location services enabled, to develop mapping applications, but it can be done with an AVD if you don't have access to a suitable device.
Once your device is connected or your AVD configured, launch the application using Android Studio. After the build and deployment, you should see a display similar to the following image after pressing on the red marker in the map.
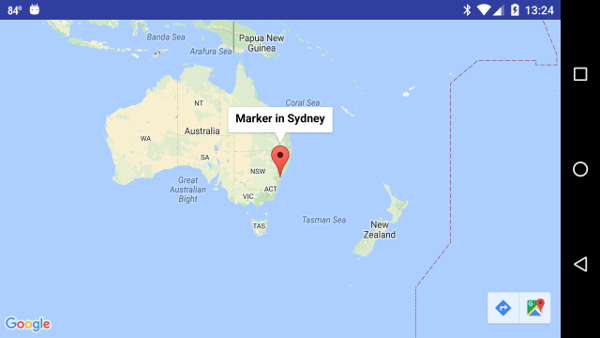
|
This indicates that the appropriate APIs are being accessed, and that the maps key just downloaded is indeed allowing access to Google mapping tiles.
| If you get a blank screen with no map (in this or any mapping application), the most likely culprit is an authorization failure because the mapping API key has been deemed not valid. Check the logcat output for confirmation. |
This app already does some useful things beyond verifying the development setup for maps.
We have a solid starting point, so let's develop some more ambitious applications of the Maps API!
For simple mapping tasks our app is already adequately configured, but the more ambitious mapping examples in this project will require some additional configuration of the manifest file. A summary of project configuration required when using the Maps API is given in the Project Configuration guide for the Google Maps Android API. For our tasks it is necessary to do the following.
Let us now consider some permissions that are either required or recommended so that the network can retrieve map data and display it in our app. We will see below that these are taken care of automatically, so there isn't anything to do yet; just read for your information.
where<uses-permission android:name="android.permission.INTERNET" /> <uses-permission android:name="android.permission.WRITE_EXTERNAL_STORAGE"/> <uses-permission android:name="android.permission.ACCESS_NETWORK_STATE"/>
where<uses-permission android:name="android.permission.ACCESS_COARSE_LOCATION" /> <uses-permission android:name="android.permission.ACCESS_FINE_LOCATION" />
which will prevent loading of the application on a device that does not implement the required level of OpenGL. (With this tag included, Google Play Store won't display the application as a download option for devices that don't have OpenGL ES version 2 installed.)<uses-feature android:glEsVersion="0x00020000" android:required="true"/>
|
Because of the
Android security model,
insertion of these permissions in the manifest file means that the user will be required to give explicit approval for all of the actions implied by the permissions. Prior to Android 6.0, these permissions were given when the application was initially installed on a device. Once installed, the permissions remained in effect, even through any updates of the application, unless the list of permissions changed in an update. In that case, the user was required to authorize the new permission list before the update would install. Implicit in this procedure was that giving permissions was an all or none proposition---the user was not allowed to give some permissions and deny others.
This security model has evolved for Android 6.0 (API 23) and beyond. In the newer model there is more flexibility for the user of an app in granting some permissions and not others, granting of certain permissions ("dangerous" permissions) will shift largely to the first time the permission is needed rather than all at once at installation (runtime permissions), and the user will have the option of revoking a permission at some later time. These changes and the programming required to implement them will be explained further below. |
Now for the GOOD NEWS! Although you should be aware of the above permissions requirements for your own edification, or in case you need to understand or modify an app written under older versions of the Maps API (where all these and more had to be inserted by the developer), these permissions have already automatically been taken care of by the Maps API, Android Studio, and Google Play Services!
Hence, there are no explicit permissions to add to the manifest file. However, there are some additional metadata and Activity declarations to be inserted in the manifest file that we will summarize in the next two subsections.
Open the manifest file app/manifests/AndroidManifest.xml for the project and add (as a child of <application>) the meta-data tag
<meta-data
   android:name="com.google.android.gms.version"
   android:value="@integer/google_play_services_version" />
which will cause the version of Google Play Services with which the app was compiled to be embedded in the application.
| This Google Play Services tag embeds metadata identifying the version of the Google Services client library to which it is bound. When the Google Play Services component is added to an application, the correct version of the Google Play Services client library is downloaded and the component automatically binds to that, instead of the version installed by the Android SDK Manager. |
Much of Google Play Services operates under the hood for a mapping application, so we don't need to do much more than specify it in most applications; however, more detailed instructions concerning the Google Play SDK and its usage may be found in the Google Play Services documentation.
There is one final set of entries that must be added to the manifest file. We will create a number of FragmentActivities in our application and Android requires that they be declared in the manifest file before they can be used. Although the FragmentActivities have not been created yet, let's go ahead and declare them. Add to the manifest file as children of the <application> tag the <activity> tags
   <activity android:name=".MapsActivity" android:label="Default map"> </activity>
        <activity android:name=".IndoorExample" android:label="Indoor example"> </activity>
        <activity android:name=".MapMarkers" android:label="Map markers"> </activity>
        <activity android:name=".ShowMap" android:label="Show Map"> </activity>
        <activity android:name=".RouteMapper" android:label=""></activity>
        <activity android:name=".MapMe" android:label="Map Me"></activity>
        <activity android:name=".Help" android:label="Help"
            android:theme="@style/MyDialogTheme"> </activity>
        <activity android:name=".Settings" android:label="Settings"
            android:theme="@style/MyDialogTheme"> </activity>
(The activity names will be highlighted in red, indicating errors, since they haven't been defined yet. We will fix that later, so ignore it for now.)
This, at long last, completes the initial specification of the manifest file. For reference, the final form of AndroidManifest.xml, with the additions just implemented highlighted in red, should read
<?xml version="1.0" encoding="utf-8"?>
<manifest xmlns:android="http://schemas.android.com/apk/res/android"
    package="<YourNamespace>.mapexample">

    <!-- The ACCESS_COARSE/FINE_LOCATION permissions are not required to use
         Google Maps Android API v2, but you must specify either coarse or fine
         location permissions for the 'MyLocation' functionality. -->

    <uses-permission android:name="android.permission.ACCESS_FINE_LOCATION" />

    <application
        android:allowBackup="true"
        android:icon="@mipmap/ic_launcher"
        android:label="@string/app_name"
        android:supportsRtl="true"
        android:theme="@style/AppTheme">

        <meta-data
           android:name="com.google.android.gms.version"
           android:value="@integer/google_play_services_version" />

        <!-- The API key for Google Maps-based APIs is defined as a string resource.
             (See the file "res/values/google_maps_api.xml"). Note that the API key
             is linked to the encryption key used to sign the APK. You need a different
             API key for each encryption key, including the release key that is used to
             sign the APK for publishing. You can define the keys for the debug and
             release targets in src/debug/ and src/release/. -->

        <meta-data
            android:name="com.google.android.geo.API_KEY"
            android:value="@string/google_maps_key" />

        <meta-data
            android:name="com.google.android.gms.version"
            android:value="@integer/google_play_services_version" />

        <activity
            android:name=".MapsActivity"
            android:label="@string/title_activity_maps"
            android:theme="@style/AppTheme">
            <intent-filter>
                <action android:name="android.intent.action.MAIN" />

                <category android:name="android.intent.category.LAUNCHER" />
            </intent-filter>
        </activity>

        <activity android:name=".IndoorExample"
	    android:label="Indoor example"> </activity>
        <activity android:name=".MapMarkers" android:label="Map markers"> </activity>
        <activity android:name=".ShowMap" android:label="Show Map"> </activity>
        <activity android:name=".RouteMapper" android:label=""></activity>
        <activity android:name=".MapMe" android:label="Map Me"></activity>
        <activity android:name=".Help" android:label="Help"
            android:theme="@style/MyDialogTheme"> </activity>
        <activity android:name=".Settings" android:label="Settings"
            android:theme="@style/MyDialogTheme"> </activity>

    </application>

</manifest>
where your own package name should be substituted for <YourNamespace> and the identifier @string/google_maps_key will read and insert the 40-character Google Maps API key that was stored earlier in google_maps_api.xml.
This is a large project with various pieces that illustrate a number of ways to use Google Maps in an Android application. Rather than construct it step by step, we shall take the approach of first creating all the XML files, Java files, and resources that will be required. Then we shall describe in some detail the functionality and the way that it is implemented with the underlying code. If you would rather not create all these files by hand, the entire project can be obtained directly from MapExample, with instructions for installing it in Android Studio in Packages for All Projects. In that case you can jump directly to the discussion below of the functionality and how the code implements it.
Android apps typically consist of a set of activities that call each other. Which activity is called first (the initial entry point) is specified by the AndroidManifest.xml file. In the MapExample project created initially by Android Studio the entry point (specified by the intent-filter tag) is directly into a mapping application defined by the class MapsActivity. We wish to change that so that the initial entry point is a screen with choices that allow various mapping examples to be chosen. So let us first create the Activity that will define the entry screen, and modify the Manifest file so that this activity is called first when the app is launched.
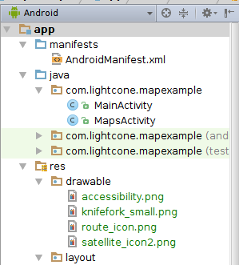
Create a class app/java/<YourNamespace>.mapexample/MainActivity.java (where you must substitute for <YourNamespace> your own package identifier, and a correspondinglayout file app/res/layout/activity_main.xml. Edit the manifest file and change the entry activity from MapsActivity to MainActivity in the activity tag containing the intent-filter, and add an activity declaration for the original class MapsActivity (since it is no longer declared in the manifest once the preceding change is made). These changes to the manifest file are marked in red below:
<activity
	android:name=".MainActivity"
	android:label="@string/title_activity_maps"
	android:theme="@style/AppTheme">
		<intent-filter>
		<action android:name="android.intent.action.MAIN" />

		<category android:name="android.intent.category.LAUNCHER" />
		</intent-filter>
</activity>

<activity android:name=".MapsActivity" android:label="Default map"> </activity>
<activity android:name=".IndoorExample" android:label="Indoor example"> </activity>
Now the code in the Java class MainActivity will be executed first when the app is launched. Later we will add commands to MainActivity that implement the desired functionality of the entrance screen, but first let us define a set of XML resources that will be required.
Edit the file app/res/values/colors.xml to read
<?xml version="1.0" encoding="utf-8"?>
<resources>

    <color name="barColor">@color/accent</color>
    <color name="barTextColor">#ffffff</color>color>
    <!--<color name="buttonColor">@color/primary_light</color>-->  <!-- Tint with a palette color-->
    <color name="buttonColor">#dedede</color>  <!-- Tint with very light gray-->
    <color name="dialogBackground">#eeeeee</color>

    <!-- Choose one of the following palettes and leave the rest commented out -->

    <!-- Palette 1  Generated at http://www.materialpalette.com -->
    <color name="primary">#009688</color>
    <color name="primary_dark">#00796B</color>
    <color name="primary_light">#B2DFDB</color>
    <color name="accent">#448AFF</color>
    <color name="primary_text">#212121</color>
    <color name="secondary_text">#727272</color>
    <color name="icons">#FFFFFF</color>
    <color name="divider">#B6B6B6</color>

    <!-- Palette 2  Generated at http://www.materialpalette.com-->
<!--    <color name="primary">#FFC107</color>
    <color name="primary_dark">#FFA000</color>
    <color name="primary_light">#FFECB3</color>
    <color name="accent">#536DFE</color>
    <color name="primary_text">#212121</color>
    <color name="secondary_text">#727272</color>
    <color name="icons">#212121</color>
    <color name="divider">#B6B6B6</color>-->

    <!-- Palette 3  Generated at http://www.materialpalette.com -->
<!--    <color name="primary">#4CAF50</color>
    <color name="primary_dark">#388E3C</color>
    <color name="primary_light">#C8E6C9</color>
    <color name="accent">#FFC107</color>
    <color name="primary_text">#212121</color>
    <color name="secondary_text">#727272</color>
    <color name="icons">#FFFFFF</color>
    <color name="divider">#B6B6B6</color>-->

    <!-- Palette 4  Generated at http://www.materialpalette.com -->
<!--    <color name="primary">#CDDC39</color>
    <color name="primary_dark">#AFB42B</color>
    <color name="primary_light">#F0F4C3</color>
    <color name="accent">#009688</color>
    <color name="primary_text">#212121</color>
    <color name="secondary_text">#727272</color>
    <color name="icons">#212121</color>
    <color name="divider">#B6B6B6</color>-->

    <!-- Palette 5  Generated at http://www.materialpalette.com -->
<!--    <color name="primary">#673AB7</color>
    <color name="primary_dark">#512DA8</color>
    <color name="primary_light">#D1C4E9</color>
    <color name="accent">#FFC107</color>
    <color name="primary_text">#212121</color>
    <color name="secondary_text">#727272</color>
    <color name="icons">#FFFFFF</color>
    <color name="divider">#B6B6B6</color>-->

     <!-- Palette 6  Generated at http://www.materialpalette.com -->
   <!-- <color name="primary">#8BC34A</color>
    <color name="primary_dark">#689F38</color>
    <color name="primary_light">#DCEDC8</color>
    <color name="accent">#CDDC39</color>
    <color name="primary_text">#212121</color>
    <color name="secondary_text">#727272</color>
    <color name="icons">#212121</color>
    <color name="divider">#B6B6B6</color>-->

</resources>
Open the strings.xml file under res/values and edit it to define the strings
<resources>
    <string name="app_name">MapExample</string>
    <string name="title_activity_maps">MapExample</string>
    <string name="action_settings">Settings</string>
    <string name="settings">Settings</string>

    <string name="locLabel">Location:</string>
    <string name="goLabel">Go</string>
    <string name="latLabel">Lat</string>
    <string name="longLabel">Long</string>
    <string name="trackLabel">Track Present Location</string>
    <string name="satLabel">Sat</string>
    <string name="mapLabel">Map</string>
    <string name="place_name">Place name</string>
    <string name="lat_deg">Latitude (o)</string>
    <string name="lon_deg">Longitude (o)</string>
    <string name="markerLabel">Map with Markers</string>
    <string name="indoorLabel">Indoor Map Example</string>

    <string name="quit">Exit</string>
    <string name="help_title">Help</string>
    <string name="satellite_label">Sat</string>
    <string name="traffic_label">Traffic</string>
    <string name="track_label">Track</string>

    <string name="help_text"><p><i>Latitude</i> given in degrees, 0 to +90 above the equator; 0 to -90
        below the equator.</p>
        <p><i>Longitude</i> is measured in degrees from the prime meridian; 0 to -180
        West and 0 to +180 East.</p>
    </string>
      <string name="settings_text">We omit creating a preferences page here.
         See the project <i>PrefsFragments</i> for an introduction to constructing
         a fragments-based preferences page.</string>

    <string name="building_label">3D</string>
    <string name="indoor_label">Indoor</string>

    <string name="routeLabel">Route Overlay on Map</string>
    <string name="mapme_label">Map Current Location</string>
    <string name="default_label">Show Default Map</string>
    <string name="connected_toast">Location services connected</string>
    <string name="disconnected_toast">Location services disconnected</string>
    <string name="route_toggle_label">Route</string>
    <string name="eat_toggle_label">Eat</string>
    <string name="hc_toggle_label">Access</string>

    <string name="nomap_error">Error: target map not found</string>

</resources>
Next, edit the file app/res/values/styles.xml to read
<resources>

    <!-- Base application theme. NoActionBar because we are using a Toolbar -->
    <style name="AppTheme" parent="Theme.AppCompat.Light.NoActionBar">

        <!-- Set AppCompat actionBarStyle -->
        <item name="actionBarStyle">@style/AppTheme</item>

        <item name="colorPrimary">@color/primary</item>
        <item name="colorPrimaryDark">@color/primary_dark</item>
        <item name="colorAccent">@color/accent</item>
        <item name="android:textColor">@color/primary_text</item>

        <!--<item name="android:windowBackground">@drawable/mapbkg</item>-->  <!--Background image-->

    </style>

    <style name="MyDialogTheme" parent="Theme.AppCompat.Light.Dialog.Alert">
        <!--buttons color-->
        <item name="colorAccent">@color/accent</item>
        <!--title and message color-->
        <item name="android:textColorPrimary">@color/primary_text</item>
        <!--dialog background-->
        <item name="android:textColorSecondary">@color/primary_text</item>
        <!--dialog background-->
        <item name="android:background">@color/dialogBackground</item>

    </style>

    <style name="MyPopupTheme" parent="ThemeOverlay.AppCompat.Light">
        <!--buttons color-->
        <item name="colorAccent">@color/accent</item>
        <!--title and message color-->
        <item name="android:textColorPrimary">@color/primary</item>
        <!--dialog background-->
        <item name="android:textColorSecondary">@color/primary</item>
        <!--dialog background-->
        <item name="android:background">@color/primary_light</item>


    </style>

</resources>
Finally, edit the file app/res/values/dimens.xml to read
<?xml version="1.0" encoding="utf-8"?>
<resources>
    <!-- Default screen margins, per the Android Design guidelines. -->
      <dimen name="activity_horizontal_margin">16dp</dimen>
      <dimen name="activity_vertical_margin">16dp</dimen>

      <dimen name="button_vertical_margin">16dp</dimen>
      <dimen name="button_horizontal_margin">50dp</dimen>

</resources>
Notice that by by defining string resources in strings.xml. dimension resources in dimens.xml, color resources in color.xml, and style resources in styles.xml, we are following Android best practices of separating these format resource definitions from the Java code implementation.
Let us now create and edit the files that will define the layouts of the screens in our application. Open the layout file app/res/layout/activity_main.xml and edit it to read
<?xml version="1.0" encoding="utf-8"?>
<ScrollView xmlns:android="http://schemas.android.com/apk/res/android"
    xmlns:tools="http://schemas.android.com/tools"
    android:id="@+id/scrollView1"
    android:layout_width="match_parent"
    android:layout_height="wrap_content" >

    <LinearLayout
        android:id="@+id/LinearLayout1"
        android:layout_width="match_parent"
        android:layout_height="wrap_content"
        android:orientation="vertical"
        android:paddingBottom="@dimen/activity_vertical_margin"
        android:paddingLeft="0dp"
        android:paddingRight="0dp"
        android:paddingTop="0dp"
        tools:context=".MainActivity" >

        <android.support.v7.widget.Toolbar
            android:id="@+id/my_toolbar2"
            android:layout_height="wrap_content"
            android:layout_width="match_parent"
            android:elevation="10dp"
            android:minHeight="?attr/actionBarSize"
            android:background="@color/barColor" />

        <LinearLayout
            android:layout_width="fill_parent"
            android:layout_height="fill_parent"
            android:paddingBottom="@dimen/activity_vertical_margin"
            android:paddingLeft="@dimen/activity_horizontal_margin"
            android:paddingRight="@dimen/activity_horizontal_margin"
            android:paddingTop="@dimen/activity_vertical_margin"
            android:orientation="horizontal" >

            <EditText
                android:id="@+id/geocode_input"
                android:layout_width="0dip"
                android:layout_height="wrap_content"
                android:layout_weight="1.0"
                android:hint="@string/place_name"
                android:inputType="text"
                android:lines="1" />

            <Button
                android:id="@+id/geocode_button"
                android:layout_width="wrap_content"
                android:layout_height="wrap_content"
                android:text="@string/goLabel" />
        </LinearLayout>

        <LinearLayout
            android:layout_width="fill_parent"
            android:layout_height="wrap_content"
            android:paddingBottom="@dimen/activity_vertical_margin"
            android:paddingLeft="@dimen/activity_horizontal_margin"
            android:paddingRight="@dimen/activity_horizontal_margin"
            android:paddingTop="@dimen/activity_vertical_margin"
            android:orientation="horizontal"
            android:padding="0sp"
            android:layout_marginLeft="10dp"
            android:layout_marginRight="10dp">

            <EditText
                android:id="@+id/lat_input"
                android:layout_width="wrap_content"
                android:layout_height="wrap_content"
                android:layout_marginTop="5sp"
                android:layout_weight="0.35"
                android:hint="@string/lat_deg"
                android:inputType="numberDecimal|numberSigned"
                android:lines="1"
                android:layout_marginLeft="10dp"
                android:layout_marginRight="5dp" />

            <EditText
                android:id="@+id/lon_input"
                android:layout_width="wrap_content"
                android:layout_height="wrap_content"
                android:layout_marginTop="5sp"
                android:layout_weight="0.35"
                android:hint="@string/lon_deg"
                android:inputType="numberDecimal|numberSigned"
                android:lines="1"
                android:layout_marginLeft="10dp"
                android:layout_marginRight="5dp" />

            <Button
                android:id="@+id/latlong_button"
                android:layout_width="wrap_content"
                android:layout_height="wrap_content"
                android:layout_marginTop="5sp"
                android:layout_weight="0.25"
                android:text="@string/goLabel"
                android:layout_marginLeft="10dp"
                android:layout_marginRight="5dp" />
        </LinearLayout>

        <LinearLayout
            android:layout_width="fill_parent"
            android:layout_height="fill_parent"
            android:orientation="vertical"
            android:paddingLeft="@dimen/button_horizontal_margin"
            android:paddingRight="@dimen/button_horizontal_margin"
            android:paddingTop="10dp">

            <Button
                android:id="@+id/honolulu_button"
                android:layout_width="fill_parent"
                android:layout_height="wrap_content"
                android:layout_gravity="center_horizontal"
                android:layout_marginTop="10sp"
                android:text="@string/markerLabel" />

            <Button
                android:id="@+id/indoor_map_button"
                android:layout_width="fill_parent"
                android:layout_height="wrap_content"
                android:layout_gravity="center_horizontal"
                android:layout_marginTop="10sp"
                android:text="@string/indoorLabel" />

            <Button
                android:id="@+id/route_map_button"
                android:layout_width="fill_parent"
                android:layout_height="wrap_content"
                android:layout_gravity="center_horizontal"
                android:layout_marginTop="10sp"
                android:text="@string/routeLabel" />

            <Button
                android:id="@+id/mapme_button"
                android:layout_width="fill_parent"
                android:layout_height="wrap_content"
                android:layout_gravity="center_horizontal"
                android:layout_marginTop="10sp"
                android:text="@string/mapme_label" />

            <Button
                android:id="@+id/default_button"
                android:layout_width="fill_parent"
                android:layout_height="wrap_content"
                android:layout_gravity="center_horizontal"
                android:layout_marginTop="10sp"
                android:text="@string/default_label" />

        </LinearLayout>
    </LinearLayout>

</ScrollView>
The documentation explaining the components of this layout may be found at ScrollView, LinearLayout, EditText, and Button, but briefly
Thus, reading vertically, activity_main.xml should lay out a row containing a textfield and a button arrayed across the entire screen, then a row with two textfields and a button arrayed across the entire screen, and then below that a column of five buttons centered on the screen. All of that is contained within a ScrollView, which has no effect if the widgets all fit on the screen but will allow scrolling to access all widgets if they do not.
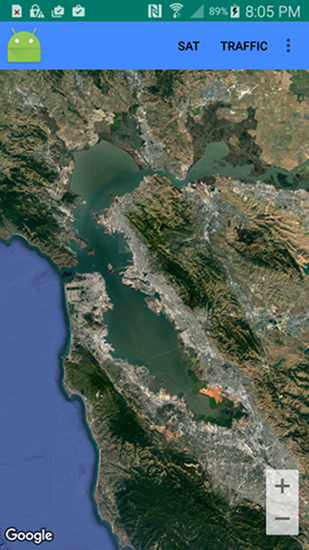
Let's check our progress. Execute MapExample on a device or properly-configured emulator. You should see something like the following image
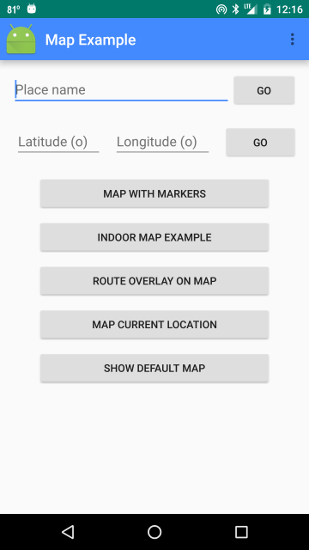
|
Notice that the XML attributes used in laying out this page have given certain capabilities and placed certain restrictions on text fields automatically. The first text field is set up to accept general text, but the other two text fields will accept only decimal numbers, possibly with a negative sign. Try it and see; you should find that you can type anything into the first field, but only digits, a single period, and a minus sign (only if it is the first entry) in the other two fields.
We have also indicated with the android:hint attributes further guidance for the user. For example, android:hint="@string/lat_deg" references the string lat_deg = "Latitude (o)" defined in strings.xml, which inserts initially in the corresponding field a hint that the user is to enter the latitude in degrees (this hint will disappear as soon as the user begins to type into the field). When the hints are displayed in the text fields, the actual content of the field is the empty string, which is the reason for the logic statements in the event handlers defined later that do not launch the intents if the fields have not been filled in.
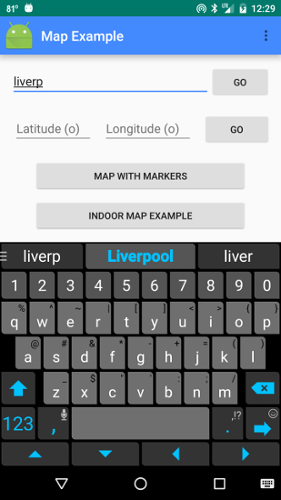
If you execute on a device it is likely that autocompletion will be
enabled on the first text field. For
example, if I type the string "liverp" into the first field on a Nexus 6 phone
I get
which illustrates text completion in the first EditText field. For example, if we were entering the word "Liverpool", it could be selected off the bar above the keyboard at this point, without typing further. Automatic text completion in an EditText field can be implemented using the class AutoCompleteTextView, which extends EditText. It requires that the programmer supply the list of words against which the autocompletion will be checked. Most modern phones would have the EditText fields automatically autocomplete against a basic dictionary. However, Android provides the option of providing your own implementation of AutoCompleteTextView. |
Now we create XML files to lay out a series of screen views that we shall need.
This layout will define a sample Help file for the main page of our app.<?xml version="1.0" encoding="utf-8"?> <LinearLayout xmlns:android="http://schemas.android.com/apk/res/android" android:id="@+id/LinearLayout1" android:layout_width="wrap_content" android:layout_height="wrap_content" android:paddingBottom="@dimen/activity_vertical_margin" android:paddingLeft="@dimen/activity_horizontal_margin" android:paddingRight="@dimen/activity_horizontal_margin" android:paddingTop="@dimen/activity_vertical_margin" android:orientation="vertical" > <TextView android:id="@+id/help_content" android:layout_width="wrap_content" android:layout_height="wrap_content" android:text="@string/help_text" /> </LinearLayout>
This will define a layout for a place-holder Settings window.<?xml version="1.0" encoding="utf-8"?> <LinearLayout xmlns:android="http://schemas.android.com/apk/res/android" android:layout_width="match_parent" android:layout_height="match_parent" android:paddingBottom="@dimen/activity_vertical_margin" android:paddingLeft="@dimen/activity_horizontal_margin" android:paddingRight="@dimen/activity_horizontal_margin" android:paddingTop="@dimen/activity_vertical_margin" android:orientation="vertical" > <TextView android:id="@+id/settings_content" android:layout_width="wrap_content" android:layout_height="wrap_content" android:text="@string/settings_text" /> </LinearLayout>
Now let us define a set of layouts that will be intended to display maps using the class MapFragment, which extends Fragment to include map management capabilities and represents the simplest way to insert a map in an Android application.
<?xml version="1.0" encoding="utf-8"?>
<LinearLayout xmlns:android="http://schemas.android.com/apk/res/android"
    android:layout_width="match_parent"
    android:layout_height="match_parent"
    android:orientation="vertical" >

    <android.support.v7.widget.Toolbar
        android:id="@+id/my_toolbar2"
        android:layout_height="wrap_content"
        android:layout_width="match_parent"
        android:elevation="0dp"
        android:minHeight="?attr/actionBarSize"
        android:background="@color/barColor" />

    <fragment xmlns:android="http://schemas.android.com/apk/res/android"
        xmlns:tools="http://schemas.android.com/tools"
        android:id="@+id/indoor_map"
        android:name="com.google.android.gms.maps.SupportMapFragment"
        android:layout_width="match_parent"
        android:layout_height="match_parent"
        tools:context="com.lightcone.mapexample.IndoorExample"
        tools:layout="@layout/showmap" />

</LinearLayout>
<?xml version="1.0" encoding="utf-8"?>
<LinearLayout xmlns:android="http://schemas.android.com/apk/res/android"
    android:layout_width="match_parent"
    android:layout_height="match_parent"
    android:orientation="vertical" >

    <android.support.v7.widget.Toolbar
        android:id="@+id/my_toolbar3"
        android:layout_height="wrap_content"
        android:layout_width="match_parent"
        android:elevation="10dp"
        android:minHeight="?attr/actionBarSize"
        android:background="@color/barColor" />

    <fragment xmlns:android="http://schemas.android.com/apk/res/android"
        xmlns:map="http://schemas.android.com/apk/res-auto"
        xmlns:tools="http://schemas.android.com/tools"
        android:id="@+id/markers_map"
        android:name="com.google.android.gms.maps.SupportMapFragment"
        android:layout_width="match_parent"
        android:layout_height="match_parent"
        tools:context="com.lightcone.mapexample.MapMarkers"
        tools:layout="@layout/showmap" />

</LinearLayout>
<?xml version="1.0" encoding="utf-8"?>
<LinearLayout xmlns:android="http://schemas.android.com/apk/res/android"
    android:layout_width="match_parent"
    android:layout_height="match_parent"
    android:orientation="vertical" >

<android.support.v7.widget.Toolbar
        android:id="@+id/my_toolbar4"
        android:layout_height="wrap_content"
        android:layout_width="match_parent"
        android:elevation="10dp"
        android:minHeight="?attr/actionBarSize"
        android:background="@color/barColor" />

<fragment xmlns:android="http://schemas.android.com/apk/res/android"
    xmlns:map="http://schemas.android.com/apk/res-auto"
    xmlns:tools="http://schemas.android.com/tools"
    android:id="@+id/mapme_map"
    android:name="com.google.android.gms.maps.SupportMapFragment"
    android:layout_width="match_parent"
    android:layout_height="match_parent"
    tools:context="com.lightcone.mapexample.MapsActivity" />

</LinearLayout>
<LinearLayout xmlns:android="http://schemas.android.com/apk/res/android"
    xmlns:tools="http://schemas.android.com/tools"
    android:orientation="vertical" android:layout_width="match_parent"
    android:layout_height="match_parent">

    <android.support.v7.widget.Toolbar
        android:id="@+id/route_map"
        android:layout_height="wrap_content"
        android:layout_width="match_parent"
        android:elevation="0dp"
        android:minHeight="?attr/actionBarSize"
        android:background="@color/barColor" />

    <fragment xmlns:android="http://schemas.android.com/apk/res/android"
        xmlns:map="http://schemas.android.com/apk/res-auto"
        xmlns:tools="http://schemas.android.com/tools"
        android:id="@+id/the_map"
        android:name="com.google.android.gms.maps.SupportMapFragment"
        android:layout_width="match_parent"
        android:layout_height="match_parent"
        tools:context="com.lightcone.mapexample.RouteMapper"
        tools:layout="@layout/routemapper" />

</LinearLayout>
<LinearLayout xmlns:android="http://schemas.android.com/apk/res/android"
    xmlns:tools="http://schemas.android.com/tools"
    android:orientation="vertical" android:layout_width="match_parent"
    android:layout_height="match_parent">

    <android.support.v7.widget.Toolbar
        android:id="@+id/my_toolbar"
        android:layout_height="wrap_content"
        android:layout_width="match_parent"
        android:elevation="0dp"
        android:minHeight="?attr/actionBarSize"
        android:background="@color/barColor" />

    <fragment xmlns:android="http://schemas.android.com/apk/res/android"
        xmlns:tools="http://schemas.android.com/tools"
        android:id="@+id/the_map"
        android:name="com.google.android.gms.maps.SupportMapFragment"
        android:layout_width="match_parent"
        android:layout_height="match_parent"
        tools:context="com.lightcone.mapexample.ShowMap"
        tools:layout="@layout/showmap" />

</LinearLayout>
That completes the XML layout specifications.
Now let us create some additional XML files that will specify the layout of some menus that will be implemented on various screens.
This layout will define the Options menu for our main page.<?xml version="1.0" encoding="utf-8"?> <menu xmlns:android="http://schemas.android.com/apk/res/android" xmlns:app="http://schemas.android.com/apk/res-auto"> <item android:id="@+id/menuItem1" android:orderInCategory="0" app:showAsAction="never" android:title="@string/help_title" app:title="Help" /> <item android:id="@+id/menuItem2" android:orderInCategory="10" app:showAsAction="never" android:title="@string/settings" app:title="Settings" /> <item android:id="@+id/menuItem3" android:orderInCategory="100" app:showAsAction="never" android:title="@string/quit" app:title="Exit" /> </menu>
As will be explained more fully later, this and related menu layout files below will define the content of the top bar (Toolbar) and overflow options menus in our map displays.<?xml version="1.0" encoding="utf-8"?> <menu xmlns:android="http://schemas.android.com/apk/res/android" xmlns:app="http://schemas.android.com/apk/res-auto"> <item android:id="@+id/track_mapme" android:orderInCategory="0" app:showAsAction="ifRoom" android:title="@string/track_label" app:title="Track" /> <item android:id="@+id/satellite_mapme" android:orderInCategory="5" app:showAsAction="ifRoom" android:title="@string/satellite_label" app:title="Sat" /> <item android:id="@+id/traffic_mapme" android:orderInCategory="10" app:showAsAction="ifRoom" android:title="@string/traffic_label" app:title="Traffic" /> <item android:id="@+id/indoor_mapme" android:orderInCategory="20" app:showAsAction="ifRoom" android:title="@string/indoor_label" app:title="Indoor" /> <item android:id="@+id/building_mapme" android:orderInCategory="30" app:showAsAction="ifRoom" android:title="@string/building_label" app:title="3D" /> <item android:id="@+id/action_settings" android:orderInCategory="100" app:showAsAction="never" android:title="@string/action_settings" app:title="Settings" /> </menu>
<?xml version="1.0" encoding="utf-8"?>
<menu xmlns:android="http://schemas.android.com/apk/res/android"
    xmlns:app="http://schemas.android.com/apk/res-auto">

    <item
        android:id="@+id/satellite_route"
        android:orderInCategory="0"
        app:showAsAction="always"
        android:icon="@drawable/satellite_icon2"
        android:title="@string/satLabel" />

    <item
        android:id="@+id/route_toggle"
        android:orderInCategory="10"
        app:showAsAction="always"
        android:icon="@drawable/route_icon"
        android:title="@string/route_toggle_label" />

    <item
        android:id="@+id/eat_toggle"
        android:orderInCategory="20"
        app:showAsAction="always"
        android:icon="@drawable/knifefork_small"
        android:title="@string/eat_toggle_label" />

    <item
        android:id="@+id/hc_toggle"
        android:orderInCategory="30"
        app:showAsAction="always"
        android:icon="@drawable/accessibility"
        android:title="@string/hc_toggle_label" />

    <item
        android:id="@+id/route_action_settings"
        android:orderInCategory="100"
        app:showAsAction="never"
        android:title="@string/action_settings"/>

</menu>
<?xml version="1.0" encoding="utf-8"?>
<menu xmlns:android="http://schemas.android.com/apk/res/android"
    xmlns:app="http://schemas.android.com/apk/res-auto">
    <item
        android:id="@+id/satellite"
        android:orderInCategory="0"
        app:showAsAction="ifRoom"
        android:title="@string/satellite_label"
        app:title="Sat" />

    <item
        android:id="@+id/traffic"
        android:orderInCategory="10"
        app:showAsAction="ifRoom"
        android:title="@string/traffic_label"
        app:title="@string/traffic_label" />

    <item
        android:id="@+id/indoor"
        android:orderInCategory="20"
        app:showAsAction="ifRoom"
        android:title="@string/indoor_label"
        app:title="Indoor" />

    <item
        android:id="@+id/building"
        android:orderInCategory="30"
        app:showAsAction="ifRoom"
        android:title="@string/building_label"
        app:title="3D" />

    <item
        android:id="@+id/action_settings"
        android:orderInCategory="100"
        app:showAsAction="never"
        android:title="@string/action_settings"
        app:title="Settings" />

</menu>
That completes the XML files required to implement the menus.
We shall need some bitmap image resources. The four images required may be downloaded from the images resource page.
|
| Image resources for Android are placed in the Drawable directories and must be named by strict rules: you can use only lower-case letters a-z, numbers 0-9, _ and . in these image file names. The preferred format is .png, but .gif and .jpg can be used. General design guidelines for image resources in Android may be found in the Icon Design Guidelines document. |
This project was under version control with Git. If the image files are pasted directly into Android Studio it asks after each if you would like to add it to version control. On the other hand, if the files are copied manually into the directory and then synced with Android Studio they will not be under version control. In this case they may be added manually to version control by right-clicking on the file name and choosing Git > Add from the resulting context menu.
Our final task is to define the code that will implement our app in a series of Java class files.
package <YourNamespace>.mapexample;

import android.graphics.PorterDuff;
import android.os.Bundle;
import android.content.Intent;
import android.support.v7.app.AppCompatActivity;
import android.support.v7.widget.Toolbar;
import android.util.Log;
import android.view.Menu;
import android.view.MenuItem;
import android.view.View;
import android.view.WindowManager;
import android.widget.EditText;
import android.widget.Toast;

import java.io.IOException;
import java.util.Iterator;
import java.util.List;
import android.location.Address;
import android.location.Geocoder;

public class MainActivity extends AppCompatActivity implements
        android.view.View.OnClickListener {

    static final String TAG = "Mapper";
    private double lon;
    private double lat;
    private EditText placeText;
    private String placeName;
    static final int numberOptions = 10;
    String [] optionArray = new String[numberOptions];
    EditText geocodeField;

    @Override
    protected void onCreate(Bundle savedInstanceState) {
        super.onCreate(savedInstanceState);
        setContentView(R.layout.activity_main);

        // Set up Toolbar
        Toolbar toolbar = (Toolbar) findViewById(R.id.my_toolbar2);
        // Remove default toolbar title and replace with an icon
        toolbar.setNavigationIcon(R.mipmap.ic_launcher);
        // Note: getColor(color) deprecated as of API 23
        toolbar.setTitleTextColor(getResources().getColor(R.color.barTextColor));
        toolbar.setTitle("Map Example");
        setSupportActionBar(toolbar);

        geocodeField = (EditText) findViewById(R.id.geocode_input);

        // Add Click listeners for all buttons
        View firstButton = findViewById(R.id.geocode_button);
        firstButton.setOnClickListener(this);
        View secondButton = findViewById(R.id.latlong_button);
        secondButton.setOnClickListener(this);
        View thirdButton = findViewById(R.id.honolulu_button);
        thirdButton.setOnClickListener(this);
        View fourthButton = findViewById(R.id.indoor_map_button);
        fourthButton.setOnClickListener(this);
        View fifthButton = findViewById(R.id.route_map_button);
        fifthButton.setOnClickListener(this);
        View sixthButton = findViewById(R.id.mapme_button);
        sixthButton.setOnClickListener(this);
        View seventhButton = findViewById(R.id.default_button);
        seventhButton.setOnClickListener(this);

        // Color the buttons with our color theme.  Note that
        // getColor(color) is deprecated as of API 23, but we use it for
        // compatibility with earlier versions.  PorterDuff.Mode.MULTIPLY multiplies
        // the current button color value by the specified color. See colors.xml
        // for the definition of buttonColor, which supplies the tint.  Presently
        // a light gray (#dedede) is used so it has only a small effect on the button color.

        firstButton.getBackground().setColorFilter
                (getResources().getColor(R.color.buttonColor), PorterDuff.Mode.MULTIPLY);
        secondButton.getBackground().setColorFilter
                (getResources().getColor(R.color.buttonColor), PorterDuff.Mode.MULTIPLY);
        thirdButton.getBackground().setColorFilter
                (getResources().getColor(R.color.buttonColor), PorterDuff.Mode.MULTIPLY);
        fourthButton.getBackground().setColorFilter
                (getResources().getColor(R.color.buttonColor), PorterDuff.Mode.MULTIPLY);
        fifthButton.getBackground().setColorFilter
                (getResources().getColor(R.color.buttonColor), PorterDuff.Mode.MULTIPLY);
        sixthButton.getBackground().setColorFilter
                (getResources().getColor(R.color.buttonColor), PorterDuff.Mode.MULTIPLY);
        seventhButton.getBackground().setColorFilter
                (getResources().getColor(R.color.buttonColor), PorterDuff.Mode.MULTIPLY);

        // Following prevents some devices (for example, Nexus 7 running Android 4.4.2) from opening
        // the soft keyboard when the app is launched rather than when an input field is selected.

        this.getWindow().setSoftInputMode(
                WindowManager.LayoutParams.SOFT_INPUT_STATE_ALWAYS_HIDDEN);

    }

    @Override
    public boolean onCreateOptionsMenu(Menu menu) {
        // Inflate the menu; this adds items to toolbar.
        getMenuInflater().inflate(R.menu.main, menu);
        return true;
    }

    @Override
    public boolean onOptionsItemSelected(MenuItem item) {
        // Handle item selection
        switch (item.getItemId()) {
            case R.id.menuItem1:
                // Actions for help page
                Intent i = new Intent(this, Help.class);
                startActivity(i);
                return true;
            case R.id.menuItem2:
                // Actions for settings page
                Intent j = new Intent(this, Settings.class);
                startActivity(j);
                return true;
            // Note: A Quit button is redundant in Android because it duplicates the
            // functionality of the Back button.  But some people feel more comfortable
            // with one, so here is how to add one.
            case R.id.menuItem3:
                finish();
                return true;
            default:
                return super.onOptionsItemSelected(item);
        }
    }

    @Override
    public void onClick(View v) {

        switch(v.getId()){

            case R.id.geocode_button:

                // Test whether geocoder is present on platform
                if(Geocoder.isPresent()){
                    placeText = (EditText) findViewById(R.id.geocode_input);
                    placeName = placeText.getText().toString();
                    // Break from execution if the user has not entered anything in the field
                    if(placeName.compareTo("")==0) break;

                    geocodeLocation(placeName);

                    ShowMap.putMapData(lat, lon, 18, true);

                    Intent j = new Intent(this, ShowMap.class);
                    startActivity(j);
                } else {
                    String noGoGeo = "FAILURE: No Geocoder on this platform.";
                    Toast.makeText(this, noGoGeo, Toast.LENGTH_LONG).show();
                    geocodeField.setText(noGoGeo);
                    return;
                }
                break;

            case R.id.latlong_button:

                // Read the latitude and longitude from the input fields
                EditText latText = (EditText) findViewById(R.id.lat_input);
                EditText lonText = (EditText) findViewById(R.id.lon_input);
                String latString = latText.getText().toString();
                String lonString = lonText.getText().toString();

                // Only execute if user has put entries in both lat and long fields.
                if(latString.compareTo("") != 0 && lonString.compareTo("") != 0){
                    lat = Double.parseDouble(latString);
                    lon = Double.parseDouble(lonString);
                    ShowMap.putMapData(lat, lon, 13, true);
                    Intent k = new Intent(this, ShowMap.class);
                    startActivity(k);
                }
                break;

            case R.id.honolulu_button:
                Intent m = new Intent(this, MapMarkers.class);
                startActivity(m);
                break;

            case R.id.indoor_map_button:
                Intent n = new Intent(this, IndoorExample.class);
                startActivity(n);
                break;

            case R.id.route_map_button:
                Intent p = new Intent(this, RouteMapper.class);
                startActivity(p);
                break;

            case R.id.mapme_button:
                Intent q = new Intent(this, MapMe.class);
                startActivity(q);
                break;

            case R.id.default_button:
                Intent r = new Intent(this, MapsActivity.class);
                startActivity(r);
                break;
        }
    }

    // Method to geocode location passed as string (e.g., "Pentagon"), which
    // places the corresponding latitude and longitude in the variables lat and lon.

    private void geocodeLocation(String placeName){

        // Following adapted from Conder and Darcey, pp.321 ff.
        Geocoder gcoder = new Geocoder(this);

        // Note that the Geocoder uses synchronous network access, so in a serious application
        // it would be best to put it on a background thread to prevent blocking the main UI if network
        // access is slow. Here we are just giving an example of how to use it so, for simplicity, we
        // don't put it on a separate thread.  See the class RouteMapper in this package for an example
        // of making a network access on a background thread. Geocoding is implemented by a backend
        // that is not part of the core Android framework, so we use the static method
        // Geocoder.isPresent() to test for presence of the required backend on the given platform.

        try{
            List<Address> results = null;
            if(Geocoder.isPresent()){
                results = gcoder.getFromLocationName(placeName,numberOptions);
            } else {
                Log.i(TAG,"No geocoder found");
                return;
            }
            Iterator<Address> locations = results.iterator();
            String raw = "\nRaw String:\n";
            String country;
            int opCount = 0;
            while(locations.hasNext()){
                Address location = locations.next();
                if(opCount==0 && location != null){
                    lat = location.getLatitude();
                    lon = location.getLongitude();
                }
                country = location.getCountryName();
                if(country == null) {
                    country = "";
                } else {
                    country =  ", "+country;
                }
                raw += location+"\n";
                optionArray[opCount] = location.getAddressLine(0)+", "
                        +location.getAddressLine(1)+country+"\n";
                opCount ++;
            }
            // Log the returned data
            Log.i(TAG, raw);
            Log.i(TAG,"\nOptions:\n");
            for(int i=0; i<opCount; i++){
                Log.i(TAG,"("+(i+1)+") "+optionArray[i]);
            }
            Log.i(TAG,"lat="+lat+" lon="+lon);

        } catch (IOException e){
            Log.e(TAG, "I/O Failure; do you have a network connection?",e);
        }
    }
}
package <YourNamespace>.mapexample;

import android.os.Bundle;
import android.support.v7.app.AppCompatActivity;

public class Help extends AppCompatActivity {

    @Override
    protected void onCreate(Bundle savedInstanceState){
        super.onCreate(savedInstanceState);
        setContentView(R.layout.help);
    }

}
package <YourNamespace>.mapexample;

import com.google.android.gms.maps.CameraUpdateFactory;
import com.google.android.gms.maps.GoogleMap;
import com.google.android.gms.maps.OnMapReadyCallback;
import com.google.android.gms.maps.SupportMapFragment;
import com.google.android.gms.maps.model.CameraPosition;
import com.google.android.gms.maps.model.LatLng;

import android.content.Intent;
import android.os.Bundle;
import android.support.v7.app.AppCompatActivity;
import android.support.v7.widget.Toolbar;
import android.view.Menu;
import android.view.MenuItem;
import android.widget.Toast;

/* A list of indoor locations with maps enabled may be found at
 *
 *    https://support.google.com/gmm/answer/1685827?hl=en
 *
 * If the map view is centered on one of these locations with high enough
 * zoom, and map.isIndoorEnabled() is true, the interior map will be
 * displayed with a floor selector if there is more than one floor.  We
 * illustrate here with the interior of the 2-story Honolulu International
 * Airport.
*/

public class IndoorExample extends AppCompatActivity implements OnMapReadyCallback {

    private GoogleMap map;
    private LatLng honolulu_airport = new LatLng(21.332, -157.92);

    @Override
    protected void onCreate(Bundle savedInstanceState) {
        super.onCreate(savedInstanceState);
        setContentView(R.layout.indoorexample);

        Toolbar toolbar = (Toolbar) findViewById(R.id.my_toolbar2);
        // Remove default toolbar title and replace with an icon
        if (toolbar != null) {
            toolbar.setNavigationIcon(R.mipmap.ic_launcher);
        }
        // Note: getColor(color) deprecated as of API 23
        toolbar.setTitleTextColor(getResources().getColor(R.color.barTextColor));
        toolbar.setTitle("Indoor Maps");
        setSupportActionBar(toolbar);

        // Obtain the SupportMapFragment and get notified when the map is ready to be used
        // in onMapReady().

        SupportMapFragment mapFragment = (SupportMapFragment) getSupportFragmentManager()
                .findFragmentById(R.id.indoor_map);
        mapFragment.getMapAsync(this);

    }

    @Override
    public boolean onCreateOptionsMenu(Menu menu) {
        // Inflate the menu; adds items to the action bar if present.
        getMenuInflater().inflate(R.menu.showmap_menu, menu);
        return true;
    }

    @Override
    public void onMapReady(GoogleMap googleMap) {
        map = googleMap;
        initializeMap();
    }

    // Method to initialize the map.  Check for map!=null before using.

    private void initializeMap(){

        // Move camera view and zoom to location
        map.moveCamera(CameraUpdateFactory.newLatLngZoom(honolulu_airport, 18));

        // Initialize type of map
        map.setMapType(GoogleMap.MAP_TYPE_NORMAL);

        // Initialize 3D buildings enabled for map view
        map.setBuildingsEnabled(false);

        // Initialize whether indoor maps are shown if available
        map.setIndoorEnabled(true);

        // Initialize traffic overlay
        map.setTrafficEnabled(false);

        // Disable rotation gestures
        map.getUiSettings().setRotateGesturesEnabled(false);

        // Enable zoom controls on map [in addition to gesture controls like spread or double-
        // tap with 1 finger (to zoom in), and pinch or double-tap with two fingers (to zoom out)].

        map.getUiSettings().setZoomControlsEnabled(true);
    }

    // Method to animate camera properties change

    private void changeCamera(GoogleMap map, LatLng center, float zoom,
                              float bearing, float tilt) {

        // Change properties of camera
        CameraPosition cameraPosition = new CameraPosition.Builder()
                .target(center)         // Sets the center of the map
                .zoom(zoom)             // Sets the zoom
                .bearing(bearing)       // Sets the orientation of the camera
                .tilt(tilt)             // Sets the tilt of the camera relative to nadir
                .build();               // Creates a CameraPosition from the builder
        if(map != null){
            map.animateCamera(CameraUpdateFactory.newCameraPosition(cameraPosition));
        } else {
            Toast.makeText(this, getString(R.string.nomap_error),
                    Toast.LENGTH_LONG).show();
        }
    }


    // Handle clicks on toolbar menus
    @Override
    public boolean onOptionsItemSelected(MenuItem item) {

        if(map == null) {
            Toast.makeText(this, getString(R.string.nomap_error),
                    Toast.LENGTH_LONG).show();
            return false;
        }

        // Handle item selection
        switch (item.getItemId()) {
            // Toggle traffic overlay
            case R.id.traffic:
                map.setTrafficEnabled(!map.isTrafficEnabled());
                return true;
            // Toggle satellite overlay
            case R.id.satellite:
                int mt = map.getMapType();
                if(mt == GoogleMap.MAP_TYPE_NORMAL){
                    map.setMapType(GoogleMap.MAP_TYPE_SATELLITE);
                } else {
                    map.setMapType(GoogleMap.MAP_TYPE_NORMAL);
                }
                return true;
            // Toggle 3D building display
            case R.id.building:
                map.setBuildingsEnabled(!map.isBuildingsEnabled());
                // Change camera tilt to view from angle if 3D
                if(map.isBuildingsEnabled()){
                    changeCamera(map, map.getCameraPosition().target,
                            map.getCameraPosition().zoom,
                            map.getCameraPosition().bearing, 45);
                } else {
                    changeCamera(map, map.getCameraPosition().target,
                            map.getCameraPosition().zoom,
                            map.getCameraPosition().bearing, 0);
                }
                return true;
            // Toggle whether indoor maps displayed
            case R.id.indoor:
                map.setIndoorEnabled(!map.isIndoorEnabled());
                return true;
            // Settings page
            case R.id.action_settings:
                // Actions for settings page
                Intent j = new Intent(this, Settings.class);
                startActivity(j);
                return true;
            default:
                return super.onOptionsItemSelected(item);
        }
    }
}
package <YourNamespace>.mapexample;

import com.google.android.gms.common.ConnectionResult;
import com.google.android.gms.common.api.GoogleApiClient;
import com.google.android.gms.maps.CameraUpdateFactory;
import com.google.android.gms.maps.GoogleMap;
import com.google.android.gms.maps.MapsInitializer;
import com.google.android.gms.maps.OnMapReadyCallback;
import com.google.android.gms.maps.SupportMapFragment;
import com.google.android.gms.maps.model.BitmapDescriptorFactory;
import com.google.android.gms.maps.model.CameraPosition;
import com.google.android.gms.maps.model.LatLng;
import com.google.android.gms.maps.model.Marker;
import com.google.android.gms.maps.model.MarkerOptions;

import android.content.Intent;
import android.net.Uri;
import android.os.Bundle;
import android.support.annotation.NonNull;
import android.support.annotation.Nullable;
import android.support.v7.app.AppCompatActivity;
import android.support.v7.widget.Toolbar;
import android.util.Log;
import android.view.Menu;
import android.view.MenuItem;
import android.widget.Toast;

public class MapMarkers extends AppCompatActivity implements
        GoogleApiClient.ConnectionCallbacks,
        GoogleApiClient.OnConnectionFailedListener,
        OnMapReadyCallback,GoogleMap.OnInfoWindowClickListener {

    private GoogleMap map;
    private static final String TAG = "Mapper";
    private final LatLng honolulu = new LatLng(21.31,-157.85000);
    private final LatLng waikiki = new LatLng(21.275,-157.825000);
    private final LatLng diamond_head = new LatLng(21.261941,-157.805901);
    private final LatLng map_center = new LatLng(21.3,-157.825);

    @Override
    protected void onCreate(final Bundle savedInstanceState) {
        super.onCreate(savedInstanceState);
        setContentView(R.layout.mapmarkers);

        // Set up Toolbar
        Toolbar toolbar = (Toolbar) findViewById(R.id.my_toolbar3);
        // Remove default toolbar title and replace with an icon
        if (toolbar != null) {
            toolbar.setNavigationIcon(R.mipmap.ic_launcher);
        }
        // Note: getColor(color) deprecated as of API 23
        toolbar.setTitleTextColor(getResources().getColor(R.color.barTextColor));
        toolbar.setTitle("Map Example");
        setSupportActionBar(toolbar);

        // Obtain the SupportMapFragment and get notified when the map is ready to be used
        // in onMapReady().

        SupportMapFragment mapFragment = (SupportMapFragment) getSupportFragmentManager()
                .findFragmentById(R.id.markers_map);
        mapFragment.getMapAsync(this);
    }


    @Override
    public boolean onCreateOptionsMenu(final Menu menu) {
        // Inflate the menu; this adds items to the action bar if it is present.
        getMenuInflater().inflate(R.menu.showmap_menu, menu);
        return true;
    }


    @Override
    public void onMapReady(GoogleMap googleMap) {
        map = googleMap;
        initializeMap();
    }

    // Method to initialize the map

    private void initializeMap(){

        // Move camera view and zoom to location
        map.moveCamera(CameraUpdateFactory.newLatLngZoom(map_center, 13));

        // Initialize type of map
        map.setMapType(GoogleMap.MAP_TYPE_NORMAL);

        // Initialize 3D buildings enabled for map view
        map.setBuildingsEnabled(false);

        // Initialize whether indoor maps are shown if available
        map.setIndoorEnabled(false);

        // Initialize traffic overlay
        map.setTrafficEnabled(false);

        // Enable rotation gestures
        map.getUiSettings().setRotateGesturesEnabled(true);

        // Enable zoom controls on map [in addition to gesture controls like spread or double-
        // tap with 1 finger (to zoom in), and pinch or double-tap with two fingers (to zoom out)].

        map.getUiSettings().setZoomControlsEnabled(true);

        addMapMarkers();

        // Add marker info window click listener
        map.setOnInfoWindowClickListener(this);
    }

    // Method to animate camera properties change

    private void changeCamera(final GoogleMap map, final LatLng center, final float zoom,
                              final float bearing, final float tilt) {

        // Change properties of camera
        final CameraPosition cameraPosition = new CameraPosition.Builder()
                .target(center)         // Sets the center of the map
                .zoom(zoom)             // Sets the zoom
                .bearing(bearing)       // Sets the orientation of the camera
                .tilt(tilt)             // Sets the tilt of the camera relative to nadir
                .build();               // Creates a CameraPosition from the builder
        if(map != null){
            map.animateCamera(CameraUpdateFactory.newCameraPosition(cameraPosition));
        } else {
            Toast.makeText(this, getString(R.string.nomap_error),
                    Toast.LENGTH_LONG).show();
        }
    }


    @Override
    public void onInfoWindowClick(final Marker marker) {

        String address = null;
        final String title = marker.getTitle();
        if(title.equals("Honolulu")){
            address = "http://www.honolulu.gov/government/";
        } else if (title.equals("Waikiki")) {
            address = "http://en.wikipedia.org/wiki/Waikiki";
        } else if (title.equals("Diamond Head")) {
            address = "http://en.wikipedia.org/wiki/Diamond_Head,_Hawaii";
        }

        marker.hideInfoWindow();

        final Intent link = new Intent(Intent.ACTION_VIEW);
        link.setData(Uri.parse(address));
        startActivity(link);
    }

    @Override
    public void onConnected(@Nullable Bundle bundle) {

    }

    @Override
    public void onConnectionSuspended(int i) {

    }

    @Override
    public void onConnectionFailed(@NonNull ConnectionResult connectionResult) {

    }

    // Method to add map markers. See
    //     http://developer.android.com/reference/com/google/android/gms/maps/model
    //      /BitmapDescriptorFactory.html
    // for additional marker color options.

    private void addMapMarkers(){

        MapsInitializer.initialize(this);

        // Add some location markers
        map.addMarker(new MarkerOptions()
                .title("Honolulu")
                .snippet("Capitol of the state of Hawaii")
                .position(honolulu)
        ).setDraggable(true);

        map.addMarker(new MarkerOptions()
                .title("Diamond Head")
                .snippet("Extinct volcano; iconic landmark")
                .position(diamond_head)
                .icon(BitmapDescriptorFactory.defaultMarker(BitmapDescriptorFactory.HUE_VIOLET))
        );

        map.addMarker(new MarkerOptions()
                .title("Waikiki")
                .snippet("A world-famous beach")
                .position(waikiki)
                .icon(BitmapDescriptorFactory.defaultMarker(BitmapDescriptorFactory.HUE_BLUE))
        );

    }

    // Handle menu clicks in toolbar

    @Override
    public boolean onOptionsItemSelected(final MenuItem item) {
        // Handle item selection
        switch (item.getItemId()) {
            // Toggle traffic overlay
            case R.id.traffic:
                map.setTrafficEnabled(!map.isTrafficEnabled());
                return true;
            // Toggle satellite overlay
            case R.id.satellite:
                final int mt = map.getMapType();
                if(mt == GoogleMap.MAP_TYPE_NORMAL){
                    map.setMapType(GoogleMap.MAP_TYPE_SATELLITE);
                } else {
                    map.setMapType(GoogleMap.MAP_TYPE_NORMAL);
                }
                return true;
            // Toggle 3D building display (best when showing map instead of satellite)
            case R.id.building:
                map.setBuildingsEnabled(!map.isBuildingsEnabled());
                // Change camera tilt to view from angle if 3D
                if(map.isBuildingsEnabled()){
                    changeCamera(map, map.getCameraPosition().target,
                            map.getCameraPosition().zoom,
                            map.getCameraPosition().bearing, 45);
                } else {
                    changeCamera(map, map.getCameraPosition().target,
                            map.getCameraPosition().zoom,
                            map.getCameraPosition().bearing, 0);
                }
                return true;
            // Toggle whether indoor maps displayed
            case R.id.indoor:
                map.setIndoorEnabled(!map.isIndoorEnabled());
                return true;
            // Settings page
            case R.id.action_settings:
                // Actions for settings page
                final Intent j = new Intent(this, Settings.class);
                startActivity(j);
                return true;
            default:
                return super.onOptionsItemSelected(item);
        }
    }
}
package <YourNamespace>.mapexample; import java.io.IOException; import java.text.DecimalFormat; import java.util.Iterator; import java.util.List; import com.google.android.gms.common.ConnectionResult; import com.google.android.gms.common.api.GoogleApiClient; import com.google.android.gms.location.LocationListener; import com.google.android.gms.location.LocationRequest; import com.google.android.gms.location.LocationServices; import com.google.android.gms.maps.CameraUpdateFactory; import com.google.android.gms.maps.GoogleMap; import com.google.android.gms.maps.GoogleMap.OnMapLongClickListener; import com.google.android.gms.maps.GoogleMap.OnMarkerClickListener; import com.google.android.gms.maps.OnMapReadyCallback; import com.google.android.gms.maps.SupportMapFragment; import com.google.android.gms.maps.model.BitmapDescriptorFactory; import com.google.android.gms.maps.model.CameraPosition; import com.google.android.gms.maps.model.Circle; import com.google.android.gms.maps.model.CircleOptions; import com.google.android.gms.maps.model.LatLng; import com.google.android.gms.maps.model.Marker; import com.google.android.gms.maps.model.MarkerOptions; import android.Manifest; import android.content.Context; import android.content.DialogInterface; import android.content.Intent; import android.content.IntentSender; import android.content.SharedPreferences; import android.content.pm.PackageManager; import android.graphics.Color; import android.location.Address; import android.location.Geocoder; import android.location.Location; import android.net.Uri; import android.os.Bundle; import android.support.v4.app.ActivityCompat; import android.support.v7.app.AlertDialog; import android.support.v7.app.AppCompatActivity; import android.support.v7.widget.Toolbar; import android.util.Log; import android.view.Menu; import android.view.MenuItem; import android.view.WindowManager; import android.widget.Toast; public class MapMe extends AppCompatActivity implements GoogleApiClient.ConnectionCallbacks, GoogleApiClient.OnConnectionFailedListener, LocationListener, OnMapReadyCallback, GoogleMap.OnMapClickListener, OnMapLongClickListener, OnMarkerClickListener, GoogleMap.OnInfoWindowClickListener { // Update interval in milliseconds for location services private static final long UPDATE_INTERVAL = 5000; // Fastest update interval in milliseconds for location services private static final long FASTEST_INTERVAL = 1000; // Google Play diagnostics constant private final static int CONNECTION_FAILURE_RESOLUTION_REQUEST = 9000; // Speed threshold for orienting map in direction of motion (m/s) private static final double SPEED_THRESH = 1; private static final String TAG = "Mapper"; // User defines value of REQUEST_LOCATION. It will identify a permission request // specifically for ACCESS_FINE_LOCATION. Define a different integer for each // "dangerous" permission to be requested at runtime (in this example there is only one). final private int REQUEST_LOCATION = 2; private GoogleApiClient mGoogleApiClient; private LocationRequest mLocationRequest; private Location myLocation; private double myLat; private double myLon; private GoogleMap map; private LatLng map_center; private int startZoom = 14; private float currentZoom; private float bearing; private float speed; private float acc; private Circle localCircle; private double lon; private double lat; static final int numberOptions = 10; String[] optionArray = new String[numberOptions]; private static final int dialogIcon = R.mipmap.ic_launcher; // Set up shared preferences to persist data. We will use it later to save // current zoom level if user leaves this activity, and restore it when she returns. SharedPreferences prefs; SharedPreferences.Editor prefsEditor; @Override protected void onCreate(Bundle savedInstanceState) { super.onCreate(savedInstanceState); setContentView(R.layout.mapme); Toolbar toolbar = (Toolbar) findViewById(R.id.my_toolbar4); // Remove default toolbar title and replace with an icon if (toolbar != null) { toolbar.setNavigationIcon(R.mipmap.ic_launcher); } // Note: getColor(color) deprecated as of API 23 toolbar.setTitleTextColor(getResources().getColor(R.color.barTextColor)); toolbar.setTitle("Map Location"); setSupportActionBar(toolbar); // Obtain the SupportMapFragment and get notified when the map is ready to be used. // [by the onMapReady(GoogleMap googleMap) callback]. SupportMapFragment mapFragment = (SupportMapFragment) getSupportFragmentManager() .findFragmentById(R.id.mapme_map); mapFragment.getMapAsync(this); /* Create new GoogleApiClient for location services. The first 'this' in args is * present context; the next two 'this' args indicate that this class will handle * callbacks associated with connections and connection errors, respectively * (see the onConnected, onDisconnected, and onConnectionError callbacks below). * You cannot use the location client until the onConnected callback * fires, indicating a valid connection. At that point you can access location * services such as present position and location updates. */ mGoogleApiClient = new GoogleApiClient.Builder(this) .addApi(LocationServices.API) .addConnectionCallbacks(this) .addOnConnectionFailedListener(this) .build(); // Create the LocationRequest object mLocationRequest = LocationRequest.create(); // Set request for high accuracy mLocationRequest.setPriority(LocationRequest.PRIORITY_HIGH_ACCURACY); // Set update interval mLocationRequest.setInterval(UPDATE_INTERVAL); // Set fastest update interval that we can accept mLocationRequest.setFastestInterval(FASTEST_INTERVAL); // Get a shared preferences and ShredPreferences editor prefs = getSharedPreferences("SharedPreferences", Context.MODE_PRIVATE); prefsEditor = prefs.edit(); // Keep screen on while this map location tracking activity is running getWindow().addFlags(WindowManager.LayoutParams.FLAG_KEEP_SCREEN_ON); } // Callback executed when the map is ready, passing in the map reference googleMap. // First set up map, then check for runtime permission on location. @Override public void onMapReady(GoogleMap googleMap) { map = googleMap; setupMap(); checkForPermissions(); } public void setupMap(){ // Initialize type of map to normal map.setMapType(GoogleMap.MAP_TYPE_NORMAL); // Initialize 3D buildings enabled for map view map.setBuildingsEnabled(false); // Initialize whether indoor maps are shown if available map.setIndoorEnabled(false); // Initialize traffic overlay map.setTrafficEnabled(false); // Disable rotation gestures map.getUiSettings().setRotateGesturesEnabled(false); // Enable zoom controls on map [in addition to gesture controls like spread or double- // tap with 1 finger (to zoom in), and pinch or double-tap with two fingers (to zoom out)]. map.getUiSettings().setZoomControlsEnabled(true); // Set the initial zoom level of the map and store in prefs currentZoom = startZoom; storeZoom(currentZoom); // Add a click listener to the map map.setOnMapClickListener(this); // Add a long-press listener to the map map.setOnMapLongClickListener(this); // Add Marker click listener to the map map.setOnMarkerClickListener(this); // Add marker info window click listener map.setOnInfoWindowClickListener(this); } /* Method to check for runtime permissions. For Android 6 (API 23) and beyond, we must check for the "dangerous" permission ACCESS_FINE_LOCATION at runtime (in addition to declaring it in the manifest file). The following code checks for this permission. If it has already been granted, it proceeds as normal. If it has not yet been granted by the user, the user is presented with an opportunity to grant it. In general, the rest of this class will not execute until the user has granted such permission. */ public void checkForPermissions(){ if (ActivityCompat.checkSelfPermission(this, Manifest.permission.ACCESS_FINE_LOCATION) != PackageManager.PERMISSION_GRANTED) { /* Permission has not been granted by user previously. Request it now. The system will present a dialog to the user requesting the permission, with options "accept", "deny", and a box to check "don't ask again". When the user chooses, the system will then fire the onRequestPermissionsResult() callback, passing in the user-defined integer defining the type of permission request (REQUEST_LOCATION in this case) and the "accept" or "deny" user response. We deal appropriately with the user response in our override of onRequestPermissionsResult() below.*/ ActivityCompat.requestPermissions(this, new String[]{Manifest.permission.ACCESS_FINE_LOCATION}, REQUEST_LOCATION); } else { Log.i(TAG, "checkForPermission: Permission has been granted"); } } // Create Toolbar menu. @Override public boolean onCreateOptionsMenu(Menu menu) { // Inflate the menu; this adds items to the action bar if present. getMenuInflater().inflate(R.menu.mapme_menu, menu); return true; } @Override protected void onPause() { super.onPause(); } @Override protected void onResume() { super.onResume(); // Restore previous zoom level (default to max zoom level if // no prefs stored) if (prefs.contains("KEY_ZOOM") && map != null) { currentZoom = prefs.getFloat("KEY_ZOOM", map.getMaxZoomLevel()); } // Keep screen on while this map location tracking activity is running getWindow().addFlags(WindowManager.LayoutParams.FLAG_KEEP_SCREEN_ON); } /* The following two lifecycle methods conserve resources by ensuring that * location services are connected when the map is visible and disconnected when * it is not. */ // Called by system when Activity becomes visible, so connect location client. @Override protected void onStart() { super.onStart(); if(mGoogleApiClient != null) mGoogleApiClient.connect(); } // Called by system when Activity no longer visible, so disconnect client, @Override protected void onStop() { // Save the current zoom level for next session if (map != null) { currentZoom = map.getCameraPosition().zoom; storeZoom(currentZoom); } // If the client is connected, remove location updates and disconnect if (mGoogleApiClient.isConnected()) { mGoogleApiClient.disconnect(); } // Turn off the screen-always-on request getWindow().clearFlags(WindowManager.LayoutParams.FLAG_KEEP_SCREEN_ON); super.onStop(); } // The following three callbacks indicate connections, disconnections, and // connection errors, respectively. /* Called by Location Services when the request to connect the client finishes successfully. At this point, you can request current location or begin periodic location updates. */ @Override public void onConnected(Bundle dataBundle) { Toast.makeText(this, getString(R.string.connected_toast), Toast.LENGTH_SHORT).show(); initializeLocation(); // Center map on current location map_center = new LatLng(myLat, myLon); if (map != null) { initializeMap(); } else { Toast.makeText(this, getString(R.string.nomap_error), Toast.LENGTH_LONG).show(); } } // Called after onConnected returns, indicating that GoogleApiClient is ready to // accept location requests public void initializeLocation(){ // We already checked for runtime permissions when onMapReady returned, but formally we // must check for it again here. if (ActivityCompat.checkSelfPermission(this, Manifest.permission.ACCESS_FINE_LOCATION) != PackageManager.PERMISSION_GRANTED && ActivityCompat.checkSelfPermission(this, Manifest.permission.ACCESS_COARSE_LOCATION) != PackageManager.PERMISSION_GRANTED) { return; } // Request location updates LocationServices.FusedLocationApi.requestLocationUpdates( mGoogleApiClient, mLocationRequest, this); // Get current location and move the camera there myLocation = LocationServices.FusedLocationApi.getLastLocation(mGoogleApiClient); myLat = myLocation.getLatitude(); myLon = myLocation.getLongitude(); map.setMyLocationEnabled(true); // Retrieve last used zoom from SharedPreferences if (prefs.contains("KEY_ZOOM") && map != null) { currentZoom = prefs.getFloat("KEY_ZOOM", map.getMaxZoomLevel()); } map.moveCamera(CameraUpdateFactory.newLatLngZoom(new LatLng(myLat,myLon), currentZoom)); storeZoom(currentZoom); } // Method to store current value of zoom in preferences private void storeZoom(float zoom){ prefsEditor.putFloat("KEY_ZOOM", zoom); prefsEditor.commit(); } @Override public void onConnectionSuspended(int i) { } // Called by Location Services if the connection to location client fails //@Override public void onDisconnected() { Toast.makeText(this, getString(R.string.disconnected_toast), Toast.LENGTH_SHORT).show(); } // Called by Location Services if the attempt to connect to Location Services fails. @Override public void onConnectionFailed(ConnectionResult connectionResult) { /* Google Play services can resolve some errors it detects. * If the error has a resolution, try sending an Intent to * start a Google Play services activity that can resolve the error. */ if (connectionResult.hasResolution()) { try { // Start an Activity that tries to resolve the error connectionResult.startResolutionForResult( this, CONNECTION_FAILURE_RESOLUTION_REQUEST); // Thrown if Google Play services canceled the original PendingIntent } catch (IntentSender.SendIntentException e) { e.printStackTrace(); } } else { // If no resolution is available, display a dialog with the error. showErrorDialog(connectionResult.getErrorCode()); } } public void showErrorDialog(int errorCode) { Log.e(TAG, "Error_Code =" + errorCode); // Create an error dialog display here } // Method to initialize the map. Called after onMapReady returns. private void initializeMap() { // We already checked for runtime permissions when onMapReady returned, but formally we // must check for it again here. if (ActivityCompat.checkSelfPermission(this, Manifest.permission.ACCESS_FINE_LOCATION) != PackageManager.PERMISSION_GRANTED && ActivityCompat.checkSelfPermission(this, Manifest.permission.ACCESS_COARSE_LOCATION) != PackageManager.PERMISSION_GRANTED) { return; } // Move camera view and zoom to location map.setMyLocationEnabled(true); map.moveCamera(CameraUpdateFactory.newLatLngZoom(map_center,currentZoom)); } // Starts location tracking private void startTracking(){ mGoogleApiClient.connect(); Toast.makeText(this, "Location tracking started", Toast.LENGTH_SHORT).show(); } // Stops location tracking private void stopTracking(){ if (mGoogleApiClient.isConnected()) { mGoogleApiClient.disconnect(); } Toast.makeText(this, "Location tracking halted", Toast.LENGTH_SHORT).show(); } /* Method to add map marker at give latitude and longitude. The third arg is a float * variable defining color for the marker. Pre-defined marker colors may be found at * http://developer.android.com/reference/com/google/android/gms/maps/model * /BitmapDescriptorFactory.html * and should be specified in the format BitmapDescriptorFactory.HUE_RED, which is * the default color, but various other ones are defined there such as HUE_ORANGE, * HUE_BLUE, HUE_GREEN, ... The arguments title and snippet are for the window that * will open if one clicks on the marker. */ private void addMapMarker (double lat, double lon, float markerColor, String title, String snippet){ if(map != null){ Marker marker = map.addMarker(new MarkerOptions() .title(title) .snippet(snippet) .position(new LatLng(lat,lon)) .icon(BitmapDescriptorFactory.defaultMarker(markerColor)) ); marker.setDraggable(false); marker.showInfoWindow(); } else { Toast.makeText(this, getString(R.string.nomap_error), Toast.LENGTH_LONG).show(); } } // Decimal output formatting class that uses Java DecimalFormat. See // http://developer.android.com/reference/java/text/DecimalFormat.html. // The string "formatPattern" specifies the output formatting pattern for // the float or double. For example, 35.8577877288 will be returned // as the string "35.85779" if formatPattern = "0.00000", and as // the string "3.586E01" if formatPattern = "0.000E00". public String formatDecimal(double number, String formatPattern){ DecimalFormat df = new DecimalFormat(formatPattern); // The method format(number) with a single argument is inherited by // DecimalFormat from NumberFormat. return df.format(number); } /* Method to change properties of camera. Use * * map.getCameraPosition().target * map.getCameraPosition().zoom * map.getCameraPosition().bearing * map.getCameraPosition().tilt * * to get the current values of the camera position (target, which is a LatLng), * zoom, bearing, and tilt, respectively. This permits changing only a subset of * the camera properties by passing the current values for all arguments you do not * wish to change. */ private void changeCamera(GoogleMap map, LatLng center, float zoom, float bearing, float tilt, boolean animate) { CameraPosition cameraPosition = new CameraPosition.Builder() .target(center) // Sets the center of the map .zoom(zoom) // Sets the zoom .bearing(bearing) // Sets the bearing of the camera .tilt(tilt) // Sets the tilt of the camera relative to nadir .build(); // Creates a CameraPosition from the builder // Move (if variable animate is false) or animate (if animate is true) to new // camera properties. Move is sudden; animate is smooth. if(animate){ map.animateCamera(CameraUpdateFactory.newCameraPosition(cameraPosition)); } else { map.moveCamera(CameraUpdateFactory.newCameraPosition(cameraPosition)); } } // Following callback associated with implementing LocationListener. // It fires when a location change is detected, passing in the new // location as the variable "newLocation". @Override public void onLocationChanged(Location newLocation) { bearing = newLocation.getBearing(); speed = newLocation.getSpeed(); acc = newLocation.getAccuracy(); // Get latitude and longitude of updated location double lat = newLocation.getLatitude(); double lon = newLocation.getLongitude(); LatLng currentLatLng = new LatLng(lat, lon); // Return a bundle of additional location information, if available. // This will return null if no extras are available, so check for // null before using this Bundle. Bundle locationExtras = newLocation.getExtras(); // If there is no satellite info, return -1 for number of satellites. // Note that the satellite info generally no longer works with current // location providers. Under Android 24 there will be a new class GnssStatus that // will allow detailed location provider information like number of satellites // and more. See // https://developer.android.com/reference/android/location/GnssStatus.html // for documentation. int numberSatellites = -1; if(locationExtras != null){ Log.i(TAG, "Extras:"+locationExtras.toString()); if(locationExtras.containsKey("satellites")){ numberSatellites = locationExtras.getInt("satellites"); } } // Store zoom in Prefs storeZoom(map.getCameraPosition().zoom); // Log some basic location information Log.i(TAG,"Lat="+formatDecimal(lat,"0.00000") +" Lon="+formatDecimal(lon,"0.00000") +" Bearing="+formatDecimal(bearing, "0.0") +" deg Speed="+formatDecimal(speed, "0.0")+" m/s" +" Accuracy="+formatDecimal(acc, "0.0")+" m" +" Zoom="+map.getCameraPosition().zoom +" Sats="+numberSatellites); if(map != null) { // Animate camera to reflect location update. Orient the view in the // direction of motion, but only if the velocity is above a threshold // to prevent random rotations of view when velocity direction is // not well defined. if(speed < SPEED_THRESH) { // Smoothly move the camera view to center on the updated location // without changing bearing, tilt, or zoom of camera. map.animateCamera(CameraUpdateFactory.newLatLng(currentLatLng)); } else { // Animate motion to the updated position and also orient camera in // direction of motion using current bearing, keeping the same tilt // and zoom. Note: bearing is the horizontal direction of travel // for the device; it has nothing to do with orientation of the device. changeCamera(map, currentLatLng, map.getCameraPosition().zoom, bearing, map.getCameraPosition().tilt, true); } } else { Toast.makeText(this, getString(R.string.nomap_error), Toast.LENGTH_LONG).show(); } } // Method to reverse-geocode location passed as latitude and longitude. It returns a string which // is the first reverse-geocode location in the returned list. (The full list is output to the // logcat stream.) This method returns null if no geocoder backend is available. private String reverseGeocodeLocation(double latitude, double longitude){ // Use to suppress country in returned address for brevity boolean omitCountry = true; // String to hold single address that will be returned String returnString = ""; Geocoder gcoder = new Geocoder(this); // Note that the Geocoder uses synchronous network access, so in a serious application // it would be best to put it on a background thread to prevent blocking the main UI if network // access is slow. Here we are just giving an example of how to use it so, for simplicity, we // don't put it on a separate thread. See the class RouteMapper in this package for an example // of making a network access on a background thread. Geocoding is implemented by a backend // that is not part of the core Android framework, so it is not guaranteed to be present on // every device. Thus we use the static method Geocoder.isPresent() to test for presence of // the required backend on the given platform. try{ List<Address> results = null; if(Geocoder.isPresent()){ results = gcoder.getFromLocation(latitude, longitude, numberOptions); } else { Log.i(TAG,"No geocoder accessible on this device"); return null; } Iterator<Address> locations = results.iterator(); String raw = "\nRaw String:\n"; String country; int opCount = 0; while(locations.hasNext()){ Address location = locations.next(); if(opCount==0 && location != null){ lat = location.getLatitude(); lon = location.getLongitude(); } country = location.getCountryName(); if(country == null) { country = ""; } else { country = ", "+country; } raw += location+"\n"; optionArray[opCount] = location.getAddressLine(0)+", " +location.getAddressLine(1)+country+"\n"; if(opCount == 0){ if(omitCountry){ returnString = location.getAddressLine(0)+", " +location.getAddressLine(1)+"\n"; } else { returnString = optionArray[opCount]; } } opCount ++; } // Log the basic information returned Log.i(TAG, raw); Log.i(TAG,"\nOptions:\n"); for(int i=0; i<opCount; i++){ Log.i(TAG,"("+(i+1)+") "+optionArray[i]); } Log.i(TAG,"lat="+lat+" lon="+lon); } catch (IOException e){ Log.e(TAG, "I/O Failure",e); } // Return the first location entry in the list. A more sophisticated implementation // would present all location entries in optionArray to the user for choice when more // than one is returned by the geodecoder. return returnString; } // Callback that fires when map is tapped, passing in the latitude // and longitude coordinates of the tap (actually the point on the ground // projected from the screen tap). This will be invoked only if no overlays // on the map intercept the click first. Here we will just issue a Toast // displaying the map coordinates that were tapped. See the onMapLongClick // handler for an example of additional actions that could be taken. @Override public void onMapClick(LatLng latlng) { String f = "0.0000"; double lat = latlng.latitude; double lon = latlng.longitude; Toast.makeText(this, "Latitude="+formatDecimal(lat,f)+" Longitude=" +formatDecimal(lon,f), Toast.LENGTH_LONG).show(); } // This callback fires for long clicks on the map, passing in the LatLng coordinates @Override public void onMapLongClick(LatLng latlng) { double lat = latlng.latitude; double lon = latlng.longitude; String title = reverseGeocodeLocation(latlng.latitude, latlng.longitude); Log.i(TAG,"Reverse geocode="+title); String snippet="Tap marker to delete; tap window for Street View"; // Add an orange marker on map at position of tap (default marker color is red). addMapMarker(lat, lon, BitmapDescriptorFactory.HUE_ORANGE, title, snippet); // Add a circle centered on the marker given the current position uncertainty // Keep a reference to the returned circle so we can remove it later. localCircle = addCircle (lat, lon, acc, "#00000000", "#40ff9900"); } /* Add a circle at (lat, lon) with specified radius. Stroke and fill colors are specified * as strings. Valid strings are those valid for the argument of Color.parseColor(string): * for example, "#RRGGBB", "#AARRGGBB", "red", "blue", ...*/ private Circle addCircle(double lat, double lon, float radius, String strokeColor, String fillColor){ if(map == null){ Toast.makeText(this, getString(R.string.nomap_error), Toast.LENGTH_LONG).show(); return null; } CircleOptions circleOptions = new CircleOptions() .center( new LatLng(lat, lon) ) .radius( radius ) .strokeWidth(1) .fillColor(Color.parseColor(fillColor)) .strokeColor(Color.parseColor(strokeColor)); // Add circle to map and return reference to the Circle for possible later use return map.addCircle(circleOptions); } // Process clicks on markers @Override public boolean onMarkerClick(Marker marker) { // Remove the marker and its info window and circle if marker clicked marker.remove(); localCircle.remove(); // Return true to prevent default behavior of opening info window return true; } // Process clicks on the marker info window @Override public void onInfoWindowClick(Marker marker) { double lat = marker.getPosition().latitude; double lon = marker.getPosition().longitude; // Launch a Street View on current location showStreetView(lat,lon); // Remove marker and circle marker.remove(); localCircle.remove(); } /* Open a Street View, if available. The user will have the choice of getting the Street View * in a browser, or with the StreetView app if it is installed. If no Street View exists for * a given location, this will present a blank page. */ private void showStreetView(double lat, double lon ){ String uriString = "google.streetview:cbll="+lat+","+lon; Intent streetView = new Intent(android.content.Intent.ACTION_VIEW,Uri.parse(uriString)); startActivity(streetView); } /*Following method invoked by the system after the user response to a runtime permission request (Android 6, API 23 and beyond implement such runtime permissions). The system passes to this method the user's response, which you then should act upon in this method. This method can respond to more than one type permission. The user-defined integer requestCode (passed in the call to ActivityCompat.requestPermissions) distinguishes which permission is being processed. */ @Override public void onRequestPermissionsResult(int requestCode, String[] permissions, int[] grantResults) { Log.i(TAG, "Permission result: requestCode=" + requestCode); switch(requestCode){ // The permission response was for fine location case REQUEST_LOCATION : // If the request was canceled by user, the results arrays are empty if(grantResults.length > 0 && grantResults[0] == PackageManager.PERMISSION_GRANTED){ // Permission was granted. Do the location task that triggered permission request initializeLocation(); } else { // The permission was denied. Warn the user of the consequences and give // them one last time to enable the permission. showTaskDialog(1, "Warning!", "This part of the app will not function without this permission!", dialogIcon, this, "OK, Do Over", "Refuse Permission"); } break; } } /** * Method showTaskDialog() creates a custom alert dialog. This dialog presents text defining * a choice to the user and has buttons for a binary choice. Pressing the rightmost button * will execute the method positiveTask(id) and pressing the leftmost button will execute the * method negativeTask(id). You should define appropriate actions in each. (If the * negativeTask(id) method is empty the default action is just to close the dialog window.) * The argument id is a user-defined integer distinguishing multiple uses of this method in * the same class. The programmer should switch on id in the response methods * positiveTask(id) and negativeTask(id) to decide which alert dialog to respond to. * This version of AlertDialog.Builder allows a theme to be specified. Removing the theme * argument from AlertDialog.Builder below will cause the default dialog theme to be used. */ private void showTaskDialog(int id, String title, String message, int icon, Context context, String positiveButtonText, String negativeButtonText){ final int fid=id; // Must be final to access from anonymous inner class below AlertDialog.Builder builder = new AlertDialog.Builder(context,R.style.MyDialogTheme); builder.setMessage(message).setTitle(title).setIcon(icon); // Add the right button builder.setPositiveButton(positiveButtonText, new DialogInterface.OnClickListener() { public void onClick(DialogInterface dialog, int id) { positiveTask(fid); } }); // Add the left button builder.setNegativeButton(negativeButtonText, new DialogInterface.OnClickListener() { public void onClick(DialogInterface dialog, int id) { negativeTask(fid); } }); AlertDialog dialog = builder.create(); dialog.show(); } // Method to execute if user chooses negative button. This returns to main // activity since no permission has been given to execute required methods of this class. private void negativeTask(int id){ // Use id to distinguish if more than one usage of the showTaskDialog in same class switch(id) { case 1: String warn = "The purpose of this part of the app is to determine your "; warn += "location. Hence it cannot function unless you grant the requested "; warn += "permission. Returning to app homescreen. To enable this "; warn += "part of the app you may manually enable Location permissions in "; warn += " Settings > App > MapExample > Permissions."; // New single-button dialog showTaskDialog(2,"Task not enabled!", warn, dialogIcon, this, "", "OK"); break; case 2: // Return to main page since permission was denied Intent i = new Intent(this, MainActivity.class); startActivity(i); break; } } // Method to execute if user chooses positive button ("OK, Do Over"). This starts the // map initialization, which will present the location permissions dialog again. private void positiveTask(int id){ // Use id to distinguish if more than one usage of the alert dialog switch(id) { case 1: // User agreed to enable so go back to permissions check checkForPermissions(); break; case 2: break; } } // Handle events in the toolbar menu @Override public boolean onOptionsItemSelected(MenuItem item) { if (map == null) { Toast.makeText(this, getString(R.string.nomap_error), Toast.LENGTH_LONG).show(); return false; } // Handle item selection switch (item.getItemId()) { // Toggle traffic overlay case R.id.traffic_mapme: map.setTrafficEnabled(!map.isTrafficEnabled()); return true; // Toggle satellite overlay case R.id.satellite_mapme: int mt = map.getMapType(); if (mt == GoogleMap.MAP_TYPE_NORMAL) { map.setMapType(GoogleMap.MAP_TYPE_SATELLITE); } else { map.setMapType(GoogleMap.MAP_TYPE_NORMAL); } return true; // Toggle 3D building display case R.id.building_mapme: map.setBuildingsEnabled(!map.isBuildingsEnabled()); // Change camera tilt to view from angle if 3D if (map.isBuildingsEnabled()) { changeCamera(map, map.getCameraPosition().target, currentZoom, map.getCameraPosition().bearing, 45, true); } else { changeCamera(map, map.getCameraPosition().target, currentZoom, map.getCameraPosition().bearing, 0, true); } return true; // Toggle whether indoor maps displayed case R.id.indoor_mapme: map.setIndoorEnabled(!map.isIndoorEnabled()); return true; // Toggle tracking enabled case R.id.track_mapme: if (mGoogleApiClient != null) { if (mGoogleApiClient.isConnected()) { stopTracking(); } else { startTracking(); } } return true; // Settings page case R.id.action_settings: Intent j = new Intent(this, Settings.class); startActivity(j); return true; default: return super.onOptionsItemSelected(item); } } }
package <YourNamespace>.mapexample; import java.net.MalformedURLException; import java.net.URL; import org.xmlpull.v1.XmlPullParser; import org.xmlpull.v1.XmlPullParserFactory; import com.google.android.gms.common.ConnectionResult; import com.google.android.gms.common.api.GoogleApiClient; import com.google.android.gms.location.LocationServices; import com.google.android.gms.maps.CameraUpdateFactory; import com.google.android.gms.maps.GoogleMap; import com.google.android.gms.maps.OnMapReadyCallback; import com.google.android.gms.maps.SupportMapFragment; import com.google.android.gms.maps.model.BitmapDescriptorFactory; import com.google.android.gms.maps.model.CircleOptions; import com.google.android.gms.maps.model.LatLng; import com.google.android.gms.maps.model.Marker; import com.google.android.gms.maps.model.MarkerOptions; import com.google.android.gms.maps.model.Polyline; import com.google.android.gms.maps.model.PolylineOptions; import android.content.Intent; import android.content.IntentSender; import android.graphics.Color; import android.net.Uri; import android.os.AsyncTask; import android.os.Bundle; import android.support.v7.app.AppCompatActivity; import android.support.v7.widget.Toolbar; import android.util.Log; import android.view.Menu; import android.view.MenuItem; import android.widget.Toast; public class RouteMapper extends AppCompatActivity implements GoogleApiClient.ConnectionCallbacks, GoogleApiClient.OnConnectionFailedListener, GoogleMap.OnMarkerClickListener, OnMapReadyCallback, GoogleMap.OnInfoWindowClickListener, GoogleMap.OnMapLongClickListener, com.google.android.gms.maps.GoogleMap.OnMapClickListener { private final static int CONNECTION_FAILURE_RESOLUTION_REQUEST = 9000; private static final String TAG = "Mapper"; private GoogleApiClient locationClient; private GoogleMap map; private LatLng map_center = new LatLng(35.955, -83.9275); private int zoomOffset = 5; private int numberRoutePoints = -1; private int totalWaypoints = -1; private LatLng routePoints[]; private int routeGrade[]; private Polyline[] route; private String warnPointSnippet[]; private LatLng warnPointLatLng[]; private static final int numberAccessMarkers = 4; private static final int numberFoodMarkers = 3; private LatLng[] accessLoc = new LatLng[numberAccessMarkers]; private Marker[] accessMarker = new Marker[numberAccessMarkers]; private String[] accessMarkerTitle = new String[numberAccessMarkers]; private String[] accessMarkerSnippet = new String[numberAccessMarkers]; private Uri[] uriAccess = new Uri[numberAccessMarkers]; private LatLng[] foodLoc = new LatLng[numberFoodMarkers]; private Marker[] foodMarker = new Marker[numberFoodMarkers]; private String[] foodMarkerTitle = new String[numberFoodMarkers]; private String[] foodMarkerSnippet = new String[numberFoodMarkers]; private Uri[] uriFood = new Uri[numberFoodMarkers]; private boolean accessInitiallyVisible = false; private boolean foodInitiallyVisible = false; private boolean accessIsVisible = false; private boolean foodIsVisible = false; @Override protected void onCreate(Bundle savedInstanceState) { super.onCreate(savedInstanceState); setContentView(R.layout.routemapper); // Create top toolbar Toolbar toolbar = (Toolbar) findViewById(R.id.route_map); // Remove default toolbar title and replace with an icon if (toolbar != null) { toolbar.setNavigationIcon(R.mipmap.ic_launcher); } // Note: getColor(color) deprecated as of API 23 toolbar.setTitleTextColor(getResources().getColor(R.color.barTextColor)); toolbar.setTitle(""); setSupportActionBar(toolbar); // Get a handle to the Map Fragment // Obtain the SupportMapFragment and get notified when the map is ready to be used. SupportMapFragment mapFragment = (SupportMapFragment) getSupportFragmentManager() .findFragmentById(R.id.the_map); mapFragment.getMapAsync(this); /* Create a new location client. The first 'this' in the args is the * present context; the next two indicate that the present class will handle * the callbacks associated with connection and connection errors, respectively * (see the onConnected, onDisconnected, and onConnectionError callbacks below). * You cannot use the location client until the onConnected callback * fires, indicating a valid connection. At that point you can access location * services such as present position and location updates. */ locationClient = new GoogleApiClient.Builder(this) .addApi(LocationServices.API) .addConnectionCallbacks(this) .addOnConnectionFailedListener(this) .build(); } // Inflate toolbar menu. Actions handled below in onOptionsItemSelected method. @Override public boolean onCreateOptionsMenu(Menu menu) { // Inflate the menu; this adds items to the action bar if it is present. getMenuInflater().inflate(R.menu.routemapper_menu, menu); return true; } // Fired by system when map fragment is ready. @Override public void onMapReady(GoogleMap googleMap) { map=googleMap; // Add a click listener to the map map.setOnMapClickListener(this); // Add a long-press listener to the map map.setOnMapLongClickListener(this); // Add symbol overlays (initially invisible) addAccessSymbols(); addFoodSymbols(); } @Override protected void onPause() { super.onPause(); } @Override protected void onResume() { super.onResume(); } /* The following two lifecycle methods conserve resources by ensuring that location * services are connected when the map is visible and disconnected when not. */ // Called by system when Activity becomes visible, so connect location client. @Override protected void onStart() { super.onStart(); locationClient.connect(); } // Called by system when Activity is no longer visible, so disconnect location // client, which invalidates it. @Override protected void onStop() { locationClient.disconnect(); super.onStop(); } // The following three callbacks indicate connections, disconnections, and // connection errors, respectively. /* Called by Location Services when the request to connect the * client finishes successfully. At this point, you can * request current location or begin periodic location updates. */ @Override public void onConnected(Bundle dataBundle) { // Display the connection status Toast.makeText(this, getString(R.string.connected_toast), Toast.LENGTH_SHORT).show(); if (map != null) { initializeMap(); } else { Toast.makeText(this, getString(R.string.nomap_error), Toast.LENGTH_LONG).show(); } } @Override public void onConnectionSuspended(int i) { } // Called by Location Services if the connection to the location client drops out //@Override public void onDisconnected() { // Display the connection status Toast.makeText(this, getString(R.string.disconnected_toast), Toast.LENGTH_SHORT).show(); } // Called by Location Services if the attempt to connect to Location Services fails. @Override public void onConnectionFailed(ConnectionResult connectionResult) { /* Google Play services can resolve some errors it detects. * If the error has a resolution, try sending an Intent to * start a Google Play services activity that can resolve the error. */ if (connectionResult.hasResolution()) { try { // Start an Activity that tries to resolve the error connectionResult.startResolutionForResult( this, CONNECTION_FAILURE_RESOLUTION_REQUEST); // Thrown if Google Play services canceled the original PendingIntent } catch (IntentSender.SendIntentException e) { // Log the error e.printStackTrace(); } } else { // If no resolution is available, display a dialog with the error. showErrorDialog(connectionResult.getErrorCode()); } } public void showErrorDialog(int errorCode) { Log.e(TAG, "Error_Code =" + errorCode); } // Method to initialize the map. private void initializeMap() { // Move camera view and zoom to location map.moveCamera(CameraUpdateFactory.newLatLngZoom(map_center, map.getMaxZoomLevel()-zoomOffset)); // Initialize type of map map.setMapType(GoogleMap.MAP_TYPE_NORMAL); // Initialize 3D buildings enabled for map view map.setBuildingsEnabled(false); // Initialize whether indoor maps are shown if available map.setIndoorEnabled(false); // Initialize traffic overlay map.setTrafficEnabled(false); // Add map marker click listener map.setOnMarkerClickListener(this); // Add map maker info window click listener map.setOnInfoWindowClickListener(this); // Disable rotation gestures map.getUiSettings().setRotateGesturesEnabled(false); // Enable zoom controls on map [in addition to gesture controls like spread or double- // tap with 1 finger (to zoom in), and pinch or double-tap with two fingers (to zoom out)]. map.getUiSettings().setZoomControlsEnabled(true); } // Method to read and parse route data from server as XML. The network request // will be executed on a background thread to avoid locking up the UI // if the network response is slow. Once the data are returned over the network, // the background thread will call the method overlayRoute() to overlay the route // on the map. public void loadRouteData(){ // The constructor new URL(url) throws MalformedURLException, so must enclose // everything in a try-catch to handle the exception. try { // Specify the URL of the server program producing the XML String url = "http://eagle.phys.utk.edu/reubendb/UTRoute.php"; // Specify the starting and ending points of route in GET data string. // Lat and long expected in microdegrees for server program (divide by 1e6 // to get corresponding values in degrees). String data = "?lat1=35952967&lon1=-83929158&lat2=35956567&lon2=-83925450"; // Execute the request on a background thread new RouteLoader().execute(new URL(url+data)); } catch (MalformedURLException e) { Log.i(TAG, "Failed to generate valid URL"); } } // Overlay a route. This method is executed only after loadRouteData() completes // on background thread. public void overlayRoute() { int lw = 10; // Define the route as a line with multiple segments route = new Polyline[numberRoutePoints]; PolylineOptions routeOptions; // Color legend for path slope. Increasing values of the index // indicate steeper paths int[] slopeColor = new int[4]; slopeColor[0] = Color.parseColor("#cc5ea2c6"); slopeColor[1] = Color.parseColor("#ccebc05c"); slopeColor[2] = Color.parseColor("#ccbb6255"); slopeColor[3] = Color.parseColor("#ccd27451"); // Add each segment of the route to the map with appropriate color for (int i = 0; i < numberRoutePoints - 1; i++) { routeOptions = new PolylineOptions().width(lw); routeOptions.add(routePoints[i]); routeOptions.add(routePoints[i + 1]); routeOptions.color(slopeColor[routeGrade[i] - 1]); route[i] = map.addPolyline(routeOptions); } // Circle at beginning of route CircleOptions circleOptions = new CircleOptions() .center(routePoints[0]) .radius(6) .strokeWidth(0) .strokeColor(slopeColor[0]) .fillColor(Color.DKGRAY) .zIndex(100); map.addCircle(circleOptions); // Circle at end of route circleOptions = circleOptions.center(routePoints[numberRoutePoints - 1]); map.addCircle(circleOptions); // Add warning areas for (int i = 0; i < totalWaypoints; i++) { map.addMarker(new MarkerOptions() .title("WARNING") .snippet(warnPointSnippet[i]) .position(warnPointLatLng[i]) .icon(BitmapDescriptorFactory.defaultMarker(BitmapDescriptorFactory.HUE_RED)) ); } } // Method to overlay access symbols public void addAccessSymbols(){ // Set up access markers overlay accessLoc[0] = new LatLng(35.953700,-83.926158); accessLoc[1] = new LatLng(35.954000,-83.928200); accessLoc[2] = new LatLng(35.955000,-83.927558); accessLoc[3] = new LatLng(35.954000,-83.927158); accessMarkerTitle[0] = "Access Marker 1"; accessMarkerTitle[1] = "Access Marker 2"; accessMarkerTitle[2] = "Access Marker 3"; accessMarkerTitle[3] = "Access Marker 4"; accessMarkerSnippet[0] = "Access snippet 1"; accessMarkerSnippet[1] = "Access snippet 2"; accessMarkerSnippet[2] = "Access snippet 3"; accessMarkerSnippet[3] = "Access snippet 4"; uriAccess[0] = Uri.parse("http://www.google.com"); uriAccess[1] = Uri.parse("http://whitehouse.gov"); uriAccess[2] = Uri.parse("http://www.amazon.com"); uriAccess[3] = Uri.parse("http://www.stackoverflow.com"); for(int i=0; i<numberAccessMarkers; i++){ accessMarker[i] = map.addMarker(new MarkerOptions() .position(accessLoc[i]) .icon(BitmapDescriptorFactory.fromResource(R.drawable.accessibility)) .draggable(false) .alpha(0.7f) .snippet(accessMarkerSnippet[i]) .title(accessMarkerTitle[i])); accessMarker[i].setVisible(accessInitiallyVisible); } } // Method to toggle visibility of access symbols public void toggleAccessSymbols(){ accessIsVisible = !accessIsVisible; for (int i=0; i<numberAccessMarkers; i++){ accessMarker[i].setVisible(accessIsVisible); } } // Method to overlay food symbols public void addFoodSymbols(){ // Set up food markers overlay Log.i(TAG,"Adding food symbols"); foodLoc[0] = new LatLng(35.952967,-83.929158); foodLoc[1] = new LatLng(35.953000,-83.928000); foodLoc[2] = new LatLng(35.955000,-83.929158); foodMarkerTitle[0]="Food Marker 1"; foodMarkerTitle[1]="Food Marker 2"; foodMarkerTitle[2]="Food Marker 3"; foodMarkerSnippet[0] = "Food snippet 1"; foodMarkerSnippet[1] = "Food snippet 2"; foodMarkerSnippet[2] = "Food snippet 3"; uriFood[0] = Uri.parse("http://antwrp.gsfc.nasa.gov/apod/astropix.html"); uriFood[1] = Uri.parse("http://www.youtube.com"); uriFood[2] = Uri.parse("http://www.kayak.com"); for(int i=0; i<numberFoodMarkers; i++){ foodMarker[i] = map.addMarker(new MarkerOptions() .position(foodLoc[i]) .icon(BitmapDescriptorFactory.fromResource(R.drawable.knifefork_small)) .draggable(false) .alpha(0.7f) .snippet(foodMarkerSnippet[i]) .title(foodMarkerTitle[i])); foodMarker[i].setVisible(foodInitiallyVisible); }; } // Method to toggle visibility of food symbols public void toggleFoodSymbols(){ foodIsVisible = !foodIsVisible; for(int i=0; i<numberFoodMarkers; i++){ foodMarker[i].setVisible(foodIsVisible); } } // Handle click events on markers @Override public boolean onMarkerClick(Marker marker) { Log.i(TAG, "Marker ID="+marker.getId()); Log.i(TAG, "Marker title="+marker.getTitle()); // By returning false we get the default behavior, which is to open a window // displaying the title and snippet associated with this marker. If instead // we handle the marker click in a custom way, we should return true. return false; } // Handle clicks on info windows that pop up when markers are clicked. First // identify the marker associated with the window by title and then take // appropriate action. In this case we illustrate by opening different // web pages that have no connection to the symbols, but in a realistic application // these would be links to relevant information for the symbol. @Override public void onInfoWindowClick(Marker marker) { int markerIndex = -1; Log.i(TAG, "Info window: Marker ID="+marker.getId()); Log.i(TAG, "Info window: Marker title="+marker.getTitle()); // Check whether it is an access marker for(int i=0; i<numberAccessMarkers; i++){ if(marker.getTitle().equals(accessMarkerTitle[i])){ markerIndex = i; Log.i(TAG,"Index of access marker whose window was clicked="+markerIndex); Intent j = new Intent(Intent.ACTION_VIEW); j.setData(uriAccess[markerIndex]); startActivity(j); marker.hideInfoWindow(); break; } } // Check whether it is a food marker for(int i=0; i<numberFoodMarkers; i++){ if(marker.getTitle().equals(foodMarkerTitle[i])){ markerIndex = i; Log.i(TAG,"Index of food marker whose window was clicked="+markerIndex); Intent j = new Intent(Intent.ACTION_VIEW); j.setData(uriFood[markerIndex]); startActivity(j); marker.hideInfoWindow(); break; } } } // Callback that executes when map is tapped, passing in the latitude // and longitude coordinates of the tap. This will be invoked // only if no overlays on the map intercept the click first. @Override public void onMapClick(LatLng latlng) { Log.i(TAG, "Map tapped: Latitude="+latlng.latitude +" Longitude="+latlng.longitude); } // This callback fires for long clicks on the map, passing in the LatLng coordinates // of the click. We will use it to launch a StreetView of the position corresponding to the // long press on the map. @Override public void onMapLongClick(LatLng latlng) { double lat = latlng.latitude; double lon = latlng.longitude; // Launch a Google StreetView on current location showStreetView(lat,lon); } /* Open a Street View, if available. The user will have the choice of getting the Street View in a browser, or with the StreetView app if it is installed. If no Street View exists for a given location, this will present a blank page. */ private void showStreetView(double lat, double lon ){ String uriString = "google.streetview:cbll="+lat+","+lon; Intent streetView = new Intent(android.content.Intent.ACTION_VIEW,Uri.parse(uriString)); startActivity(streetView); } // Handle clicks on toolbar menus @Override public boolean onOptionsItemSelected(MenuItem item) { if (map == null) { Toast.makeText(this, getString(R.string.nomap_error), Toast.LENGTH_LONG).show(); return false; } // Handle item selection switch (item.getItemId()) { // Load route case R.id.route_toggle: loadRouteData(); return true; // Toggle satellite overlay case R.id.satellite_route: int mt = map.getMapType(); if (mt == GoogleMap.MAP_TYPE_NORMAL) { map.setMapType(GoogleMap.MAP_TYPE_SATELLITE); } else { map.setMapType(GoogleMap.MAP_TYPE_NORMAL); } return true; // Toggle access markers case R.id.hc_toggle: toggleAccessSymbols(); return true; // Toggle eating markers case R.id.eat_toggle: toggleFoodSymbols(); return true; // Settings page case R.id.route_action_settings: // Actions for settings page Intent j = new Intent(this, Settings.class); startActivity(j); return true; default: return super.onOptionsItemSelected(item); } } /* Inner class to implement single task on background thread without having to manage the threads directly. Launch with "new RouteLoader().execute(new URL(urlString)". Must be launched from the UI thread and may only be invoked once. Adapted from example in Ch. 10 of Android Wireless Application Development. Use this to do data load from network on separate thread from main user interface to prevent locking main UI if there is network delay. The three argument types inside the < > are (1) a type for the input parameters (URL in this case), (2) a type for any published progress during the background task (String in this case), and (3) a type for the object returned from the background task (in this case it is type String). Each of these is understood to be an array of the corresponding type, so each can hold multiple entries. */ private class RouteLoader extends AsyncTask<URL, String, String> { @Override protected String doInBackground(URL... params) { // params is an array of URLs, but we need only the first entry since we are // passing just one argument in new RouteLoader().execute(new URL(urlString) try { URL text = params[0]; XmlPullParserFactory parserCreator; parserCreator = XmlPullParserFactory.newInstance(); XmlPullParser parser = parserCreator.newPullParser(); parser.setInput(text.openStream(), null); publishProgress("Parsing XML..."); int parserEvent = parser.getEventType(); int pointCounter = -1; int wptCounter = -1; double lat; double lon; int grade = -1; // Parse the XML returned on the network while (parserEvent != XmlPullParser.END_DOCUMENT) { switch (parserEvent) { case XmlPullParser.START_TAG: String tag = parser.getName(); if(tag.compareTo("number")==0){ numberRoutePoints = Integer.parseInt(parser.getAttributeValue(null,"numpoints")); totalWaypoints = Integer.parseInt(parser.getAttributeValue(null,"numwpts")); routePoints = new LatLng[numberRoutePoints]; routeGrade = new int[numberRoutePoints]; Log.i(TAG, " Total points = "+numberRoutePoints +" Total waypoints = "+totalWaypoints); warnPointSnippet = new String[totalWaypoints]; warnPointLatLng = new LatLng[totalWaypoints]; } if(tag.compareTo("trkpt")==0){ pointCounter ++; // Divide by 1e6 because on server in microdegrees and need degrees here lat = Double.parseDouble(parser.getAttributeValue(null,"lat"))/1e6; lon = Double.parseDouble(parser.getAttributeValue(null,"lon"))/1e6; grade = Integer.parseInt(parser.getAttributeValue(null,"grade")); routePoints[pointCounter] = new LatLng(lat, lon); routeGrade[pointCounter] = grade; Log.i(TAG," trackpoint="+pointCounter+" latitude="+lat+" longitude="+lon +" grade="+grade); } else if(tag.compareTo("wpt")==0) { // Store waypoint information about potential hazards wptCounter ++; // Divide by 1e6 because on server in microdegrees and need degrees here lat = Double.parseDouble(parser.getAttributeValue(null,"lat"))/1e6; lon = Double.parseDouble(parser.getAttributeValue(null,"lon"))/1e6; warnPointLatLng[wptCounter] = new LatLng(lat,lon); warnPointSnippet[wptCounter] = parser.getAttributeValue(null,"description"); Log.i(TAG," waypoint="+wptCounter+" latitude="+lat+" longitude="+lon +" "+warnPointSnippet[wptCounter]); } break; } parserEvent = parser.next(); } } catch (Exception e) { Log.i(TAG, "XML parsing failed", e); return "Failure"; } return "Finished"; } protected void onCancelled() { Log.i(TAG, "RouteLoader task Cancelled"); } // Executed after the thread run by doInBackground has returned. The variable result // passed is the string value returned by doInBackground. protected void onPostExecute(String result) { // Now that route data are loaded, execute the method to overlay the route on the map Log.i(TAG, "Route data transfer complete"); overlayRoute(); } // Executes before the thread run by doInBackground. This can be used to do any required // setup before the thread is executed. protected void onPreExecute() { Log.i(TAG,"Ready to load URL"); } // May be used to update progress as the background thread executes. We won't do anything // with it here since we are loading a very small XML file over the network but for a long // background task this can be used to keep the user informed of progress on the background // task. protected void onProgressUpdate(String... values) { super.onProgressUpdate(values); Log.i(TAG,"Progress:"+values[0]); } } }
package <YourNamespace>.mapexample;

import android.os.Bundle;
import android.support.v7.app.AppCompatActivity;

public class Settings extends AppCompatActivity {

    @Override
    protected void onCreate(Bundle savedInstanceState){
        super.onCreate(savedInstanceState);
        setContentView(R.layout.settings);
    }

}
package <YourNamespace>.mapexample;

import com.google.android.gms.common.ConnectionResult;
import com.google.android.gms.common.api.GoogleApiClient;
import com.google.android.gms.location.LocationListener;
import com.google.android.gms.location.LocationRequest;
import com.google.android.gms.location.LocationServices;
import com.google.android.gms.maps.CameraUpdateFactory;
import com.google.android.gms.maps.GoogleMap;
import com.google.android.gms.maps.OnMapReadyCallback;
import com.google.android.gms.maps.SupportMapFragment;
import com.google.android.gms.maps.model.CameraPosition;
import com.google.android.gms.maps.model.LatLng;

import android.content.Context;
import android.content.DialogInterface;
import android.content.Intent;
import android.content.pm.PackageManager;
import android.location.Location;
import android.net.Uri;
import android.os.Bundle;
import android.support.annotation.NonNull;
import android.support.v4.app.ActivityCompat;
import android.support.v7.app.AlertDialog;
import android.support.v7.app.AppCompatActivity;
import android.support.v7.widget.Toolbar;
import android.util.Log;
import android.view.Menu;
import android.view.MenuItem;
import android.view.WindowManager;
import android.widget.Toast;
import android.Manifest;


public class ShowMap extends AppCompatActivity implements
        GoogleApiClient.ConnectionCallbacks,
        GoogleApiClient.OnConnectionFailedListener,
        LocationListener,
        OnMapReadyCallback, GoogleMap.OnMapLongClickListener {

    // Update interval in milliseconds for location services
    private static final long UPDATE_INTERVAL = 5000;
    // Fastest update interval in milliseconds for location services
    private static final long FASTEST_INTERVAL = 1000;

    // User defines value of REQUEST_LOCATION. It will identify a permission request
    // specifically for ACCESS_FINE_LOCATION.  Define a different integer for each
    // "dangerous" permission that you will request at runtime (in this example there
    // is only one).

    final private int REQUEST_LOCATION = 2; // User-defined integer

    private static final String TAG = "Mapper";
    private static double lat;
    private static double lon;
    private static int zm;
    private static boolean trk;
    private static LatLng map_center;
    private GoogleMap map;
    private GoogleApiClient mGoogleApiClient;
    private Location myLocation;
    private double myLat;
    private double myLon;
    private LocationRequest mLocationRequest;
    private static final int dialogIcon = R.mipmap.ic_launcher;


    @Override
    protected void onCreate(Bundle savedInstanceState) {

        super.onCreate(savedInstanceState);
        setContentView(R.layout.showmap);

        Toolbar toolbar = (Toolbar) findViewById(R.id.my_toolbar);
        // Remove default toolbar title and replace with an icon
        if (toolbar != null) {
            toolbar.setNavigationIcon(R.mipmap.ic_launcher);
        }
        // Note: getColor(color) deprecated as of API 23
        toolbar.setTitleTextColor(getResources().getColor(R.color.barTextColor));
        toolbar.setTitle("");
        setSupportActionBar(toolbar);

        // Obtain the SupportMapFragment.  We will be notified when the map is ready to
        // be used in onMapReady().

        SupportMapFragment mapFragment = (SupportMapFragment) getSupportFragmentManager()
                .findFragmentById(R.id.the_map);
        mapFragment.getMapAsync(this);

        /* Create new location client. The first 'this' in args is the present
		 * context; the next two 'this' args indicate that this class will handle
		 * callbacks associated with connection and connection errors, respectively
		 * (see the onConnected, onDisconnected, and onConnectionError callbacks below).
		 * You cannot use the location client until the onConnected callback
		 * fires, indicating a valid connection.  At that point you can access location
		 * services such as present position and location updates. */

        mGoogleApiClient = new GoogleApiClient.Builder(this)
                .addApi(LocationServices.API)
                .addConnectionCallbacks(this)
                .addOnConnectionFailedListener(this)
                .build();

        // Create the LocationRequest object
        mLocationRequest = LocationRequest.create();
        // Set request for high accuracy
        mLocationRequest.setPriority(LocationRequest.PRIORITY_HIGH_ACCURACY);
        // Set update interval
        mLocationRequest.setInterval(UPDATE_INTERVAL);
        // Set fastest update interval that we can accept
        mLocationRequest.setFastestInterval(FASTEST_INTERVAL);

    }

    // This method will be called when the map is ready.  Only then can we
    // manipulate the map object.

    @Override
    public void onMapReady(GoogleMap googleMap) {
        map = googleMap;
        setupMap();
        initializeLocation();
    }

    // Method to set up map.

    public void setupMap() {

        // Initialize type of map
        map.setMapType(GoogleMap.MAP_TYPE_HYBRID);

        // Initialize 3D buildings enabled for map view
        map.setBuildingsEnabled(false);

        // Initialize whether indoor maps are shown if available
        map.setIndoorEnabled(false);

        // Initialize traffic overlay
        map.setTrafficEnabled(false);

        // Enable rotation gestures
        map.getUiSettings().setRotateGesturesEnabled(true);

        // Enable zoom controls on map [in addition to gesture controls like spread or double-
        // tap with 1 finger (to zoom in), and pinch or double-tap with two fingers (to zoom out)].

        map.getUiSettings().setZoomControlsEnabled(true);

        // Add a long-press listener to the map
        map.setOnMapLongClickListener(this);

        map.moveCamera(CameraUpdateFactory.newLatLngZoom(map_center, zm));
    }

    /* Method to initialize location services for the map.  For Android 6 (API 23) and
     beyond, we must check for the "dangerous" permission ACCESS_FINE_LOCATION at
     runtime (in addition to declaring it in the manifest file).  The following code checks
     for this permission.  If it has already been granted, it proceeds as normal.  If it
     has not yet been granted by the user, the user is presented with an opportunity to grant
     it. In general, the rest of this class will not execute until the user has granted such permission. */

    private void initializeLocation() {

        if (ActivityCompat.checkSelfPermission(this, Manifest.permission.ACCESS_FINE_LOCATION)
                != PackageManager.PERMISSION_GRANTED) {

            /* Permission has not been granted by user previously.  Request it now. The system
             will present a dialog to the user requesting the permission, with options "accept",
             "deny", and a box to check "don't ask again". When the user chooses, the system
             will then fire the onRequestPermissionsResult() callback, passing in the user-defined
             integer defining the type of permission request (REQUEST_LOCATION in this case)
             and the "accept" or "deny" user response.  We deal appropriately
             with the user response in our override of onRequestPermissionsResult() below.*/

            ActivityCompat.requestPermissions(this,
                    new String[]{Manifest.permission.ACCESS_FINE_LOCATION}, REQUEST_LOCATION);
        } else {
            Log.i(TAG, "Permission has been granted");

            myLocation = LocationServices.FusedLocationApi.getLastLocation(mGoogleApiClient);

        }
    }


    /*Following method invoked by the system after the user response to a runtime permission request
     (Android 6, API 23 and beyond implement such runtime permissions). The system passes to this
     method the user's response, which you then should act upon in this method.  This method can respond
     to more than one type permission.  The user-defined integer requestCode (passed in the call to
     ActivityCompat.requestPermissions) distinguishes which permission is being processed. */

    @Override
    public void onRequestPermissionsResult(int requestCode, String[] permissions, int[] grantResults) {

        // Since this method may handle more than one type of permission, distinguish which one by a
        // switch on the requestCode passed back to you by the system.

        switch (requestCode) {

            // The permission response was for fine location
            case REQUEST_LOCATION:
                Log.i(TAG, "Fine location permission granted: requestCode=" + requestCode);
                // If the request was canceled by user, the results arrays are empty
                if (grantResults.length > 0
                        && grantResults[0] == PackageManager.PERMISSION_GRANTED) {

                    // Permission was granted. Do the location task that triggered the
                    // permission request

                    initializeLocation();

                } else {
                    Log.i(TAG, "onRequestPermissionsResult - permission denied: requestCode=" + requestCode);

                    // The permission was denied.  Warn the user of the consequences and give
                    // them one last time to enable the permission.

                    showTaskDialog(1, "Warning!",
                            "This part of the app will not function without this permission!",
                            dialogIcon, this, "OK, Do Over", "Refuse Permission");
                }
                return;

        }
    }


	/* Method to change properties of camera. If your GoogleMaps instance is called map,
	 * you can use
	 *
	 * map.getCameraPosition().target
	 * map.getCameraPosition().zoom
	 * map.getCameraPosition().bearing
	 * map.getCameraPosition().tilt
	 *
	 * to get the current values of the camera position (target, which is a LatLng),
	 * zoom, bearing, and tilt, respectively.  This permits changing only a subset of
	 * the camera properties by passing the current values for all arguments you do not
	 * wish to change.
	 *
	 * */

    private void changeCamera(GoogleMap map, LatLng center, float zoom,
                              float bearing, float tilt, boolean animate) {

        CameraPosition cameraPosition = new CameraPosition.Builder()
                .target(center)         // Sets the center of the map
                .zoom(zoom)             // Sets the zoom
                .bearing(bearing)       // Sets the bearing of the camera
                .tilt(tilt)             // Sets the tilt of the camera relative to nadir
                .build();               // Creates a CameraPosition from the builder

        // Move (if variable animate is false) or animate (if animate is true) to new
        // camera properties.

        if (animate) {
            map.animateCamera(CameraUpdateFactory.newCameraPosition(cameraPosition));
        } else {
            map.moveCamera(CameraUpdateFactory.newCameraPosition(cameraPosition));
        }
    }

    // Set these data using this static method before launching this class with an Intent:
    // for example, ShowMap.putMapData(30,150,18,true);

    public static void putMapData(double latitude, double longitude, int zoom, boolean track) {
        lat = latitude;
        lon = longitude;
        zm = zoom;
        trk = track;
        map_center = new LatLng(lat, lon);
    }

    // Callback from GoogleApiClient indicating that a connection has been established

    @Override
    public void onConnected(Bundle bundle) {

        // Indicate that a connection has been established
        Toast.makeText(this, getString(R.string.connected_toast), Toast.LENGTH_SHORT).show();

        // Be certain that permission has previously been given for fine location
        if (ActivityCompat.checkSelfPermission(this, Manifest.permission.ACCESS_FINE_LOCATION)
                != PackageManager.PERMISSION_GRANTED && ActivityCompat.checkSelfPermission
                (this, Manifest.permission.ACCESS_COARSE_LOCATION)
                != PackageManager.PERMISSION_GRANTED) {

            return;
        }
        LocationServices.FusedLocationApi.requestLocationUpdates(
                mGoogleApiClient, mLocationRequest, this);

        myLocation = LocationServices.FusedLocationApi.getLastLocation(mGoogleApiClient);
        myLat = myLocation.getLatitude();
        myLon = myLocation.getLongitude();

        Log.i(TAG,"Location Services Connected: myLat="+myLat+" myLon="+myLon);

        if (trk) {
            startLocationUpdates();
        }
    }

    protected void startLocationUpdates() {

    }

    @Override
    public void onConnectionSuspended(int i) {

    }

    @Override
    public void onConnectionFailed(@NonNull ConnectionResult connectionResult) {

    }

    // Following callback associated with implementing LocationListener.
    // It fires when a location change is detected, passing in the new
    // location as the variable "newLocation".

    @Override
    public void onLocationChanged(Location location) {

    }

    /**
     * Method showTaskDialog() creates a custom alert dialog. This dialog presents text defining
     * a choice to the user and has buttons for a binary choice. Pressing the rightmost button
     * will execute the method positiveTask(id) and pressing the leftmost button will execute the
     * method negativeTask(id). You should define appropriate actions in each. (If the
     * negativeTask(id) method is empty the default action is just to close the dialog window.)
     * The argument id is a user-defined integer distinguishing multiple uses of this method in
     * the same class.  The programmer should switch on id in the response methods
     * positiveTask(id) and negativeTask(id) to decide which alert dialog to respond to.
     * This version of AlertDialog.Builder allows a theme to be specified. Removing the theme
     * argument from the AlertDialog.Builder below will cause the default dialog theme to be used. */

    private void showTaskDialog(int id, String title, String message, int icon, Context context,
                                String positiveButtonText, String negativeButtonText){

        final int fid=id;  // Must be final to access from anonymous inner class below

        AlertDialog.Builder builder = new AlertDialog.Builder(context,R.style.MyDialogTheme);
        builder.setMessage(message).setTitle(title).setIcon(icon);

        // Add the right button
        builder.setPositiveButton(positiveButtonText, new DialogInterface.OnClickListener() {
            public void onClick(DialogInterface dialog, int id) {
                positiveTask(fid);
            }
        });
        // Add the left button
        builder.setNegativeButton(negativeButtonText, new DialogInterface.OnClickListener() {
            public void onClick(DialogInterface dialog, int id) {
                negativeTask(fid);
            }
        });

        AlertDialog dialog = builder.create();
        dialog.show();
    }

    // Method to be executed if user chooses negative button. This returns to main
    // activity since there is no permission to execute this class.

    private void negativeTask(int id){

        // Use id to distinguish if more than one usage of the alert dialog
        switch(id) {

            case 1:
                // Warning that this part of app not enabled
                String warn ="Returning to main page. To enable this ";
                warn += "part of the app you may manually enable Location permissions in ";
                warn += " Settings > App > MapExample > Permissions.";
                // New single-button dialog
                showTaskDialog(2,"Task not enabled!", warn, dialogIcon, this, "", "OK");
                break;

            case 2:
                // Return to main page since permission was denied
                Intent i = new Intent(this, MainActivity.class);
                startActivity(i);
                break;
        }

    }

    // Method to execute if user chooses positive button ("OK, I'll Do It"). This starts the map
    // initialization, which will present the location permissions dialog again.

    private void positiveTask(int id){

        // Use id to distinguish if more than one usage of the alert dialog
        switch(id) {

            case 1:
                // User agreed to enable location
                initializeLocation();
                break;

            case 2:
                break;
        }

    }

    @Override
    public boolean onCreateOptionsMenu(Menu menu) {
        // Inflate the menu; this adds items to the tool bar if it is present.
        getMenuInflater().inflate(R.menu.showmap_menu, menu);
        return super.onCreateOptionsMenu(menu);
    }

    @Override
    public void onMapLongClick(LatLng latlng) {
        double lat = latlng.latitude;
        double lon = latlng.longitude;

        // Launch a StreetView on current location
        showStreetView(lat,lon);
    }

    /* Open a Street View, if available. The user will have the choice of getting the Street View
	 * in a browser, or with the StreetView app if it is installed. If no Street View exists
	 * for a given location, this will present a blank page. */

    private void showStreetView(double lat, double lon ){
        String uriString = "google.streetview:cbll="+lat+","+lon;
        Intent streetView = new Intent(android.content.Intent.ACTION_VIEW, Uri.parse(uriString));
        startActivity(streetView);
    }

    /* The following two lifecycle methods conserve resources by ensuring that location services
    are connected when the map is visible and disconnected when it is not.*/

    // Called by system when Activity becomes visible, so connect location client.

    @Override
    protected void onStart() {
        super.onStart();
        if(mGoogleApiClient != null) mGoogleApiClient.connect();
    }

    // Called by system when Activity is no longer visible, so disconnect location
    // client.

    @Override
    protected void onStop() {

        // If the client is connected, remove location updates and disconnect
        if (mGoogleApiClient.isConnected()) {
            mGoogleApiClient.disconnect();
        }
        mGoogleApiClient.disconnect();

        // Turn off the screen-always-on request
        getWindow().clearFlags(WindowManager.LayoutParams.FLAG_KEEP_SCREEN_ON);

        super.onStop();
    }

    // Deal with selections in the options menu

    @Override
    public boolean onOptionsItemSelected(MenuItem item) {

        if (map == null) {
            Toast.makeText(this, getString(R.string.nomap_error),
                    Toast.LENGTH_LONG).show();
            return false;
        }

        // Handle item selection
        switch (item.getItemId()) {
            // Toggle traffic overlay
            case R.id.traffic:
                map.setTrafficEnabled(!map.isTrafficEnabled());
                return true;
            // Toggle satellite overlay
            case R.id.satellite:
                int mt = map.getMapType();
                if (mt == GoogleMap.MAP_TYPE_NORMAL) {
                    map.setMapType(GoogleMap.MAP_TYPE_SATELLITE);
                } else {
                    map.setMapType(GoogleMap.MAP_TYPE_NORMAL);
                }
                return true;
            // Toggle 3D building display
            case R.id.building:
                map.setBuildingsEnabled(!map.isBuildingsEnabled());
                // Change camera tilt to view from angle if 3D
                if (map.isBuildingsEnabled()) {
                    changeCamera(map, map.getCameraPosition().target,
                            map.getCameraPosition().zoom,
                            map.getCameraPosition().bearing, 45, true);
                } else {
                    changeCamera(map, map.getCameraPosition().target,
                            map.getCameraPosition().zoom,
                            map.getCameraPosition().bearing, 0, true);
                }
                return true;
            // Toggle whether indoor maps displayed
            case R.id.indoor:
                map.setIndoorEnabled(!map.isIndoorEnabled());
                return true;
            // Settings page
            case R.id.action_settings:
                // Actions for settings page
                Intent j = new Intent(this, Settings.class);
                startActivity(j);
                return true;
            default:
                return super.onOptionsItemSelected(item);
        }
    }
}
That completes the input of code and resources for the project.
Let's now see how our application works and discuss how that functionality is implemented by the code we have just created. For purposes of discussion, we shall assume the application to be launched on a device having location services enabled, since testing location services using an emulator is possible but awkward. (See Simulating GPS Position for methods to simulate positioning at specific GPS coordinates if you must test on an emulator rather than actual device.) Launch the application on the device, which will give the entry screen already shown above:
|
|
If you insert latitude and longitude values in degrees in the second set of input fields and push the corresponding Go button, the map display screen should center on the location corresponding to the input latitude and longitude. For example, try
where you may have to change the map zoom for the best view.
| As an aside, here is one way to get precise longitude and latitude coordinates for arbitrary locations: Using Google Maps on your computer, navigate to the desired area, zoom to the desired level of precision, and click on the desired point. This should display a box with the latitude and longitude of the point. For well-known places, you can also just search for their latitude and longitude with the browser: type "latitude longitude Big Ben" into a browser, for example. Or the more modern equivalent on your phone: "OK Google, what is the latitude and longitude of the Eiffel Tower?" |
The Toolbar at the top of the display displays five options:
How many of these are displayed in the Toolbar at the top and how many are displayed in the overflow menu accessed by clicking the three vertical dots at the right of the Toolbar depends on our indicated preference in the programming and on the device. Our programming requests that the first four items be displayed in the top bar, if there is room, but for the last one to always be in the secondary overflow menu.
Then, for example, on a Galaxy Nexus phone with a 4.7" screen only the first two are displayed on the top bar (and the last three are relegated to the overflow menu) in portrait mode, and the first three are displayed on the top bar in landscape mode with two relegated to the overflow menu, but on a Nexus 7 tablet with a 7" screen the first four are displayed in the top bar in either portrait or landscape mode. The figure below shows the Toolbar and overflow menu for the Galaxy Nexus in landscape mode.
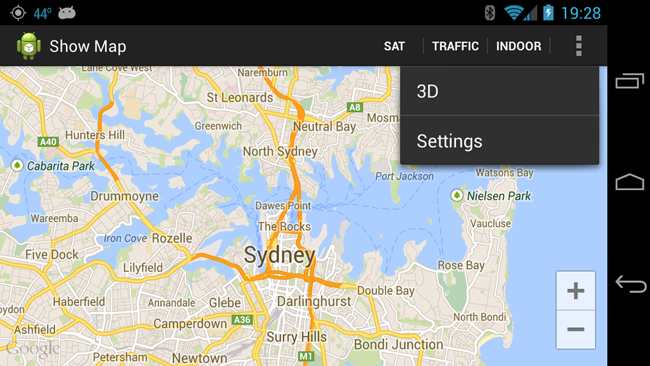
|
The figure below shows the satellite view toggled on (by clicking SAT in the Toolbar).

|
The figure below shows the traffic view toggled on (with green bands indicating little traffic congestion in either direction on the routes displayed).
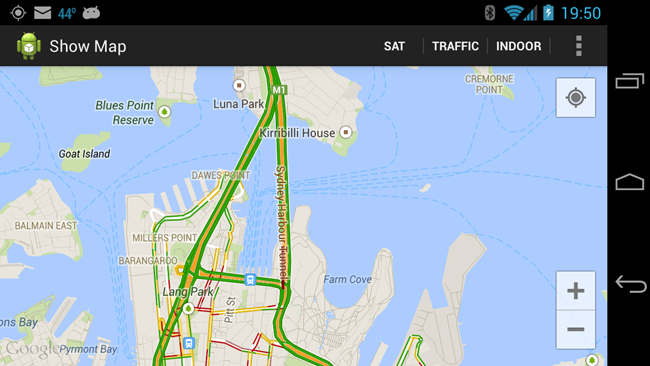
|
The Indoor toggle is relevant only if one is zoomed in on a building that has an indoor map registered with Google Maps. We shall discuss examples below.
The 3D toggle displays buildings in 3D outline (if available). For this view we also tilt the camera view of the map to an angle, rather than from directly overhead where we have it set for the other map views. An example of a 3D view is shown in the figure below.
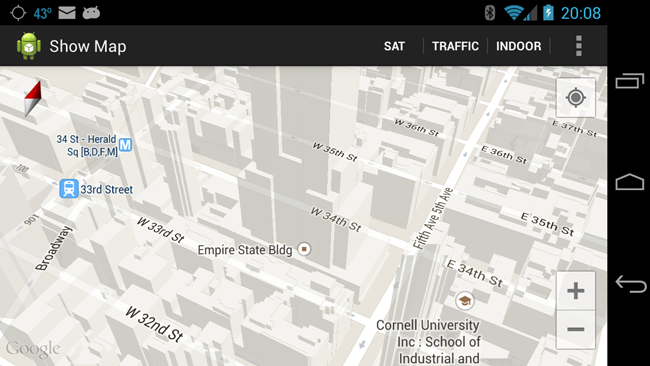
|
The screen displayed by the Settings option (in the overflow menu of the Toolbar) looks like the following:
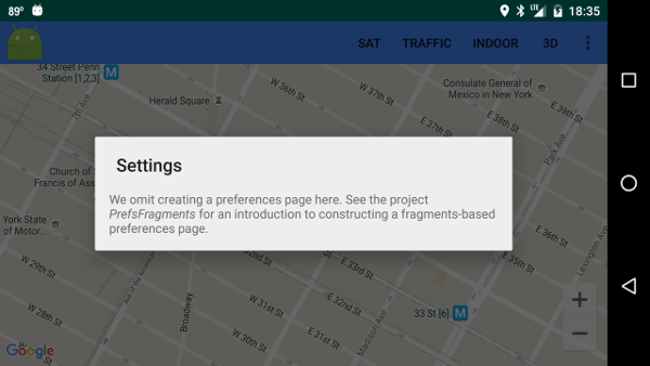
|
As indicated in the display, this is just a placeholder for a Settings interface, which we shall discuss in more depth in the project Dialogs, Alerts, and Notifications.
Now let's make it even simpler for the user to send this mapping application to a location of interest. It would be much easier to just type in "Mount Fuji", or "1516 Android Way", or "The Kremlin", rather than trying to figure out the latitude and longitude coordinates for locations. The Android/Google API in fact has classes that allow us to implement that capability with just a few lines of code. The most important resource is the Android Geocoder class, which is a class for handling geocoding and reverse geocoding:
Try entering the locations "hoover dam" or "brooklyn bridge" or "little mermaid" or "ord" (the airport identifier for Chicago O'Hare Airport) in the top input textfield and clicking Go. For example, the first two options executed on my Galaxy Nexus phone give the following figures.
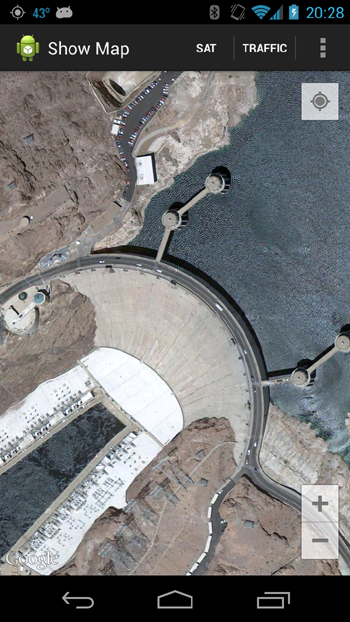 |
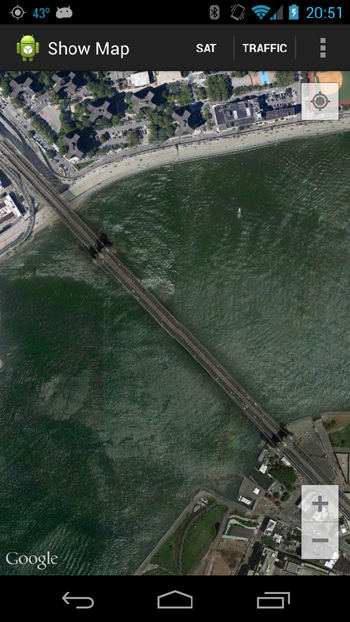 |
In the preceding examples, if you check the diagnostics sent to logcat you will see that in each of these cases a unique site was returned. But in general, a given name may correspond to more than one location. For example, if we enter the address 1101 Shevlin Drive (a street address where I once lived), the messages sent to the logcat output with Log.i() gave
06-15 13:16:19.592 I/Location-List( 8581): Raw String:
06-15 13:16:19.592 I/Location-List( 8581): Address[addressLines=[0:"1101 Shevlin Dr",1:"El Cerrito, CA
94530",2:"USA"],feature=1101,admin=California,sub-admin=Contra Costa,locality=El Cerrito,thoroughfare=Shevlin
Dr,postalCode=94530,countryCode=US,countryName=United
States,hasLatitude=true,latitude=37.91892,hasLongitude=true,longitude=-122.294027,phone=null,url=null,extras=null]
06-15 13:16:19.592 I/Location-List( 8581): Address[addressLines=[0:"1101 Shevlin Dr",1:"Wayzata, MN
55391",2:"USA"],feature=1101,admin=Minnesota,sub-admin=Hennepin,locality=Wayzata,thoroughfare=Shevlin
Dr,postalCode=55391,countryCode=US,countryName=United
States,hasLatitude=true,latitude=44.964079,hasLongitude=true,longitude=-93.5790595,phone=null,url=null,extras=null]

06-15 13:16:19.592 I/Location-List( 8581): Options:
06-15 13:16:19.592 I/Location-List( 8581): (1) 1101 Shevlin Dr, El Cerrito, CA 94530, United States
06-15 13:16:19.592 I/Location-List( 8581): (2) 1101 Shevlin Dr, Wayzata, MN 55391, United States
So two options have been returned, one in El Cerrito, California, and one in Wayzata, Minnesota. With the way we have set the code up, it will always send the map to the first option (which is my old address in this case; I lived in California, not Minnesota). We can see from this output that it would not be too difficult to use the information that has been extracted to present to the user a choice list (already contained in the array optionArray) when there is more than one option, so that the user can select the correct one. That is left as an exercise.
| It would be good practice in an actual applications to call geocoding (and reverse geocoding discussed below) on a thread separate from your primary UI thread (see the Geocoder documentation). The getFromLocationName and getFromLocation methods of Geocoder throw both IllegalArgumentException and IOException. These could be caught and used to make a more user-friendly application (we are already catching the IOException, but not using it except for diagnostic output). |
If one goes to a location using either explicit coordinates or geocoding and long-presses on the map returned, a Google Street View is launched on that location. For example, typing in "golden gate bridge" gives a map view of the center of the Golden Gate Bridge. A long press on the bridge roadway returns a 360 degree Street View from the middle of the bridge, as illustrated in the following image.
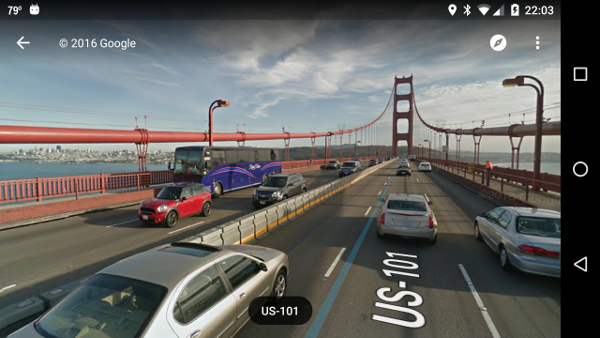
|
Since one is now in Street View, its full capabilities to pan the image in any direction are available. To return to our app, hit the Back button (back arrow at bottom, typically) on the device.
Many places now have indoor Street Views (there is a procedure for individuals to produce and upload Street Views). For example, type into the geocoding field (the top one on the main interface) "1434 California Street, Denver" and click Go. In the resulting image, long-press on the nearest (small) building to the map center. You should obtain the following indoor Street View of the Bubba Gump Shrimp Company:
|
Notice in the lower left the buttons that allow selection of Street Views for the first or second floor of the building.
The code implementing the functionality of the preceding two subsections is contained in MainActivity.java and ShowMap.java. As should be familiar from previous applications, in MainActivity we extend AppCompatActivity (a subclass of Activity) and implement the OnClickListener interface, which requires that we override the method OnClick (View v) to handle clicks on the view. In the onCreate method we
A Menu can be instantiated from an XML file using MenuInflater; see Menus and the discussion of Menus in Android User Interfaces for more details. In the method onCreateOptionsMenu we use the getMenuInflater method of Activity to return a MenuInflater, and then use its inflate() method to populate the Toolbar menu at the top (with layout specified by res/menu/main.xml).
The method onOptionsItemSelected is then used to process clicks on the items added to the Toolbar by using a switch statement to decide which button was clicked, and the method onClick is used in a similar way to decide which button in the main layout was clicked. The corresponding actions are generally implemented by Intents that launch new classes using the startActivity method of Activity.
The geocoding example is implemented by the method geocodeLocation, which instantiates the class Geocoder as the instance gcoder and uses that in conjunction with an Iterator to populate a List containing the possible matches (Address is an Android class that represents a location address as a set of strings). For our purposes in this example, we simply use the first entry in the list returned by the geocoder and send the map to that location. In a realistic application one would want to display the list and permit the user to choose among the possibilties.
The code in ShowMap.java is representative of how maps are embedded in this and other classes in this project. The class extends FragmentActivity, which is a subclass of Activity. Our maps are embedded using a MapFragment, which extends Fragment.
|
A Fragment represent a piece of an application's user interface that can be placed inside an Activity. This leads to flexible layout deployment across devices with different formfactors.
One interacts with a fragment through a
FragmentManager, which can be obtained using
Activity.getFragmentManager() or
Fragment.getFragmentManager().
A fragment may be thought of as a modular piece of an activity, which
|
A MapFragment is a wrapper around a map view that handles the necessary life cycle needs. It represents the simplest way to embed a map in an application. As we have seen in res/layout/showmap.xml, a map fragment can be embedded simply in the layout as
<LinearLayout xmlns:android="http://schemas.android.com/apk/res/android"
    xmlns:tools="http://schemas.android.com/tools"
    android:orientation="vertical" android:layout_width="match_parent"
    android:layout_height="match_parent">

    <android.support.v7.widget.Toolbar
        android:id="@+id/my_toolbar"
        android:layout_height="wrap_content"
        android:layout_width="match_parent"
        android:elevation="0dp"
        android:minHeight="?attr/actionBarSize"
        android:background="@color/barColor" />

    <fragment xmlns:android="http://schemas.android.com/apk/res/android"
        xmlns:tools="http://schemas.android.com/tools"
        android:id="@+id/the_map"
        android:name="com.google.android.gms.maps.SupportMapFragment"
        android:layout_width="match_parent"
        android:layout_height="match_parent"
        tools:context="com.lightcone.mapexample.ShowMap"
        tools:layout="@layout/showmap" />


</LinearLayout>
Then a reference to this map fragment can be obtained in the following way.
SupportMapFragment mapFragment = (SupportMapFragment) getSupportFragmentManager()
                .findFragmentById(R.id.the_map);

mapFragment.getMapAsync(this);
ShowMap extends AppCompatActivity, which extends FragmentActivity, which extends Activity. In the first statement above the method getSupportFragmentManager(), which ShowMap inherits from FragmentActivity, returns a FragmentManager, and the findFragmentById(R.id.the_map) method of the FragmentManager returns a Fragment corresponding to the fragment identified by the android:id="@+id/the_map" attribute in showmap.xml. This Fragment can then be cast to a SupportMapFragment (which extends Fragment). Thus, the variable mapFragment now holds a reference to our map fragment of type SupportMapFragment .
However, this map fragment is not manipulated directly. Instead we call in the second statement above the getMapAsync (OnMapReadyCallback callback) method of SupportMapFragment, which takes as an argument a callback method that will be triggered when the map is ready for interaction. But ShowMap implements the OnMapReadyCallback interface and hence must implement its method onMapReady (GoogleMap googleMap) [Hence the reference to the present (ShowMap) object, this.] This is a callback triggered by the system when the map is ready to use, and it passes in a reference googlemap to the GoogleMap.
Once the GoogleMap is available (the callback onMapReady has fired), we initialize it in the method initializeMap() by using various methods of the GoogleMap class. For example, in the chained expression
map.getUiSettings().setRotateGesturesEnabled(true);
the GoogleMap method getUiSettings() returns a UISettings instance containing the settings of the current map user interface and then the setRotateGesturesEnabled (boolean) method of UISettings enables rotation gestures on the map (the orientation of the map can be rotated by touching with two fingers and twisting).
The static method putMapData() is used by other classes to specify map data before they use ShowMap.class to display a map.
The method changeCamera() uses methods of the classes
to define new views for the camera view of the map, and then the camera is moved using the GoogleMap methods
where the CameraUpdate required in the arguments is generated by CameraUpdateFactory through its newCameraPosition() method.
| Let us also note that location services have been implemented in ShowMap.java. At present they are used only to log a statement giving the current latitude and longitude of the user when ShowMap starts, but their implementation is included for potential additional future capability. (For example, the position of the observer could be used to determine the distance to a point accessed by geocoding, or to determine an optimal route from the observer to that point.) Because determining location is a "dangerous" permission, this also requires the implementation of runtime permissions in ShowMap. Implementing location services and runtime permissions will be discussed in detail below for the class MapMe, and a similar discussion applies to location services and runtime permissions in ShowMap. |
Launching Google StreetViews in ShowMap.java is rather straightforward. We have implemented a long-press listener and used long-press events to extract the latitude and longitude and then passed that to an Intent defined in the method showStreetView(double latitude, double longitude).
| Display and manipulation of map fragments in other classes of this project will use similar approaches as described above. A more extensive discussion of managing map views may be found in the developer guide Camera and View. |
Not only can one do very powerful things with maps themselves, but it is possible to overlay additional location-context information on an arbitrary map. Let's introduce the concept by simply displaying a map and placing location-specific markers on it. Launch the app on a device having location services and click the button Map With Markers. This generates a display as follows:
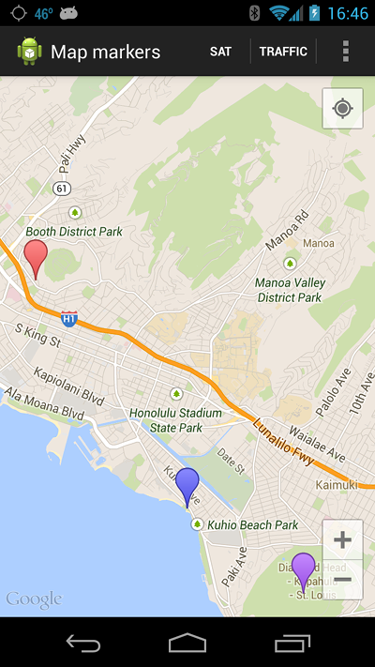
|
which shows a map centered on Honolulu, Hawaii. Standard map zoom controls (lower right) and a control to center the camera on the current location of the user (upper right) are displayed. The Toolbar at the top displays options that we have already described above, so you can toggle satellite view and traffic view (displayed in the top Toolbar), and also 3D and indoor (hidden in the overflow menu that can be accessed by clicking the three vertical dots at the right of the Toolbar).
In addition, three markers in different colors are illustrated, inserted with programming that will be descibed below. If one clicks on a marker the map centers on that marker and an information window is displayed, as illustrated in the following image.

|
If one clicks on the displayed window, a webpage is launched with information about the location indicated by the marker.
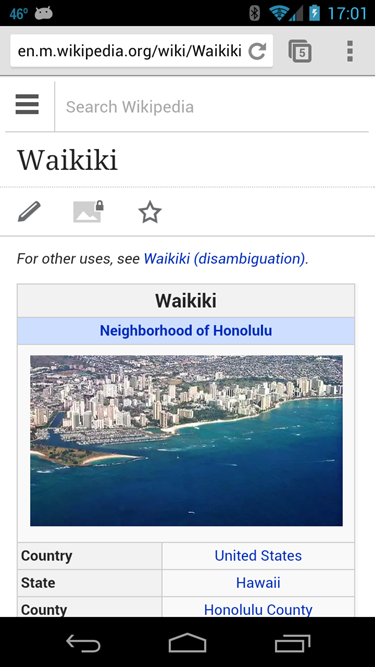
|
The code that accomplishes this is all contained in the class file MapMarkers.java, which will now be described.
Much of the map manipulation in MapMarkers.java is similar to that described above for ShowMap.java. The basic new ingredients involve the addition of Marker objects with properties specified through instances of MarkerOptions.
| For an overview of using markers in Google Maps, see the Markers developer guide and the code samples referenced there. |
The method addMapMarkers() illustrates the basic technique of adding a marker to the map with a characteristic code segment of the form
private final LatLng diamond_head = new LatLng(21.261941,-157.805901);

map.addMarker(new MarkerOptions()
   .title("Diamond Head")
   .snippet("Extinct volcano; iconic landmark")
   .position(diamond_head)
   .icon(BitmapDescriptorFactory.defaultMarker(BitmapDescriptorFactory.HUE_VIOLET))
   );
The GoogleMap method addMarker (MarkerOptions) adds a marker to the map with the properties specified by the argument of type MarkerOptions. In the argument of addMarker in the above expression the constructor is used to create a MarkerOptions object, which is then chained with MarkerOptions methods such as title to set the properties:
If the argument of icon(BitMapDescriptor) is null the default icon is used. In the above example we have instead used the static method defaultMarker(float hue) of BitmapDescriptorFactory to create a BitmapDescriptor of a custom icon by changing the color of the default icon to that specified by the constant HUE_VIOLET of the BitmapDescriptorFactory class.
| Greater levels of marker customization than demonstrated here (including substitution of your own icons specified by resource images) are possible using other methods of BitmapDescriptorFactory. Some of these will be illustrated in the class RouteMapper. |
A useful feature of Google Maps is the ability to view indoor maps of many facilities. One does not really have to do anything special to accomplish this, except to set the variable map.setBuildingsEnabled(Boolean) to true. Clicking the button Indoor Map Example provides an example. This is an ordinary map view, but under sufficiently high zoom (if INDOOR is toggled on in the Toolbar) an indoor map of the Honolulu International Airport appears in place of the normal view, with an option to display the first or second floor:
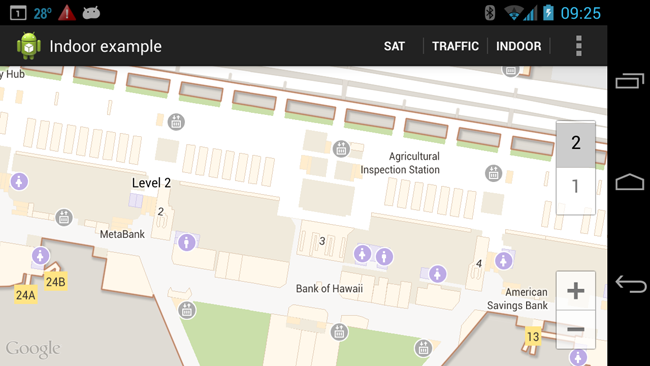
|
If you leave INDOOR on and toggle SAT on in the Toolbar (and zoom out one level for perspective), the resulting image changes to
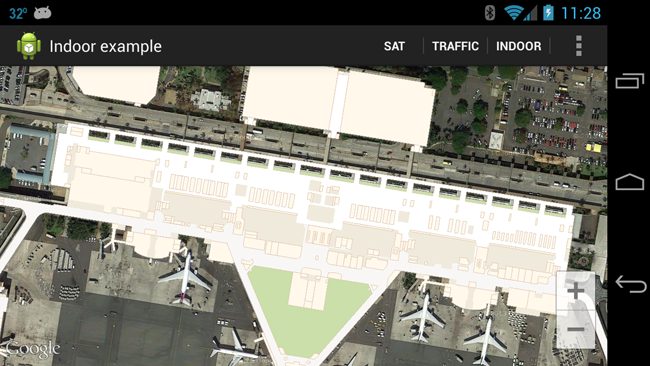
|
which shows the indoor map in relation to the actual view of the airport from directly overhead.
An overview of indoor maps may be found in the
Indoor maps document. In particular, you can find there
|
Between indoor maps and external 360-degree StreetViews, it is often possible to get a reasonable feeling for the appearance of a facility without ever going there.
The coding implementing the indoor maps example is contained primarily in IndoorExample.java. Since indoor maps are handled largely in the same way as normal maps (except that we should set the boolean to true in the GoogleMap method setIndoorEnabled(boolean)), the coding in IndoorExample.java contains no significant features that are not already described in our discussion of the other classes in this project.
Clicking on the button Route Overlay On Map should bring up a map display centered on the University of Tennessee Knoxville campus (which should display a transient Toast indicating that location services have been initialized).

|
In this example we have replaced the text labels in the Toolbar from earlier examples with more compact image symbols: reading from left to right,
Because of the more compact display of the icons relative to text, all four options that we indicated a desire to be visible on the Toolbar (if possible) are displayed, even on a phone in portrait mode. Clicking both the knife/fork and wheelchair icons gives the following display:
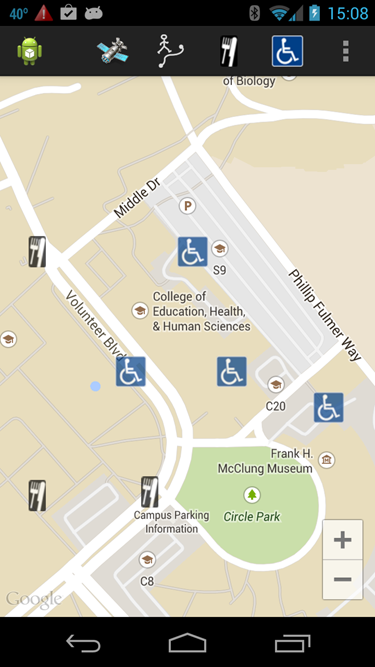
|
Note: the food and handicapped accessible symbols are only representative examples of how to do this and are placed at arbitrary locations; they don't necessarily indicate services available at those specific points at this location.
Clicking the icons on the Toolbar again will toggle the symbols displays off. If instead one clicks on one of the icons an information window opens, as in the following example,

|
with a programmer-specified title and snippet of information. If one clicks on the map background the information window closes but a click on the information window instead will launch a webpage. In this example, the title, snippet of information, and linked website for the window are just place-holder examples, but clearly this provides a method to identify locations on the map with a short description, and a link to a website with more information.
If one clicks on the walking-path symbol in the Toolbar the device sends to a server the beginning and ending points of a desired path and receives in return the path from a server and displays the route on the map, as indicated below:

|
(Note that in this basic example we have not added the capability to remove the path overlay from the map once added. In a realistic application one would typically want to add this capability but we leave that as an exercise.)
| The file returned for this example is simply a static XML file residing on the server that specifies an optimal walking path between two buildings on campus (the Department of Art and Architecture and the Department of Physics and Astronomy, to be specific). In a realistic application the server would compute the optimal path from the end-point information sent from the mobile device and send the XML specifying the computed path to the mobile device. Since we are concerned here only with the mobile-device side of the problem, it is irrelevant for us how the XML was generated on the server; we just need to know how to interepret and display the corresponding results. |
The path displayed also is color-coded for slope, based on information returned from the server, with flatter portions in blue and the steepest portions in red. This information would be relevant, for example, if our application was displaying optimal paths to get from one location to another for persons who could walk only with difficulty, or who required use of a wheelchair.
There is additional information returned in the XML route information about potential hazards such as areas of construction. That information has been displayed as two red markers on the map. If a marker is clicked, information is displayed in a window. For example,
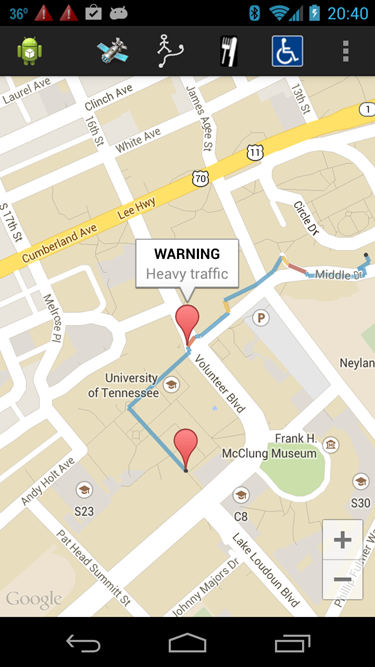
|
indicating that there is heavy traffic where the path crosses a street. The XML defining the sample route that is returned by the server corresponds to
<?xml version="1.0" encoding="utf-8" standalone="yes"?>
<number numpoints="23" numwpts="2"></number>
<wpt lat="35952967" lon="-83929158" description="Construction"></wpt>
<wpt lat="35955038" lon="-83929126" description="Heavy traffic"></wpt>
<trk>
<trkseg>
	<trkpt lat="35952967" lon="-83929158" grade="1"></trkpt>
	<trkpt lat="35954021" lon="-83930341" grade="1"></trkpt>
	<trkpt lat="35954951" lon="-83929075" grade="1"></trkpt>

	<trkpt lat="35955038" lon="-83929126" grade="4"></trkpt>
	<trkpt lat="35955203" lon="-83928973" grade="1"></trkpt>
	<trkpt lat="35955212" lon="-83928855" grade="1"></trkpt>
	<trkpt lat="35955603" lon="-83928273" grade="2"></trkpt>
	<trkpt lat="35955807" lon="-83928369" grade="1"></trkpt>
	<trkpt lat="35955974" lon="-83927943" grade="1"></trkpt>
	<trkpt lat="35956063" lon="-83927720" grade="1"></trkpt>
	<trkpt lat="35956291" lon="-83927358" grade="1"></trkpt>
	<trkpt lat="35956471" lon="-83927229" grade="1"></trkpt>

	<trkpt lat="35956541" lon="-83927176" grade="2"></trkpt>
	<trkpt lat="35956397" lon="-83927044" grade="3"></trkpt>
	<trkpt lat="35956274" lon="-83926685" grade="1"></trkpt>
	<trkpt lat="35956213" lon="-83926642" grade="1"></trkpt>
	<trkpt lat="35956239" lon="-83926261" grade="1"></trkpt>
	<trkpt lat="35956202" lon="-83925722" grade="1"></trkpt>
	<trkpt lat="35956226" lon="-83925467" grade="1"></trkpt>
	<trkpt lat="35956343" lon="-83925502" grade="1"></trkpt>
	<trkpt lat="35956324" lon="-83925617" grade="1"></trkpt>

	<trkpt lat="35956445" lon="-83925379" grade="1"></trkpt>
	<trkpt lat="35956567" lon="-83925450" grade="1"></trkpt>
</trkseg>
</trk>
which is available in the file sampleRouteXML.xml, or by pasting the address
http://eagle.phys.utk.edu/reubendb/UTRoute.php?lat1=35952967&lon1=-83929158&lat2=35956567&lon2=-83925450/span>
into a browser and then viewing the page source of the page returned by the browser (in either case the browser display will probably give an error unless it is set specifically to render XML, but look at the page source which should display the raw XML).
The various pieces of this application use Google Play Services. The primary entry point for Google Play Services integration is GoogleApiClient, which is implemented in conjunction with
For an overview, see Accessing Google APIs.
The Google API Client provides a common entry point to all the Google Play services and manages the network connection between the user's device and each Google service. Schematically, the relationship is illustrated in the following figure.
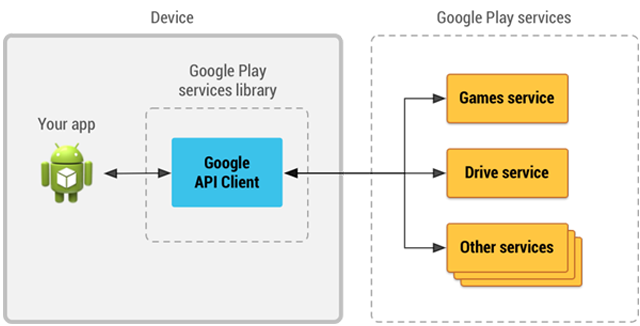
|
A GoogleApiClient is created using GoogleApiClient.Builder as follows.
private GoogleApiClient locationClient;

locationClient = new GoogleApiClient.Builder(this)
	.addApi(LocationServices.API)
	.addConnectionCallbacks(this)
	.addOnConnectionFailedListener(this)
	.build();
The first 'this' in the arguments is the present context; the next two indicate that the present class will handle the callbacks associated with connection and connection errors, respectively (see the onConnected, onDisconnected, and onConnectionError callbacks in Routemapper.java). You cannot use the Google API service until the onConnected callback fires, indicating a valid connection.
The class Routemapper extends AppCompatActivity and must implement a number of interfaces to achieve its functionality:
public class RouteMapper extends AppCompatActivity implements
	GoogleApiClient.ConnectionCallbacks,
	GoogleApiClient.OnConnectionFailedListener,
	GoogleMap.OnMarkerClickListener, OnMapReadyCallback,
	GoogleMap.OnInfoWindowClickListener,
	GoogleMap.OnMapLongClickListener,
	com.google.android.gms.maps.GoogleMap.OnMapClickListener {
These include
The food and handicap access markers are handled much as in MapMarkers.java, except that the relevant quantities are placed in arrays here so that they can be processed as groups. We implement in the method onMarkerClick(Marker marker) the default behavior, which causes an info window containing the information stored in the title and snippet arrays to be displayed. In addition, we process clicks on the open info window of a marker using the onInfoWindowClick(Marker marker) method. In that case, we identify the marker through its title and take appropriate action. In the present example, this just consists of opening some arbitrary web pages, but in an actual application these would be pages providing additional information about the location of the clicked symbol. For example, if the symbol is a food symbol representing the location of a restaurant, clicking on the marker would open the info window with the name of the restaurant and a snippet of information about it, and clicking on that window could open the full webpage of the restaurant or other appropriate links.
In the class Routemapper extensive use is made of custom icons, both for the buttons of the Toolbar (where all the displayed buttons are represented by icons without text), and for the food and handicap access overlay markers. The required icon bitmaps are stored in res/drawable. For the Toolbar they are accessed by appropriate references in the menu layout file res/menu/routemapper_menu.xml. For example,
    <item
        android:id="@+id/route_toggle"
        android:icon="@drawable/route_icon"
        android:orderInCategory="10"
        android:showAsAction="always"
        android:title="@string/route_toggle_label"/>
where the icon property shown in red references the image file res/drawable/route_icon.png. For the markers, the images to use for the markers is specified by the icon method of MarkerOptions, as illustrated by the line marked in red in the following code
   for(int i=0; i<numberAccessMarkers; i++){
         accessMarker[i] = map.addMarker(new MarkerOptions()
         .position(accessLoc[i])
         .icon(BitmapDescriptorFactory.fromResource(R.drawable.accessibility))
         .draggable(false)
         .alpha(0.7f)
         .snippet(accessMarkerSnippet[i])
         .title(accessMarkerTitle[i]));
         accessMarker[i].setVisible(accessInitiallyVisible);
   }
where the static fromResource() method of BitmapDescriptorFactory has been used to specify the bitmap resource res/drawable-hdpi/accessibility.png.
The retrieval of a route as XML from a server is handled on a background thread using AsyncTask. (A general discussion of processes and threaded programming in Android may be found in the Processes and Threads developer guide.) This is implemented in the inner class RouteLoader (which extends AsyncTask), and is well documented in the code comments for that class.
| AsyncTask is an abstract class that must be subclassed to be used. An asynchronous task is defined to be one that runs on a background thread but publishes its results on the main UI thread. The class AsyncTask permits this to be done in rather blackbox fashion, since it performs background operations and publishes results on the UI thread without the user having to manipulate threads and/or handlers directly (that is being done for you under the hood). |
The parsing of the XML stream in the inner class RouteLoader is handled primarily by XmlPullParser and XmlPullParserFactory, with the parsing API documentation and usage example given at the XML Pull Parsing site. These are used to parse the incoming XML and put the information defining the route into arrays routePoints[] and routeGrade[] and the information defining the warning waypoints in warnPointLatLng[] and warnPointSnippet[]. The route is then drawn segment by segment and the warning waypoints added by using loops over these arrays in the method overlayRoute(), with Polyline and PolylineOptions used to draw the route as a series of color-coded segments and Marker used to deploy the warning waypoints on the map.
Click on the button Map Current Location. Once Location Services are started (indicated by a Toast) the map center should animate to your current location (indicated by a blue dot), as illustrated in the following figure:
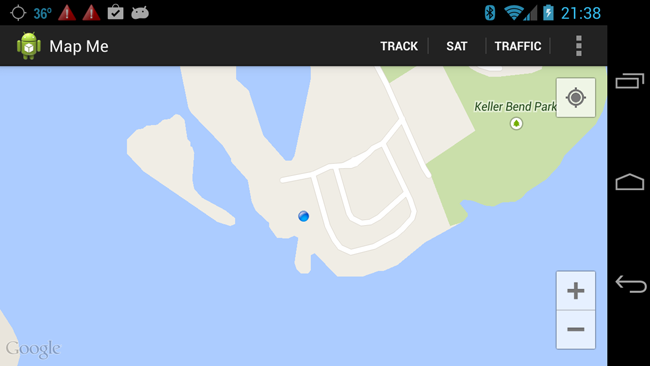
|
You can test that location services are indeed active if you drag the map to the side. You should find that it quickly re-centers on the present location, since the location services are supplying position updates continuously.
The items in the Toolbar and its overflow dropdown (SAT, TRAFFIC, ...) are the same as described earlier, except for the TRACK button, which toggles location tracking on and off. As long as it is not toggled off, if you move with the device the blue dot should turn into an arrow indicating direction of motion and the map should animate to track you, with your position always in the center, the direction of the arrow indicating the direction of motion, and with the orientation of the map display changing continuously to orient the top of the map in the direction of motion (if you are moving at a speed greater than 1 meter/second).
Disable location tracking by clicking the TRACK toggle on the Toolbar so that you can drag the map to new positions without the location tracker immediately returning it to your present location. If you tap at any point on the map, you should find that a brief Toast appears showing the latitude and longitude for that point. If instead you long-press on a location, you should get a popup window indicating the address of the location (obtained by capturing the latitude and longitude coordinates and doing a reverse geocode on those coordinates).
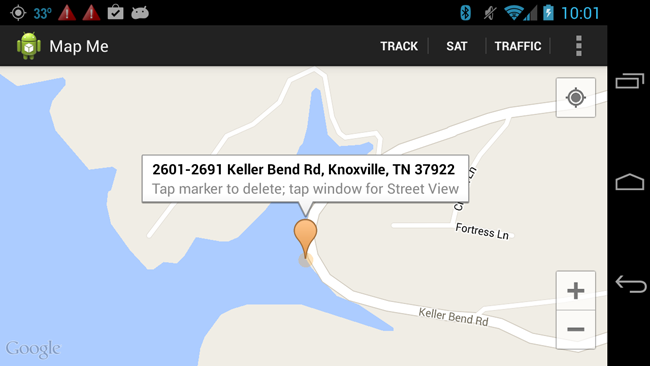
|
The location of the marker indicates the position and the cirle around the base of the marker indicates the present uncertainty in determining the position (there is a little uncertainty in the above image because the phone was indoors when this shot of its screen was taken). As indicated in the window, if you tap the marker it and its window will be deleted, but if you tap the marker's information window the application will attempt to open a Google Street View on the location. If no Street View exists for this particular location you will just get a blank screen, but if a Street View exists it will be displayed, as in the following figure.
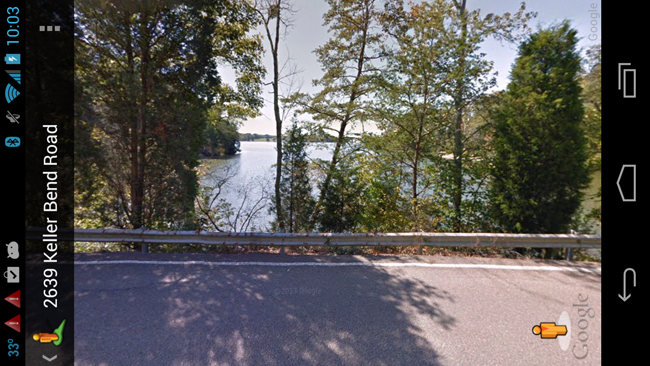
|
In this case our app has used an Intent to launch a separate application (typically Street View, if it is installed on the device, or a browser displaying a Street View). Thus, the controls now available are those of Street View. You should be able to return to our application by clicking the Android Back button.
For Android 6 (API 23) and beyond, we must check for "dangerous" permissions such as ACCESS_FINE_LOCATION at runtime (in addition to declaring it in the manifest file, as has always been the case). The code in MapMe.java will require runtime permissions because it uses the "dangerous" permission ACCESS_FINE_LOCATION. We shall now discuss code that checks for this permission. If it has already been granted, it proceeds as normal. If it has not yet been granted by the user, the user is presented with an opportunity to grant it. In general, the rest of this class will not execute until the user has granted such permission.
Since the class MapMe will not execute without the runtime permission, we go ahead and seek it upfront. After the map has been returned in onMapReady(GoogleMap googlemap), the method checkForPermissions( ) is executed:
public void checkForPermissions( ){

        if (ActivityCompat.checkSelfPermission(this, Manifest.permission.ACCESS_FINE_LOCATION)
                != PackageManager.PERMISSION_GRANTED) {

             /* Permission has not been granted by user previously.  Request it now. The system
             will present a dialog to the user requesting the permission, with options "accept",
             "deny", and a box to check "don't ask again". When the user chooses, the system
             will then fire the onRequestPermissionsResult() callback, passing in the user-defined
             integer defining the type of permission request (REQUEST_LOCATION in this case)
             and the "accept" or "deny" user response.  We deal appropriately
             with the user response in our override of onRequestPermissionsResult() below.*/

            ActivityCompat.requestPermissions(this,
                    new String[]{Manifest.permission.ACCESS_FINE_LOCATION}, REQUEST_LOCATION);

        } else {
	    // Do what you would do if this check had not been made.
        }
}
In this code, if the initial check implemented by ActivityCompat.checkSelfPermission (which ActivityCompat inherits from ContextCompat) is passed, the system has determined that the user has given this runtime permission previously for this app. Hence, we may proceed as if the check had never been made.
It is a little more complicated if the test is not passed. Then we wish for the system to present a dialog to the user asking them to accept the permission. This is accomplished by invoking the ActivityCompat.requestPermissions method, which takes as arguments the permission to be requested (ACCESS_FINE_LOCATION in this case), and an integer chosen by the programmer to identify this request (REQUEST_LOCATION, which we have chosen to be equal to 2 in MapMe.java). The system launches a dialog asynchronously, with the choices shown below.
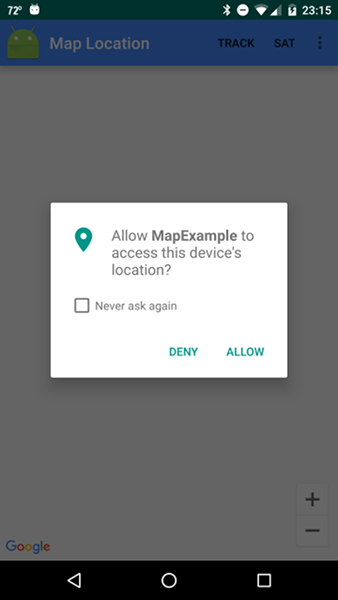
|
After the user responds, the system triggers the callback onRequestPermissionsResult, passing in the results of the user's response. We have overridden this callback to deal with the response, as shown below.
public void onRequestPermissionsResult(int requestCode, String[] permissions, int[] grantResults) {

	switch(requestCode) {

		case REQUEST_LOCATION:       // Permission response was for fine location

		// If the request was canceled by user, the results arrays are empty

		if(grantResults.length > 0
			&& grantResults[0] == PackageManager.PERMISSION_GRANTED){

			// Permission was granted. Do the location task that triggered permission request

			initializeLocation();

		} else {

			// The permission was denied.  Warn the user of the consequences and give
			// them one last time to enable the permission.

			showTaskDialog(1, "Warning!",
				"This part of the app will not function without this permission!",
				dialogIcon, this, "OK, Do Over", "Refuse Permission");
		}
		break;

		// Additional cases here if more than one permission will be requested.
	}
}
In this callback the system passes back to us in the variable requestCode the integer that we passed to it to identify the permission request. The switch statement is because in the general case more than one permission might be requested (for example, to determine fine location and to read the user's contacts), each identified by a different user-chosen integer. This logic isn't actually necessary here since only one runtime permission is being sought, but we have written the override in a form capable of dealing with the more general case.
Once it is determined that this is indeed the response to the fine location permission (requestCode = REQUEST_LOCATION), there are again two options.
We have defined the method showTaskDialog(index, title, context, message, acceptText, refuseText) to show general alert dialogs to the user, where index labels the request (we may wish to use this method to show more than one dialog in the same class), context is the present context (typically this), acceptText is the label for the accept button, and denyText is the label for the reject button. The version of this dialog corresponding to the second choice above is illustrated in the following figure.

|
The dialog generated by showTaskDialog invokes the method negativeTask() to respond if the user chooses "REFUSE PERMISSION" and the method positiveTask() if the user chooses "OK, DO OVER" from this dialog:
// Method to execute if user chooses negative button (REFUSE PERMISSION). This returns to main
// activity since no permission has been given to execute required methods of this class.

    private void negativeTask(int id){

        // Use id to distinguish if more than one usage of the showTaskDialog in same class

        switch(id) {

            case 1:
                String warn = "The purpose of this part of the app is to determine your ";
                warn += "location.  Hence it cannot function unless you grant the requested ";
                warn += "permission. Returning to app homescreen. To enable this ";
                warn += "part of the app you may manually enable Location permissions in ";
                warn += " Settings > App > MapExample > Permissions.";

                // New single-button dialog
                showTaskDialog(2,"Task not enabled!", warn, dialogIcon, this, "", "OK");
                break;

            case 2:
                // Return to main page since permission was denied
                Intent i = new Intent(this, MainActivity.class);
                startActivity(i);
                break;
        }
    }


    // Method to execute if user chooses positive button ("OK, Do Over"). This invokes
    // checkForPermissions(), which will initiate the location permissions dialog again.

    private void positiveTask(int id){

        // Use id to distinguish if more than one usage of the alert dialog

        switch(id) {

            case 1:
                // User agreed to enable so go back to permissions check
                checkForPermissions();
                break;

            case 2:
                break;
        }
}
Once again, there are two possible courses of action, corresponding to the user's choice.
The second choice (continued refusal to accept the permissions request) presents the following dialog to the user:
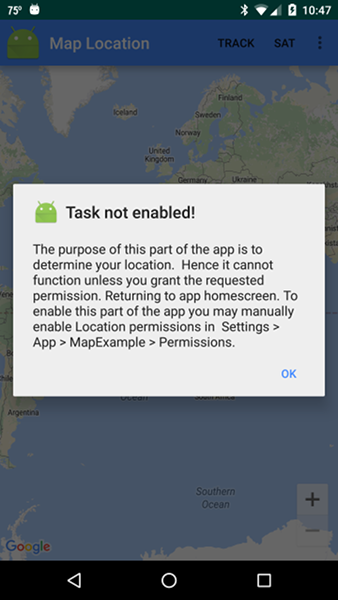
|
which informs the user of why the permission is necessary, and how permissions can be enabled manually at a later time from the Settings > App > MapExample > Permissions menu. Clicking OK invokes the case 2: option from the method negativeTask( ) shown above. This returns the user to the app home screen, since MapMe has no useful functionality without the location permission but other options from the main menu that don't require the locations permission will be functional.
|
The permissions checks described above must be executed each time the class MapMe is invoked, because under Android 6 and later the user has the option of revoking a permission at some time after it is given by going to Settings > Apps > appname > Permissions on their device. Thus, in dealing with runtime permissions it is important that you test your app to be sure that it handles correctly the situation where a permission is given and then later revoked.
The preceding runtime permissions functionality is operational only on devices running Android 6 and beyond. If an app with such runtime permissions code is executed on a device running earlier versions of Android, the old permissions model---where all permissions are given at install---is invoked (that is why we had to declare the location permission in the manifest file and in runtime code: backward compatibility). For example, here is a screenshot of the present app running under Android 5.0 on a Samsung Note 4 phone. In this case, no runtime permission requests were presented to the user.
Apps written under earlier versions of Android and already deployed to devices should continue to function correctly if those devices are upgraded to Android 6 and beyond. The exception is that in Android 6 and beyond the user can revoke a permission originally given at install of the app. This will break the functionality associated with that permission unless a new version of the app dealing correctly with runtime permissions is installed. In the sequence described above several different alert dialogs may be presented to the user (depending on choices made). The first, requesting that permission be granted, is controlled by the system and the user has no choice concerning its content. The others are generated by the user-defined method showTaskDialog and so can be configured as desired. |
Runtime permissions are a fact of life for Android developers going forward. The preceding example can be used as a template for implementing them, so adding the required code is not hard. The bigger issue is to be certain that your app remains functional under the permutations associated with the multiple possible paths through the runtime permissions process described above.
Although runtime permissions give greater flexibility and choice to users, and likely improve the Android security model, they can become a burden to users if not handled correctly by the developer. The two primary situations to worry about are
The first issue can be dealt with by providing information to the user for why the permission is needed. Part of the design of your app should now include how to get that information to users in a non-intrusive fashion. (Remember that as of API 23 you have no control over the initial permission request dialog from the system, so you cannot provide the information there. The preceding example inserted that information in the final dialog window, after the user had refused twice to grant the permission. For further discussion of these issues, see Best Practices for Runtime Permissions
The second can be ameliorated by (1) requesting only those permissions that your app actually needs, and (2) structuring your app so that permissions requests are presented in the least intrusive manner (for example, not requesting them until they are actually needed, and avoiding bunching of requests if possible).
MapMe.java implements most of the same interfaces employed above in RouteMapper, and in addition implements the interface LocationListener, which receives notifications that the location has changed from FusedLocationProviderApi. Implementation of LocationListener requires that the callback onLocationChanged() be implemented.
We first create a new GoogleApiClient for location services and a LocationRequest object that will specify the parameters of our location request:
private GoogleApiClient mGoogleApiClient;
private LocationRequest mLocationRequest;
	.
	.
	.
mGoogleApiClient = new GoogleApiClient.Builder(this)
	.addApi(LocationServices.API)
	.addConnectionCallbacks(this)
	.addOnConnectionFailedListener(this)
	.build();

// Create the LocationRequest object
mLocationRequest = LocationRequest.create();
// Set request for high accuracy
mLocationRequest.setPriority(LocationRequest.PRIORITY_HIGH_ACCURACY);
// Set update interval
mLocationRequest.setInterval(UPDATE_INTERVAL);
// Set fastest update interval that we can accept
mLocationRequest.setFastestInterval(FASTEST_INTERVAL);
where the first this in the arguments for the constructor is the present context and the next two this arguments indicate that this class will handle callbacks associated with connection and connection errors, respectively (see the onConnected, onDisconnected, and onConnectionError callbacks).
The location client cannot be used until the onConnected callback fires, indicating a valid connection. At that point one can access location services such as present position and location updates.
public void onConnected(Bundle dataBundle) {

        Toast.makeText(this, getString(R.string.connected_toast), Toast.LENGTH_SHORT).show();

        initializeLocation();

        // Center map on current location
        map_center = new LatLng(myLat, myLon);
        if (map != null) {
            initializeMap();
        } else {
            Toast.makeText(this, getString(R.string.nomap_error), Toast.LENGTH_LONG).show();
        }
}


// Called after onConnected returns, indicating that GoogleApiClient is ready to
// accept location requests

public void initializeLocation(){

// We already checked for runtime permissions when onMapReady returned, but formally we
// must check for it again here.

if (ActivityCompat.checkSelfPermission(this, Manifest.permission.ACCESS_FINE_LOCATION)
	!= PackageManager.PERMISSION_GRANTED
	&& ActivityCompat.checkSelfPermission(this, Manifest.permission.ACCESS_COARSE_LOCATION)
	!= PackageManager.PERMISSION_GRANTED) {

	return;
}

// Request location updates

LocationServices.FusedLocationApi.requestLocationUpdates(
	mGoogleApiClient, mLocationRequest, this);

// Get current location and move the camera there

myLocation = LocationServices.FusedLocationApi.getLastLocation(mGoogleApiClient);
myLat = myLocation.getLatitude();
myLon = myLocation.getLongitude();
map.setMyLocationEnabled(true);

// Retrieve stored zoom from SharedPreferences

if (prefs.contains("KEY_ZOOM") && map != null) {
	currentZoom = prefs.getFloat("KEY_ZOOM", map.getMaxZoomLevel());
}

map.moveCamera(CameraUpdateFactory.newLatLngZoom(new LatLng(myLat,myLon), currentZoom));
storeZoom(currentZoom);
}
Once we have registered for location updates, when a location change is detected the callback onLocationChanged(Location newLocation) is invoked by the system and we take actions there to update the map view using the new Location passed into onLocationChanged. Updates of the camera view on the map to follow the current location are implemented primarily through the GoogleMap method animateCamera() and the classes
A camera animation in response to locationClient updates using these methods and classes can be implemented by the generic code
CameraPosition cameraPosition = new CameraPosition.Builder()
                .target(center)            // Sets the center of the map
                .zoom(zoom)             // Sets the zoom
                .bearing(bearing)        // Sets the bearing of the camera
                .tilt(tilt)                      // Sets the tilt of the camera relative to nadir
                .build();                     // Creates a CameraPosition from the builder

// Move (if variable animate is false) or animate (if animate is true) to new
// camera properties. Move is sudden; animate is smooth.

if(animate){
	map.animateCamera(CameraUpdateFactory.newCameraPosition(cameraPosition));
} else {
	map.moveCamera(CameraUpdateFactory.newCameraPosition(cameraPosition));
}
The reverse geocoder implemented in the method reverseGeocodeLocation(latitude, longitude) mirrors the code in ShowMap.java for the method geocodeLocation(placename), except that in the present case we pass latitude and longitude coordinates instead of a placename, and we use the Geocoder method getFromLocation() instead of the Geocoder method getFromLocationName() to make our query.
Location services, particularly if they are determining fine location using GPS, can consume substantial amounts of power. Thus, it is imperative that Android lifecycle methods be used to manage those resources, so that we are not requesting location services when they are not needed. One logical way to manage that is to connect location services when a map becomes visible and disconnect those services when the map is not visible. This is handled in MapMe.java by the following code.
// Called by system when Activity becomes visible, so connect location client.

@Override
protected void onStart() {
	super.onStart();
	if(mGoogleApiClient != null) mGoogleApiClient.connect();
}

// Called by system when Activity no longer visible, so disconnect client,

@Override
protected void onStop() {

	// Save the current zoom level for next session

	if (map != null) {
		currentZoom = map.getCameraPosition().zoom;
		storeZoom(currentZoom);
	}

	// If the client is connected, disconnect

	if (mGoogleApiClient.isConnected()) {
		mGoogleApiClient.disconnect();
	}

	// Turn off the screen-always-on request
	getWindow().clearFlags(WindowManager.LayoutParams.FLAG_KEEP_SCREEN_ON);

	super.onStop();
}
Notice that in addition to managing location services through connecting and disconnecting the LocationClient, in onStop() we also turn off the request made when we started the map activity to keep the screen on at all times.
Finally, let us discuss briefly the styles and themes used to configure the look of the app (see Themes, Styles, and Preferences for a general discussion of styles and themes in Android).
For the menus we have in general replaced ActionBar with ts more modern equivalent, ToolBar. (For further discussion of transitioning from ActionBar to Toolbar, see AppCompat and Toolbar).
The basic look and feel is determined by the default app and custom styles and themes of res/values/styles.xml,
<resources>

    <!-- Base application theme. NoActionBar because we are using a Toolbar -->
    <style name="AppTheme" parent="Theme.AppCompat.Light.NoActionBar">

        <!-- Set AppCompat’s actionBarStyle -->
        <item name="actionBarStyle">@style/AppTheme</item>

        <item name="colorPrimary">@color/primary</item>
        <item name="colorPrimaryDark">@color/primary_dark</item>
        <item name="colorAccent">@color/accent</item>
        <item name="android:textColor">@color/primary_text</item>

        <!--<item name="android:windowBackground">@drawable/mapbkg</item>-->  <!--Background image-->
    </style>

    <style name="MyDialogTheme" parent="Theme.AppCompat.Light.Dialog.Alert">
        <!--buttons color-->
        <item name="colorAccent">@color/accent</item>
        <!--title and message color-->
        <item name="android:textColorPrimary">@color/primary_text</item>
        <!--dialog background-->
        <item name="android:textColorSecondary">@color/primary_text</item>
        <!--dialog background-->
        <item name="android:background">@color/dialogBackground</item>
    </style>

    <style name="MyPopupTheme" parent="ThemeOverlay.AppCompat.Light">
        <!--buttons color-->
        <item name="colorAccent">@color/accent</item>
        <!--title and message color-->
        <item name="android:textColorPrimary">@color/primary</item>
        <!--dialog background-->
        <item name="android:textColorSecondary">@color/primary</item>
        <!--dialog background-->
        <item name="android:background">@color/primary_light</item>
    </style>

</resources>
and the colors of res/values/colors.xml.
<?xml version="1.0" encoding="utf-8"?>
<resources>

    <color name="barColor">@color/accent</color>
    <color name="barTextColor">#ffffff</color>color>
    <!--<color name="buttonColor">@color/primary_light</color>-->  <!-- Tint with a palette color-->
    <color name="buttonColor">#dedede</color>  <!-- Tint with very light gray-->
    <color name="dialogBackground">#eeeeee</color>

    <!-- Choose one of the following palettes and leave the rest commented out -->

    <!-- Palette 1  Generated at http://www.materialpalette.com -->
    <color name="primary">#009688</color>
    <color name="primary_dark">#00796B</color>
    <color name="primary_light">#B2DFDB</color>
    <color name="accent">#448AFF</color>
    <color name="primary_text">#212121</color>
    <color name="secondary_text">#727272</color>
    <color name="icons">#FFFFFF</color>
    <color name="divider">#B6B6B6</color>

    <!-- Palette 2  Generated at http://www.materialpalette.com-->
<!--    <color name="primary">#FFC107</color>
    <color name="primary_dark">#FFA000</color>
    <color name="primary_light">#FFECB3</color>
    <color name="accent">#536DFE</color>
    <color name="primary_text">#212121</color>
    <color name="secondary_text">#727272</color>
    <color name="icons">#212121</color>
    <color name="divider">#B6B6B6</color>-->

    <!-- Palette 3  Generated at http://www.materialpalette.com -->
<!--    <color name="primary">#4CAF50</color>
    <color name="primary_dark">#388E3C</color>
    <color name="primary_light">#C8E6C9</color>
    <color name="accent">#FFC107</color>
    <color name="primary_text">#212121</color>
    <color name="secondary_text">#727272</color>
    <color name="icons">#FFFFFF</color>
    <color name="divider">#B6B6B6</color>-->

    <!-- Palette 4  Generated at http://www.materialpalette.com -->
<!--    <color name="primary">#CDDC39</color>
    <color name="primary_dark">#AFB42B</color>
    <color name="primary_light">#F0F4C3</color>
    <color name="accent">#009688</color>
    <color name="primary_text">#212121</color>
    <color name="secondary_text">#727272</color>
    <color name="icons">#212121</color>
    <color name="divider">#B6B6B6</color>-->

    <!-- Palette 5  Generated at http://www.materialpalette.com -->
<!--    <color name="primary">#673AB7</color>
    <color name="primary_dark">#512DA8</color>
    <color name="primary_light">#D1C4E9</color>
    <color name="accent">#FFC107</color>
    <color name="primary_text">#212121</color>
    <color name="secondary_text">#727272</color>
    <color name="icons">#FFFFFF</color>
    <color name="divider">#B6B6B6</color>-->

     <!-- Palette 6  Generated at http://www.materialpalette.com -->
   <!-- <color name="primary">#8BC34A</color>
    <color name="primary_dark">#689F38</color>
    <color name="primary_light">#DCEDC8</color>
    <color name="accent">#CDDC39</color>
    <color name="primary_text">#212121</color>
    <color name="secondary_text">#727272</color>
    <color name="icons">#212121</color>
    <color name="divider">#B6B6B6</color>-->

</resources>
Notice that in the color menu six different Material Design color palettes are defined, with all but one commented out. The effect of the different color palettes on the style can be investigated by commenting out the one in use and uncommenting another one (select and Ctrl-Shift-/ to block-comment or uncomment).
| Various resources on the Web can be used to produce Material Design color palettes. The ones used here were created with the aid of this material palette generator. |
Examples of using the six different color palettes for the current app are illustrated in the following figures.
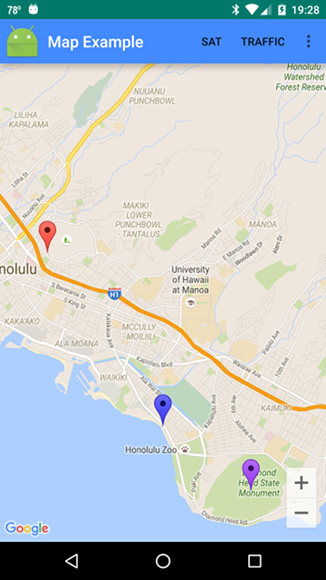 |
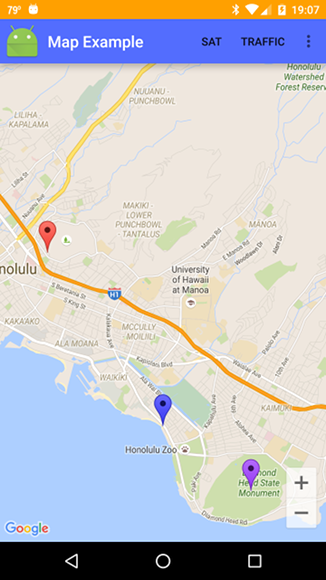 |
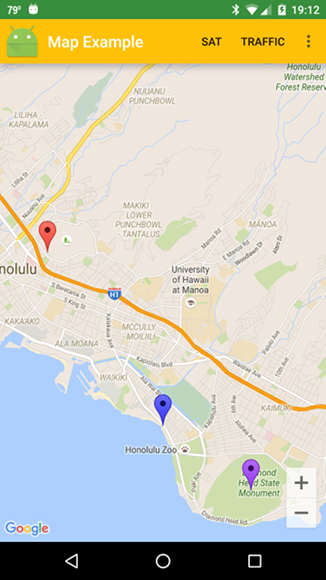 |
 |
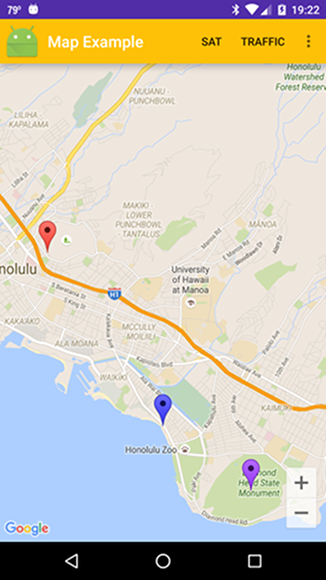 |
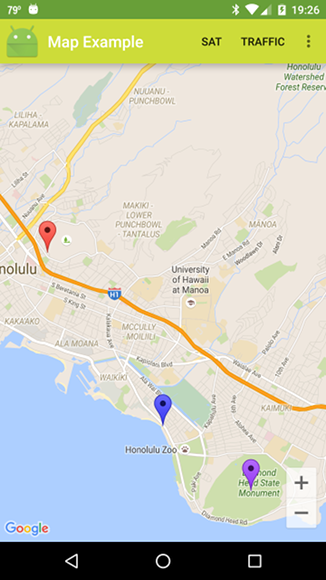 |
Where reading across to the right and down these correspond to palettes 1-6, respectively, in colors.xml.
| The complete project for the application described above is archived on GitHub at the link MapExample. Instructions for installing it in Android Studio may be found in Packages for All Projects. |
Last modified: June 29, 2016