In computing driven by interaction with a graphical interface it is often necessary to notify the user of something that is too important to ignore. A common way to do that is to pop up a window floating above the main window that forces the user to take notice. In many cases we want this window to not allow any further action by the user until it is dealt with (the popped-up window in that case is called modal). If these windows just contain warnings not requiring specific action other than dismissing the window, these are often called alerts; if they require some interaction by the user these are often called dialogs. We use alerts and dialogs in various contexts in other projects, but this project gathers in one place a basic toolkit for generating dialogs and alerts in a relatively simple way.
In addition to dialogs and alerts there are other ways of notifying a user of something that are useful in various contexts and may or may not require user action. One is the transient Toast, which briefly displays a message in a small floating window that does not require a user response (which has already been used in several earlier projects). Another is a Notification that can be displayed in the task bar, which may be informative only or may solicit user action. These less invasive notifications are also of considerable utility and we shall give examples of using both in this project.
Following the general procedure in Creating a New Project, either choose Start a new Android Studio project from the Android Studio homepage, or from the Android Studio interface choose File > New > New Project. Fill out the fields in the resulting screens as follows,
|
Application Name:
CreatingDialogs
Company Domain:< YourNamespace > Package Name: <YourNamespace> . creatingdialogs Project Location: <ProjectPath> CreatingDialogs Target Devices: Phone and Tablet; Min SDK API 21 Add an Activity: Empty Activity Activity Name: MainActivity (check the Generate Layout File box) Layout Name: activity_main |
where you should substitute your namespace for <YourNamespace> (com.lightcone in my case) and <ProjectPath> is the path to the directory where you will store this Android Studio Project (/home/guidry/StudioProjects/ in my case). If you have chosen to use version control for your projects, go ahead and commit this project to version control.
| Notification design changed substantially in Android 5.0 (API 21), so in this project we have set the minimum SDK to 21. For handling notifications in Android 4.4 and earlier see this document. |
You will need an icon image, which can be copied from the Images directory (or substitute your own icon): choose dialog_icon.png and save into the res/drawable folder of the project.
Create the following XML, Java, and Manifest files.
Edit res/values/strings.xml to give
<resources>

   <string name="action_settings">Settings</string>
   <string name="hello_world">Hello world!</string>
   <string name="hello">CreatingDialogs and Notifications</string>
   <string name="app_name">CreatingDialogs</string>
   <string name="button1_label">Dialog Example 1</string>
   <string name="button2_label">Dialog Example 2</string>
   <string name="button3_label">Taskbar Notification</string>
   <string name="create_item1">Task Choice 1</string>
   <string name="create_item2">Task Choice 2</string>
   <string name="create_item3">Task Choice 3</string>
   <string name="task_description1">A description of Task 1 will go in this field.</string>
   <string name="task_description2">A description of Task 2 will go in this field.</string>
   <string name="message1">Task Activity 1 will be launched on this screen</string>
   <string name="message2">Task Activity 2 will be launched on this screen</string>
   <string name="message3">Task Activity 3 launched and the notification icon
         deleted from the task bar</string>

</resources>
Edit res/values/colors.xml to give
<?xml version="1.0" encoding="utf-8"?>
<resources>
    <color name="colorPrimary">#3F51B5</color>
    <color name="colorPrimaryDark">#303F9F</color>
    <color name="colorAccent">#FF4081</color>

    <!-- Palette 1  Generated at http://www.materialpalette.com -->
    <color name="primary">#009688</color>
    <color name="primary_dark">#00796B</color>
    <color name="primary_light">#B2DFDB</color>
    <color name="accent">#448AFF</color>
    <color name="primary_text">#212121</color>
    <color name="secondary_text">#727272</color>
    <color name="icons">#FFFFFF</color>
    <color name="divider">#B6B6B6</color>
    <color name="dialogBackground">#eeeeee</color>
</resources>
Edit res/values/styles.xml to give
<resources>
    <!-- Base application theme. -->
    <style name="AppTheme" parent="Theme.AppCompat.Light.DarkActionBar">
        <!-- Customize your theme here. -->
        <item name="colorPrimary">@color/colorPrimary</item>
        <item name="colorPrimaryDark">@color/colorPrimaryDark</item>
        <item name="colorAccent">@color/colorAccent</item>
    </style>

    <style name="MyDialogTheme" parent="Theme.AppCompat.Light.Dialog.Alert">
      <!--buttons color-->
      <item name="colorAccent">@color/accent</item>
      <!--title and message color-->
      <item name="android:textColorPrimary">@color/primary_text</item>
      <!--dialog background-->
      <item name="android:textColorSecondary">@color/primary_text</item>
      <!--dialog background-->
      <item name="android:background">@color/dialogBackground</item>
    </style>
</resources>
Edit res/layout/activity_main.xml to give
<?xml version="1.0" encoding="utf-8"?>
<LinearLayout xmlns:android="http://schemas.android.com/apk/res/android"
   android:layout_width="fill_parent"
   android:layout_height="wrap_content"
   android:layout_marginBottom="10dp"
   android:layout_marginLeft="10dp"
   android:layout_marginRight="10dp"
   android:layout_marginTop="10dp"
   android:orientation="vertical" >

   <Button
      android:id="@+id/button01"
      android:layout_width="wrap_content"
      android:layout_height="wrap_content"
      android:layout_gravity="center_horizontal"
      android:layout_marginTop="10dp"
      android:layout_weight="0.33"
      android:paddingLeft="30dp"
      android:paddingRight="30dp"
      android:text="@string/button1_label"
      android:textSize="18sp" />

   <Button
      android:id="@+id/button02"
      android:layout_width="wrap_content"
      android:layout_height="wrap_content"
      android:layout_gravity="center_horizontal"
      android:layout_marginTop="5dp"
      android:layout_weight="0.33"
      android:paddingLeft="30dp"
      android:paddingRight="30dp"
      android:text="@string/button2_label"
      android:textSize="18sp" />

   <Button
      android:id="@+id/button03"
      android:layout_width="wrap_content"
      android:layout_height="wrap_content"
      android:layout_gravity="center_horizontal"
      android:layout_marginTop="5dp"
      android:layout_weight="0.33"
      android:paddingLeft="30dp"
      android:paddingRight="30dp"
      android:text="@string/button3_label"
      android:textSize="18sp" />

</LinearLayout>
Create the file res/layout/taskactivity1.xml and edit it to give
<?xml version="1.0" encoding="utf-8"?>

<LinearLayout xmlns:android="http://schemas.android.com/apk/res/android"
   android:layout_width="match_parent"
   android:layout_height="match_parent"
   android:orientation="vertical"
   android:padding="10dp" >

   <LinearLayout
      android:layout_width="wrap_content"
      android:layout_height="wrap_content"
      android:layout_marginBottom="10dp"
      android:layout_marginLeft="0dp"
      android:layout_marginRight="0dp"
      android:layout_marginTop="5dp"
      android:orientation="horizontal" >

      <ImageView
            android:layout_width="wrap_content"
            android:layout_height="wrap_content"
            android:layout_gravity="center_vertical"
            android:layout_marginBottom="0dp"
            android:layout_marginTop="0dp"
            android:layout_weight="0.5"
            android:padding="1dp"
            android:src="@drawable/dialog_icon" />

      <TextView
            android:layout_width="wrap_content"
            android:layout_height="wrap_content"
            android:layout_gravity="bottom"
            android:layout_weight="0.5"
            android:paddingLeft="8dp"
            android:text="@string/create_item1"
            android:textSize="20sp"
            android:textStyle="bold" />
   </LinearLayout>

   <TextView
      android:id="@+id/task_activity1"
      android:layout_width="wrap_content"
      android:layout_height="wrap_content"
      android:text="@string/message1" />

</LinearLayout>
Create the file res/layout/taskactivity2.xml and edit it to give
<?xml version="1.0" encoding="utf-8"?>

<LinearLayout xmlns:android="http://schemas.android.com/apk/res/android"
   android:layout_width="match_parent"
   android:layout_height="match_parent"
   android:orientation="vertical"
   android:padding="10dp" >

   <LinearLayout
      android:layout_width="wrap_content"
      android:layout_height="wrap_content"
      android:layout_marginBottom="10dp"
      android:layout_marginLeft="0dp"
      android:layout_marginRight="0dp"
      android:layout_marginTop="5dp"
      android:orientation="horizontal" >

      <ImageView
            android:layout_width="wrap_content"
            android:layout_height="wrap_content"
            android:layout_gravity="center_vertical"
            android:layout_marginBottom="0dp"
            android:layout_marginTop="0dp"
            android:layout_weight="0.5"
            android:padding="1dp"
            android:src="@drawable/dialog_icon" />

      <TextView
            android:layout_width="wrap_content"
            android:layout_height="wrap_content"
            android:layout_gravity="bottom"
            android:layout_weight="0.5"
            android:paddingLeft="8dp"
            android:text="@string/create_item2"
            android:textSize="20sp"
            android:textStyle="bold" />
   </LinearLayout>

   <TextView
      android:id="@+id/task_activity2"
      android:layout_width="wrap_content"
      android:layout_height="wrap_content"
      android:text="@string/message2" />

</LinearLayout>
Create the file res/layout/taskactivity3.xml and edit it to give
<?xml version="1.0" encoding="utf-8"?>

<LinearLayout xmlns:android="http://schemas.android.com/apk/res/android"
   android:layout_width="match_parent"
   android:layout_height="match_parent"
   android:orientation="vertical"
   android:padding="10dp" >

   <LinearLayout
      android:layout_width="wrap_content"
      android:layout_height="wrap_content"
      android:layout_marginBottom="10dp"
      android:layout_marginLeft="0dp"
      android:layout_marginRight="0dp"
      android:layout_marginTop="5dp"
      android:orientation="horizontal" >

      <ImageView
            android:layout_width="wrap_content"
            android:layout_height="wrap_content"
            android:layout_gravity="center_vertical"
            android:layout_marginBottom="0dp"
            android:layout_marginTop="0dp"
            android:layout_weight="0.5"
            android:padding="1dp"
            android:src="@drawable/dialog_icon" />

      <TextView
            android:layout_width="wrap_content"
            android:layout_height="wrap_content"
            android:layout_gravity="bottom"
            android:layout_weight="0.5"
            android:paddingLeft="8dp"
            android:text="@string/create_item3"
            android:textSize="20sp"
            android:textStyle="bold" />
   </LinearLayout>

   <TextView
      android:id="@+id/task_activity3"
      android:layout_width="wrap_content"
      android:layout_height="wrap_content"
      android:text="@string/message3" />

</LinearLayout>
Edit the class file MainActivity.java to give
package <YourNamespace>.creatingdialogs;

import android.app.AlertDialog;
import android.app.Dialog;
import android.content.Context;
import android.content.DialogInterface;
import android.content.Intent;
import android.os.Build;
import android.os.Bundle;
import android.support.v4.app.DialogFragment;
import android.support.v4.app.FragmentActivity;
import android.view.View;
import android.view.View.OnClickListener;
import android.widget.Toast;

public class MainActivity extends FragmentActivity implements OnClickListener {

    private static final int numberTasks = 2;
    private static final String launcherTitle = "Task Description";
    private static final int launcherIcon = R.drawable.dialog_icon;
    private static int buttonPressed;
    private String[] taskDescription = new String[numberTasks];

    private static int dialogTheme;  // Integer defining the dialog theme

    /**
     * Called when the activity is first created.
     */
    @Override
    public void onCreate(Bundle savedInstanceState) {
        super.onCreate(savedInstanceState);
        setContentView(R.layout.activity_main);

        // Identify buttons in XML layout and attach click  listeners to each

        View button01 = findViewById(R.id.button01);
        button01.setOnClickListener(this);
        View button02 = findViewById(R.id.button02);
        button02.setOnClickListener(this);
        View button03 = findViewById(R.id.button03);
        button03.setOnClickListener(this);

        // Extract  task description strings from strings.xml and place in an array for later use

        taskDescription[0] = getString(R.string.task_description1);
        taskDescription[1] = getString(R.string.task_description2);

        // Use Material Design them if API 23 or later; Holo Light if earlier

        if (Build.VERSION.SDK_INT < Build.VERSION_CODES.LOLLIPOP) {
            dialogTheme = AlertDialog.THEME_HOLO_LIGHT;  // Deprecated with API 23
        } else {
            dialogTheme = R.style.MyDialogTheme;
        }
    }

    @Override
    public void onPause() {
        super.onPause();
    }

    @Override
    public void onResume() {
        super.onResume();
    }

    @Override
    public void onClick(View v) {

        switch (v.getId()) {
            // For buttons 1 and 2, launch floating dialogs
            case R.id.button01:
                buttonPressed = 1;

                // Set alert content. If icon or title are omitted or set to null, they
                // will not appear in the Alert Dialog window.

                AlertFragment.context = this;
                AlertFragment.iconID = launcherIcon;
                AlertFragment.title = launcherTitle;
                AlertFragment.message = taskDescription[buttonPressed - 1];

                DialogFragment fragment = new AlertFragment();
                fragment.show(getSupportFragmentManager(), "Task 1");

                break;

            case R.id.button02:
                buttonPressed = 2;
                showTaskDialog(launcherTitle, taskDescription[buttonPressed - 1], launcherIcon, this);
                break;

            // For button 3, start a service that will place a notification in the task bar
            case R.id.button03:
                startTheService();
                break;
        }

    }


    /**
     * Method showTaskDialog() creates a custom launch dialog popped up by a press on
     * a button.  This dialog presents a summary of the task to the user and has buttons to either
     * launch the task or cancel the dialog. Which task to present is controlled by the value of the
     * int buttonPressed, which is stored if a button is pressed and is used in the switch
     * statement in launchTask().
     */

    private void showTaskDialog(String title, String message, int icon, Context context) {

        AlertDialog.Builder builder = new AlertDialog.Builder(context, dialogTheme);
        builder.setMessage(message).setTitle(title).setIcon(icon);
        // Add the buttons
        builder.setPositiveButton("Select this Task", new DialogInterface.OnClickListener() {
            public void onClick(DialogInterface dialog, int id) {
                launchTask();
            }
        });
        builder.setNegativeButton("Cancel", new DialogInterface.OnClickListener() {
            public void onClick(DialogInterface dialog, int id) {
                // Can execute additional code here if desired
                // Default is cancellation of dialog window.
            }
        });

        AlertDialog dialog = builder.create();
        dialog.show();
    }

    /**
     * Method launchTask() uses a switch statement to decide which task to launch.
     */

    private void launchTask() {

        // Illustrate a Toast notification
        Toast.makeText(this, "launchTask() executed", Toast.LENGTH_SHORT).show();

        switch (buttonPressed) {
            case 1:    // Launch task 1
                Intent i = new Intent(this, TaskActivity1.class);
                startActivity(i);
                break;
            case 2:    // Launch task 2
                Intent j = new Intent(this, TaskActivity2.class);
                startActivity(j);
                break;
        }
    }

    // Start a service to demo a status bar notification

    public void startTheService() {
        Intent serviceIntent = new Intent(this, MyNotificationService.class);
        this.startService(serviceIntent);
    }

    /**
     * Example of a class to create alert dialog fragments. To call from another
     * class, set the values of the static variables and then instantiate.  Example:
     *
     * AlertFragment.context = this;
     * AlertFragment.iconID = launcherIcon;
     * AlertFragment.title = launcherTitle;
     * AlertFragment.message = taskDescription[buttonPressed-1];
     * DialogFragment fragment = new AlertFragment();
     * fragment.show(getSupportFragmentManager(), "Task 1");
     */

    public static class AlertFragment extends DialogFragment {

        public static Context context;
        public static String message;
        public static String title;
        public static int iconID;
        public static int buttonPressed;

        @Override
        public Dialog onCreateDialog(Bundle savedInstanceState) {

            // Use the Builder class to construct the dialog.  Use the
            // form of the builder constructor that allows a theme to be set.

            AlertDialog.Builder builder = new AlertDialog.Builder(getActivity(), MainActivity.dialogTheme);
            if (title != null) builder.setTitle(title);
            if (iconID != 0) builder.setIcon(iconID);
            builder.setMessage(message)
                    .setPositiveButton("Select this task", new DialogInterface.OnClickListener() {
                        public void onClick(DialogInterface dialog, int id) {
                            launchTask();
                        }
                    })
                    .setNegativeButton("Cancel", new DialogInterface.OnClickListener() {
                        public void onClick(DialogInterface dialog, int id) {
                            // Default is to cancel the dialog window.  Can add
                            // additional commands if desired.
                        }
                    });
            // Create the AlertDialog object and return it
            return builder.create();
        }

        // Method to launch new activity when button pressed in Alert Dialog
        private void launchTask() {
            Intent i = new Intent(context, TaskActivity1.class);
            startActivity(i);
        }
    }
}
(Note: there will be several errors indicated because of missing classes. Ignore them, since they will go away when those classes are created below.) Create the class file MyNotificationService.java and edit it to read
package <YourNamespace>.creatingdialogs;

import android.app.Notification;
import android.app.NotificationManager;
import android.app.PendingIntent;
import android.app.Service;
import android.content.Context;
import android.content.Intent;
import android.os.IBinder;
import android.util.Log;
import android.widget.Toast;

// This service will simply run for NOTIFY_INTERVAL_MS/1000 seconds, send a notification
// to the task bar, and then terminate. When the notice bar is clicked, the activity
// TaskActivity3 will be launched and the notification icon removed from the notification bar.

public class MyNotificationService extends Service {

      public static final String TAG = "NOTIFY";

      // ID for notification. Make public, static, so can access from
      // TaskActivity3 to cancel notice

      public static final int NOTIFY_ID = 1;

      private static final long NOTIFY_INTERVAL_MS = 5000;
      private BackgroundThread background;
      public Intent savedIntent;
      public static long refTimeMS;
      public Context context;

      @Override
      public void onCreate() {
               super.onCreate();
               context  = getApplicationContext();
      }

      @Override
      public void onDestroy() {
               super.onDestroy();
               background.interrupt();
      }

      @Override
      public int onStartCommand(Intent intent, int flags, int startId) {
               super.onStartCommand( intent, flags, startId);
               Log.i(TAG,"Starting the service");
               savedIntent = intent;
               // Get an initial reference time in milliseconds
               refTimeMS = System.currentTimeMillis();
               doThreadStart();
               // Want this service to continue running until explicitly stopped, so return sticky.
               return START_STICKY;
      }

      // We won't bind anything to our service, so just return null for onBind
      @Override
      public IBinder onBind(Intent intent) {
               return null;
      }

      // Start a background thread as an instance of the class BackgroundThread
      private void doThreadStart() {
               background = new BackgroundThread();
               background.start();
               String text = "Service will run for "+(NOTIFY_INTERVAL_MS/1000)+" s, ";
               text += "post notification to the task bar, and then stop.";
               Toast.makeText(context, text, Toast.LENGTH_LONG).show();
      }

      // Method to create and place the notification in the status bar
      //   See http://developer.android.com/guide/topics/ui/notifiers/notifications.html
      //   See http://developer.android.com/reference/android/app/NotificationManager.html
      //   See http://developer.android.com/design/patterns/notifications.html
      // Will use a PendingIntent to cause the activity TaskActivity3 to be launched
      // when the notification is clicked.

      private void createStatusBarNotification(){

               String ns = Context.NOTIFICATION_SERVICE;
               NotificationManager mNotificationManager = (NotificationManager) getSystemService(ns);

               int icon = R.mipmap.ic_launcher;

               CharSequence contentTitle = "Status Bar Notification";
               CharSequence contentText = "Press to launch Task 3";

               // PendingIntent to be executed when notification is clicked
               Intent notificationIntent = new Intent(this, TaskActivity3.class);
               PendingIntent contentIntent = PendingIntent.getActivity(this, 0, notificationIntent, 0);

               // Create the notification
               Notification notification = new Notification.Builder(context)
               .setContentTitle(contentTitle)
               .setContentText(contentText)
               .setSmallIcon(icon)
               .setContentIntent(contentIntent)
               .build();

               mNotificationManager.notify(NOTIFY_ID, notification);
      }


      // Class to run background thread by overriding  the run() method that is
      // inherited from Thread.  Meaningful work, like retrieving a Web page, could be
      // done on this thread.  We will just let it run for NOTIFY_INTERVAL_MS/1000 seconds
      // and then display a status bar notification and terminate the service.

      private class BackgroundThread extends Thread {
               public void run() {
                        Log.i(TAG, "  Begin background thread");

                        long elapsedMS = 0;

                        // Loop for NOTIFY_INTERVAL_MS/1000 seconds
                        while((elapsedMS) < NOTIFY_INTERVAL_MS){
                              elapsedMS = System.currentTimeMillis() - refTimeMS;
                        }

                        // Create the status bar notification
                        createStatusBarNotification();

                        // Stop this service
                        Log.i(TAG,"Stopping the service");
                        stopSelf();
               }
      }
}
Create the class file TaskActivity1.java and edit it to read
package <YourNamespace>.creatingdialogs;

import android.app.Activity;
import android.os.Bundle;

// The class is TaskActivity1 is invoked whenever Task1 is chosen from the button menu.

public class TaskActivity1 extends Activity {

      /** onCreate is called when the activity is first created. */

      @Override
      public void onCreate(Bundle savedInstanceState) {
               super.onCreate(savedInstanceState);
               setContentView(R.layout.taskactivity1);
      }

      /** onPause is called when the activity is going to background. */

      @Override
      public void onPause() {
               super.onPause();
      }

      /** onResume is called when the activity is going to foreground. */

      @Override
      public void onResume(){
               super.onResume();
      }
}
Create the class file TaskActivity2.java and edit it to read
package <YourNamespace>.creatingdialogs;

import android.app.Activity;
import android.os.Bundle;

// The class is TaskActivity2 is invoked whenever Task2 is chosen from the button menu.

public class TaskActivity2 extends Activity {

   /** onCreate is called when the activity is first created. */

   @Override
   public void onCreate(Bundle savedInstanceState) {
      super.onCreate(savedInstanceState);
      setContentView(R.layout.taskactivity2);
   }

   /** onPause is called when the activity is going to background. */

   @Override
   public void onPause() {
      super.onPause();
   }

   /** onResume is called when the activity is going to foreground. */

   @Override
      public void onResume(){
      super.onResume();
   }
}
Create the class file TaskActivity3.java and edit it to read
package <YourNamespace>.creatingdialogs;

import android.app.Activity;
import android.app.NotificationManager;
import android.content.Context;
import android.os.Bundle;
import android.util.Log;

// The class TaskActivity3 is launched from a notification that
// we place in the notification bar (see MyNotificationService.java).

public class TaskActivity3 extends Activity {

      public static final String TAG = "NOTIFY";

      /** onCreate is called when the activity is first created. */

      @Override
      public void onCreate(Bundle savedInstanceState) {
               super.onCreate(savedInstanceState);
               setContentView(R.layout.taskactivity3);

               // Cancel the notification icon in the task bar by first getting a NotificationManager
               String ns = Context.NOTIFICATION_SERVICE;
               NotificationManager mNotificationManager = (NotificationManager) getSystemService(ns);
               // and then using the static id NOTIFY_ID from MyNotificationService
               // to cancel the display of the icon in the status bar.
               int id = MyNotificationService.NOTIFY_ID;
               Log.i(TAG, "Notification: ID="+id+" canceled");
               mNotificationManager.cancel(id);
      }

      /** onPause is called when the activity is going to background. */

      @Override
      public void onPause() {
               super.onPause();
      }

      /** onResume is called when the activity is going to foreground. */

      @Override
      public void onResume(){
               super.onResume();
      }
}
At this point the project should compile without error. However, we have one more task to do. The new Activities and the Service that we have created in the preceding Java files must be registered in the manifest file.
To register the new activities and services that have been created above, modify the AndroidManifest.xml file by adding the four lines in red below:
<?xml version="1.0" encoding="utf-8"?>
<manifest xmlns:android="http://schemas.android.com/apk/res/android"
    package="com.lightcone.creatingdialogs">

    <application
        android:allowBackup="true"
        android:icon="@mipmap/ic_launcher"
        android:label="@string/app_name"
        android:supportsRtl="true"
        android:theme="@style/AppTheme">
        <activity android:name=".MainActivity">
            <intent-filter>
                <action android:name="android.intent.action.MAIN" />

                <category android:name="android.intent.category.LAUNCHER" />
            </intent-filter>
        </activity>
        <activity android:name=".TaskActivity1" android:label="Task: Activity 1" ></activity>
        <activity android:name=".TaskActivity2" android:label="Task: Activity 2" ></activity>
        <activity android:name=".TaskActivity3" android:label="Task: Activity 3" ></activity>
        <service android:name=".MyNotificationService" />
    </application>

</manifest>
which register the three new classes and one new service that we have defined. Now, our app should both compile and exectute without error. Let's try it out.
The following images show the app running under Android 6.0.1 on a Nexus 6P phone. In the image below left the Dialog Example 2 button has been pressed, giving the floating dialog labeled "Task Description" that is displayed. In addition to an icon and text, it is displaying a Select This Task button, which will launch a new Activity if pressed, and a Cancel button, which will cancel the dialog. In the image below right, the Taskbar Notification button has been pressed, which launches a Service that sends the Notification displayed in the top status bar (the icon to the far left in the task bar) after about 5 seconds have elapsed.
 |
 |
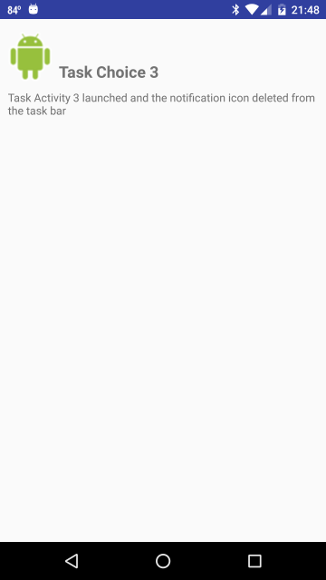
In the image below left the status bar has been dragged down to display the taskbar notification. Pressing the Status Bar Notification panel causes the Activity shown in the image below right to be launched and the notification symbol to be deleted from the status bar.
 |
 |
The image below illustrates the transient message displayed by a Toast immediately after the Taskbar Notification button is pressed.

|
Much of the Android described above should be familiar from other projects and we concentrate only on a few things specific to the dialogs, alerts, and notifications discussion here. All of the XML files are standard, using tags that have been discussed in other projects. The Java files TaskActivity1.java, TaskActivity2.java, and TaskActivity3.java likewise are standard examples of classes defining simple Activities. The essential new features are found in the classes MainActivity and MyNotificationService.
The class defined by MainActivity.java extends FragmentActivity and sets up some buttons and launches some Activities using Intents, in ways that should be familiar from many other projects. The two noteworthy features of this class are
The class defined in MyNotificationService.java implements a Service that does something very simple: it runs for a time set by the variable NOTIFY_INTERVAL_MS on a background thread, then creates a notification posted to the status bar, and finally terminates itself. Setting up and running a Service has been described in the appWidget project and similar considerations apply here. The most important new material is in the method createStatusBarNotification(), which uses methods of the NotificationManager, Notification.Builder, and Notification classes to insert a notification in the status bar. Additonal useful background on the methods employed here may be found in the documents
The class Toast is used in both MainActivity and MyNotificationService to display briefly short floating messages (that never receive focus). A general discussion of using this class may be found in the Toast guide, but for most simple applications it is adequate to use the static method
Toast.makeText(context, text, duration).show();
where text is the string to be displayed and duration is either Toast.LENGTH_LONG or Toast.LENGTH_SHORT, which determines how long the Toast will be displayed. The only tricky part can be the context. Often it is the this keyword, but not always. When in doubt, the getApplicationContext() method that Activity and Service inherit from Context can be used to return the present context.
| The complete project for the application described above is archived on GitHub at the link CreatingDialogs. Instructions for installing it in Android Studio may be found in Packages for All Projects. |
Last modified: July 4, 2016