In Configuring an AVD, we describe how to set up a virtual device for debugging, but our ultimate target is for our programs to run on actual hardware. To install and execute programs on hardware you must
Let us first describe how to configure for debugging and then how to transfer the executables.
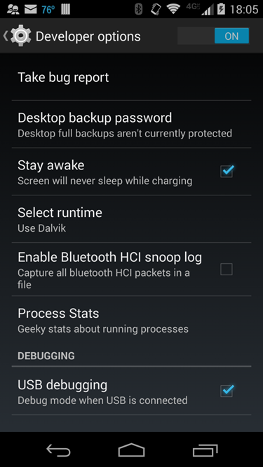
| On Android 4.2 and newer devices, the Developer options required in the following instructions are hidden by default. To make them available on those devices, go to Settings > About phone and tap Build number seven times. Then you should find Developer options displayed under Settings. |
We summarize the basics; a more extensive discussion may be found in the Android Run Apps on a Hardware Device document. Configuring the phone or tablet may be somewhat device-specific but should be similar to the following example for a Motorola Moto-X phone running Android 4.4.2.
|
| "Stay awake" has also been checked to cause the screen display to stay on while the phone is charging on the USB cable; it is often useful in debugging for the screen to stay on, but this is not essential. |
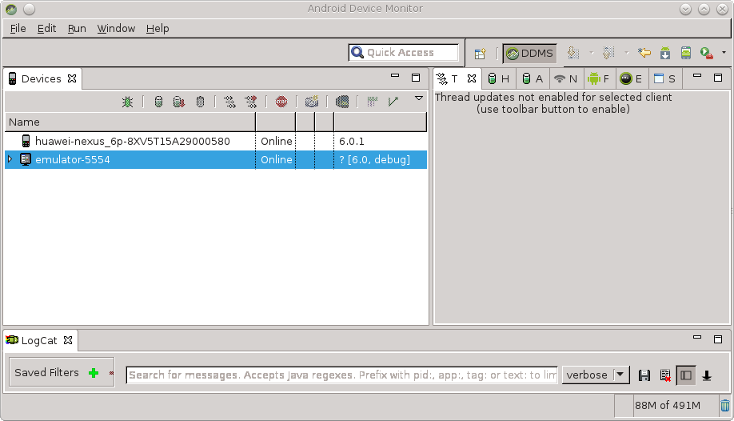
In this output, emulator-5554 is an Android virtual device (emulator) configured as in Configuring an AVD (5554 is the port number associated with the virtual device), and 0146B5BA13010009 is a Samsung Galaxy Nexus phone that was connected to the computer according to the above instructions.[guidry@m33 sdk]$ adb devices List of devices attached 0146B5BA13010009 device emulator-5554 device
|
Now that the device is connected to the computer, Android packages that we have developed can be installed and debugged directly on the device. Let's see how to do that.
To install an application on a physical device connected to your development computer by a USB cable as described above,
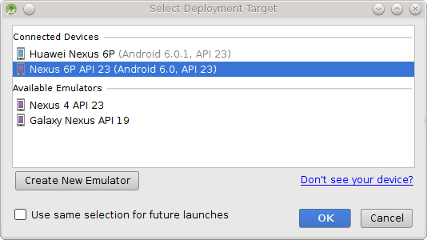
execute the app using Android Studio: click the Run button, or choose from the menu Run > Run 'app', and select the device for
output in the resulting Select Deployment Target window, as illustrated in the following figure.
|
For security, Android requires that all applications installed on physical devices be digitally signed by the developer. If you deploy apps for 3rd-party installation through channels such as the Google Play Store you must sign them with your own digital signature, but in development and debugging using Android Studio this isn't necessary because "under the hood" a debug certificate associated with the development machine is used automatically.
If you debug on a device using a particular computer, the app will be installed using the debug certificate associated with that machine. If you leave the app installed and then attempt to debug the same device on a different computer, you will get an error message in the logcat stream that the application signatures do not match. For example,
[2010-06-08 10:34:06 - MapTutorial] Installing MapTutorial.apk...
[2010-06-08 10:34:08 - MapTutorial] Re-installation failed due to different application signatures.
[2010-06-08 10:34:08 - MapTutorial] You must perform a full uninstall of the application.
                     WARNING: This will remove the application data!
[2010-06-08 10:34:08 - MapTutorial] Please execute 'adb uninstall com.lightcone.maptutorial' in a shell.
[2010-06-08 10:34:08 - MapTutorial] Launch canceled!
In this case, use the uninstall command described below first to remove the application from the device, and then repeat the install as described above.
| More recent versions of the development tools may give a popup directly in Android Studio asking you if you want to uninstall the old app and install the one with the new signature. |
To uninstall an application resident on a physical device connected by USB:
If you know there is only a single device running, you can shorten the above to adb -d uninstall appname (the -d flag targets the only physical device running). For example,[guidry@m33 ~]$ adb devices List of devices attached TA5380467L device emulator-5554 device [guidry@m33 ~]$ adb -s TA5380467L uninstall com.lightcone.recipes Success
(This returns an error if more than one physical device is running.)[guidry@m33 workspaceAndroid]$ adb -d uninstall com.lightcone.recipes Success
| The application can also be uninstalled manually from the device. The exact procedure will depend on the device but will likely be similar to: Go to Settings > Apps , select the application from the list that is populated, and press Uninstall. |
Last modified: July 25, 2016