The logcat facility is an essential debugging tool in Android because it displays a continuous stream of system messages and user-generated diagnostics.
User-generated logcat messages can be displayed by embedding commands of the form
Log.i(TAG, "Recipe url = "+turl);
in the Java files, where TAG is a user-defined string variable (e.g., static final String TAG = "Class Webscreen";) that can be used to filter the output messages and everything after the comma is a string that will be output as a line to the logcat stream, tagged by the string TAG. (See the documentation of Log; note that the use of such commands requires an import android.util.Log; statement in the code.) The i on Log.i indicates that this is an informational message, and is associated with how the messages are filtered in the LogCat display. Other options are Log.v (verbose), Log.d (debug), Log.w (warning), and Log.e (error).
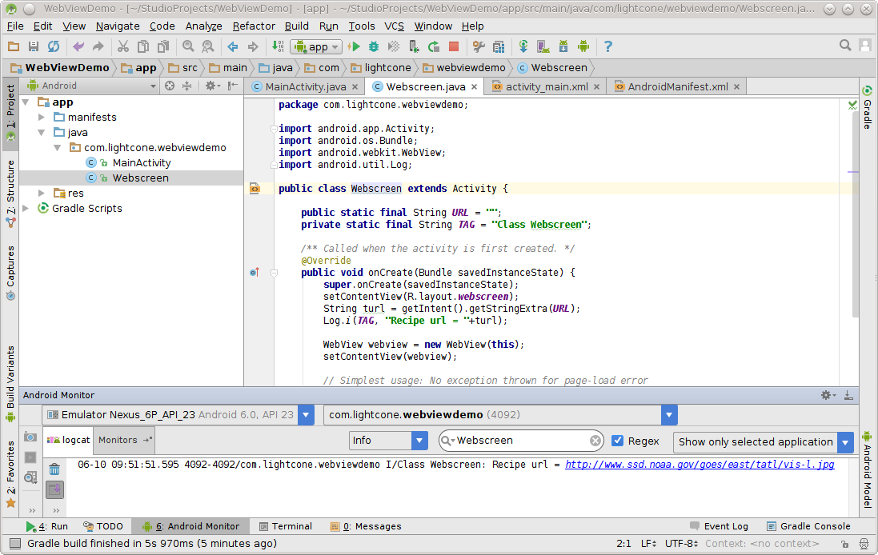
In the following figure Android Studio is displaying output from LogCat in the Android Monitor panel at the bottom (note that the logcat tab has been selected).
|
In this example the output has been selectively displayed by choosing Info (meaning only Log.i messages), Show only selected application, and filtering so that only lines containing the string "Webscreen" are displayed. A more extensive discussion of using Android Studio to view and filter logcat messages may be found in Write and View Logs with Logcat.
| The default display of the logcat output in the Android Monitor window at the bottom of Android Studio is often not very useful because it has limited display space and a large volume of information scrolls through it by default. The controls on the right side of the Android Monitor top bar can be used to make examining the logcat output more convenient by toggling the view on and off, and (particularly useful) selecting Floating Mode or Window Mode, which undocks the Android Monitor into a separate floating window that can be moved and resized as needed. (To dock a floating Android Monitor to the main AS display again, uncheck Floating Mode or Windowed Mode from the dropdown resulting from clicking its toolbox icon.) |
For the Linux systems that I use, I often find it to be more efficient to send log output to the screen or to a file where it can be scrolled, searched, and filtered using standard shell commands. From a shell, to send the output to the screen:
adb -e logcat -v time
or to redirect it to a file
adb -e logcat -v time > temp.txt
The -e flag specifies all events in the only running emulator (a -d flag
specifies all events in the only running hardware device) and the -v time flag
puts a time stamp on each event. You can of course use the filtering commands
available in your shell to massage this information further. For example, with
Linux,
adb -e logcat -v time | tee temp.txt
to both send the stream to a file and display on the screen, or
adb -e logcat -v time | grep filterTag
to display on the screen only the lines containing the string "filterTag". Finally, you can execute
adb -e logcat -c
to clear the logs. For a complete list of logcat options, type adb logcat --help at a command-line prompt.
The standard Java print statements println() and printf() (which specify output formats using syntax defined in the Formatter class) may also be used to generate formatted output that will appear in the logcat stream with the default category I and default tag "System.out". For example, the following are valid Android output statements:
System.out.println("pi = "+Math.PI);
System.out.printf("pi to 5 decimal places = %8.5f%n", Math.PI);
System.out.printf(Locale.FRANCE,
   "pi to 3 decimal places in French notation = %6.3f%n", Math.PI);
They produce the following logcat output:
04-03 11:49:15.926 I/System.out(31732): pi = 3.141592653589793
04-03 11:49:15.927 I/System.out(31732): pi to 5 decimal places =  3.14159
04-03 11:49:15.959 I/System.out(31732): pi to 3 decimal places in French notation =  3,142
The println() statement accepts a string, which can usually be a concatenation of a string and other mathematical types like the double specified by Math.PI. The printf() statement has as its arguments an optional Locale (which tailors the format to that appropriate for the specified Locale), a string defining the desired output format, and a list of variables. In the first printf() statement above, %8.5f specifies a decimal format of width 8 places with 5 of those places after the decimal and %n is the line return for the system (see Formatter for a complete list of formatting options). The second printf() statement above specifies Locale.FRANCE as the Locale, which causes the decimal output to be formatted at it would in France, with commas instead of periods.
To format decimal numbers you can also use a utility method such as the following one, which
accepts a double d and returns a double rounded to decimalPlace decimal places.
Then the statement sends pi = 3.1416 to the logcat output. The qualifier static means that the method doesn't use instance variables or methods (a static method can use only parameters, local variables, static constants, other static methods within the same class). A method generally should be declared static if it meets these conditions. The qualifer private means that this method is not accessible to other classes. Methods should generally be declared private if they will only be used in the present class. |
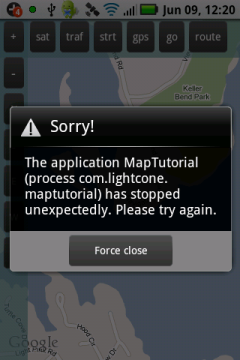
The following figure shows the dreaded and completely uninformative Force Close message associated with the crash of an app launched on an actual device (From the days of Android when dinosaurs still roamed the Earth: a Motorola Backflip phone running Android 1.5!).
|
This program had been tested and usually ran correctly, but the failure was triggered by a sequence of actions different from that for the usual use of the program. If following this crash (or before) we issue in a shell
adb -d logcat -v time
(the -d flag assumes that this is the only physical device connected), we obtain the log associated with activity on the phone. Near the end of that output we find the following lines, with times given up to milliseconds
   06-09 12:18:21.766 I/ActivityManager(   91): Displayed activity com.lightcone.maptutorial/.MapTutorial: 473 ms
   06-09 12:18:21.846 I/GPStest ( 2546): GPS position changed: oldLat=35.956549 oldLong=-83.92517328 newLat=35.956549 newLong=-83.92517328
   06-09 12:18:21.846 W/dalvikvm( 2546): threadid=3: thread exiting with uncaught exception (group=0x4000ff28)
   06-09 12:18:21.856 E/AndroidRuntime( 2546): Uncaught handler: thread main exiting due to uncaught exception
   06-09 12:18:21.856 E/AndroidRuntime( 2546): java.lang.NullPointerException
   06-09 12:18:21.856 E/AndroidRuntime( 2546): at com.lightcone.maptutorial.MapTutorial.onLocationChanged(MapTutorial.java:596)
   06-09 12:18:21.856 E/AndroidRuntime( 2546): at android.location.LocationManager$ListenerTransport._handleMessage(LocationManager.java:184)
   06-09 12:18:21.856 E/AndroidRuntime( 2546): at android.location.LocationManager$ListenerTransport.access$000(LocationManager.java:117)
   06-09 12:18:21.856 E/AndroidRuntime( 2546): at android.location.LocationManager$ListenerTransport$1.handleMessage(LocationManager.java:133)
   06-09 12:18:21.856 E/AndroidRuntime( 2546): at android.os.Handler.dispatchMessage(Handler.java:99)
   06-09 12:18:21.856 E/AndroidRuntime( 2546): at android.os.Looper.loop(Looper.java:123)
   06-09 12:18:21.856 E/AndroidRuntime( 2546): at android.app.ActivityThread.main(ActivityThread.java:3977)
   06-09 12:18:21.856 E/AndroidRuntime( 2546): at java.lang.reflect.Method.invokeNative(Native Method)
   06-09 12:18:21.856 E/AndroidRuntime( 2546): at java.lang.reflect.Method.invoke(Method.java:521)
   06-09 12:18:21.856 E/AndroidRuntime( 2546): at com.android.internal.os.ZygoteInit$MethodAndArgsCaller.run(ZygoteInit.java:782)
   06-09 12:18:21.856 E/AndroidRuntime( 2546): at com.android.internal.os.ZygoteInit.main(ZygoteInit.java:540)
   06-09 12:18:21.856 E/AndroidRuntime( 2546): at dalvik.system.NativeStart.main(Native Method)
This is much more informative! The first line indicates that the phone launched an activity MapTutorial and the second line is a user-generated diagnostic output indicating that 80 milliseconds later there was a GPS position-change event. This second line was generated by line 596 in the following block of code in the Java file MapTutorial.java.
583	public void onLocationChanged(Location arg0) {
584	  double oldLat = 0;
585	  double oldLong = 0;
586	  if(loc != null){
587	    oldLat = loc.getLatitude();
588	    oldLong = loc.getLongitude();
589    }
590	  // If the location has changed, center the map on the new location
591	  loc = locman.getLastKnownLocation(provider);
592	  if(loc != null){
593	    double lat = loc.getLatitude();
594	    double lon = loc.getLongitude();
595	    Log.i(TAG, "GPS position changed: oldLat="+oldLat+" oldLong="+oldLong+" newLat="+lat+" newLong="+lon);
596	    route.putLocation(new GeoPoint((int)(loc.getLatitude()*1e6), (int)(loc.getLongitude()*1e6)));
597	    centerOnLocation();
598
599	    // GPS Satellite accuracy (meters)
600      if(loc.hasAccuracy()){
601	      satAccuracy = loc.getAccuracy();
602	      Log.i(TAG,"Accuracy="+satAccuracy+" meters");
603	      route.putSatInfo(numberSats,satAccuracy);
604      }
605    }
606  }
| Note: the program we are using for illustration is an older one written using the original Google Maps API for Android and older versions of Location Services. While the code listed above is still functional on Android devices, it is deprecated and one should now use the new Maps API and Location Services, as we illustrate in the Map Example project. The distinction is irrelevant for the error that we are illustrating here. |
The I/GPStest tag on the corresponding line in the logcat output is because it was generated by a user-inserted Log.i command (the I) in line 595, and the GPStest part is because earlier in this file we find the definition
27 String TAG = "GPStest";
Everything appears normal until this point, but in the next logcat line we see that immediately (less than 1 millisecond later) the Dalvik virtual machine issues a warning (tagged W/dalvikvm) that it is terminating execution of a thread because of an uncaught exception. In the following lines we see that the Android runtime promptly issues an error message (tagged E/AndroidRuntime) indicating a nullPointerException---we have tried to operate on something that does not exist---and follows with a series of lines indicating exactly where in the Java code the exception occurred: It is in line 596 of the Java file MapTutorial.java, which is within the method onLocationChanged (the lines after that in the logcat output trace in sequence how that method was invoked, when read in reverse order).
So this gives us a lot of information about what caused the error: we now know that it is precipitated by the line
596  route.putLocation(new GeoPoint((int)(loc.getLatitude()*1e6),
         (int)(loc.getLongitude()*1e6)));
in the method onLocationChanged of the file MapTutorial.java, and our sleuthing suggests that it is associated in some way with detection of a GPS location change that triggers an action on something that does not exist at this point. Since the program was running normally before this crash, and performs correctly in most circumstances, it is further implied that this is not a general outcome of such an event but is because of a particular set of circumstances that occurred in this example.
The two user-defined objects associated with line 596 are loc, which is an Android Location object (instantiation of the class android.location.Location), and route, which is an instance of the user-defined RouteSegmentOverlay class. In line 591 we see that the value of loc has been set by invoking the getLastKnownLocation() method of locman, which is an instantiation of the Android class android.location.LocationManager. Consulting the documentation for the LocationManager class, we find that the variable loc can indeed be null because getLastKnownLocation() can return null (for example, if the location provider does not exist). But the programmer, savvy dude that he is, must have anticipated this because the offending statement 596 is enclosed in an if-statement that permits it to be executed only if loc is not null (see line 592); furthermore, that loc is not null is confirmed by the sensible diagnostic logcat output of line 595 for the latitude and longitude derived from the loc object. Thus, we are led to suspect the route object: a particular situation must have been encountered in which route was null when we tried to invoke its putLocation() method in line 596.
This was an actual bug in an actual program and the above diagnosis was confirmed by inserting a line
if(route == null) Log.i(TAG,"Problem: route is null");
before line 592 in the preceding code. The simple cure for this bug was to change line 592 to
592 if(loc != null && route != null){
Calling something before it is created is a likely indication of some faulty logic in organization of the code that should perhaps be corrected. However, testing of the above fix indicated that it was adequate since the statements to be executed are relevant only if the route object exists.
This, by the way, illustrates a type of bug that is common on mobile devices
such as smart phones if they are not programmed carefully because
|
Attempting to manipulate a null quantity is a sure-fire way to generate an exception in short order. The standard guards against such errors are (1) to understand your code logic so that you do not attempt to use objects before they are created, (2) to test logically for null values before performing operations that are not valid on null objects, and (3) to use try-catch enclosures to catch and process exceptions more gracefully if they do occur.
Last modified: July 25, 2016