This project introduces the basic idea of Fragments, which are an essential part of modern Android programming and will be used in various ways for some of the following projects. A Fragment is basically a piece of the user interface or a behavior that has its own lifecycle (see this overview). In that sense it is like an Activity, but with some important differences. The most fundamental is that a fragment runs within a larger activity: a fragment cannot exist apart from an activity, and the fragment lifecycle is dependent on the lifecycle of the activity. For example, if the activity is stopped no fragments inside of it can be started, and when the activity is destroyed all fragments that it contains will be destroyed.
The utility of fragments derives from their flexibility: while a fragment must be paired with an activity, it doesn't have to be paired with the same activity each time it is instantiated, and an activity can contain more than one fragment. This gives us considerable leeway in using fragments to alter the user interface in differing circumstances, such as when the same application is displayed in vertical or horizontal mode on a device, or when the same application is deployed on a phone with a smaller screen or on a tablet with a larger screen. In addition, we shall see that fragments define pieces of the user interface that we can interact with dynamically, programatically adding them, removing them, or replacing them with other fragments, thereby providing even more flexibility in implementing user interfaces.
|
The Fragment API was introduced with Android 3.0 (Honeycomb), but it is possible to
deploy fragments on older platforms through special
support libraries. We shall assume that we are writing for post-3.0 Android devices and not concern ourselves with the issue of support for older devices. Also, a fragment need not have a visual user interface, since they can be used as "headless worker fragments", but our examples will all involve the most common usage where the fragment becomes part of the UI.
More information about fragments may be found in the Fragments Developer Guide, in the Supporting Tablets and Handsets document, and in Building a Dynamical UI (with this latter emphasizing use of the support libraries making fragments compatible with older Android versions). |
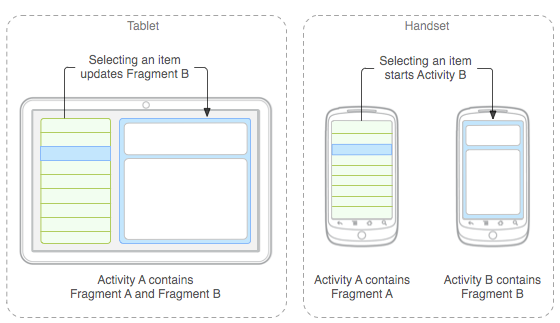
A primary motivation for the introduction of fragments was to support both phones and tablets efficiently in portrait and landscape mode. Phones and tablets generally have significantly different amounts of screen space (though "phablets" with intermediate-size screens are blurring the distinction). Thus, the optimal layout of a given set of components on a phone may differ from that for a tablet. Likewise, even confining ourselves to a phone or tablet, the optimal layout of an application's components in portrait (vertical) and landscape (horizontal) mode may be different. By introducing fragments as as kind of "sub-activity" that could be embedded in activities, it became possible to lay out the same functionality in various ways. The following figure gives a simple illustration.
|
In this example we have an application where we wish to present a list of options to a user, and when one of the options is selected we wish to display a more extensive set of information associated with that option. For example, the list could be a set of headlines for news articles and the more extensive information could be the content for an article selected from the list.
We decide that if the phone (or tablet) is in landscape mode there is enough room to display efficiently both the headline list and the news stories side by side, as in the above-left figure. Then we would like selecting something from the list on the left to display the corresponding article in the window on the right, with all action and display confined to a single screen. On the other hand, for a phone in portrait mode there is not likely to be room to display the list and articles on the same screen without scrolling (which we would like to avoid), so we opt for the option shown in the above-right figure, with the list displayed on a first screen and, when an item of the list is clicked, the initial screen containing the list is replaced by a new screen containing the article (with the user then employing the Back button to return to the list to select a new article). We can use fragments to accomplish this efficiently in the following way.
This example illustrates succinctly how a set of fragments can be used to deploy the same content in different ways in response to various display conditions.
Let us now create a project to explore the basics of fragments and fragment management. This project will illustrate some of the most important aspects of using fragments:
We shall also in this project pay particular attention to lifecycles of fragments and their relationship with lifecycles of their activity containers, since understanding these lifecycle relationships is critical to efficient use of fragments.
| In the project Themes, Styles, & Preferences we give a separate introduction to a fragments-based approach for the specific issue of managing SharedPreferences. |
Let us now create a project that illustrates the use of Fragments. Because we will use a method introduced in API 23 to replace a deprecated method, the minimum API for this project will be set at 23 to keep the discussion clean. (A version that works back to API 15 may be found on GitHub at Fragmentation2.)
Following the general procedure in Creating a New Project, either choose Start a new Android Studio project from the Android Studio homepage, or from the Android Studio interface choose File > New > New Project. Fill out the fields in the resulting screens as follows,
|
Application Name:
Fragmentation
Company Domain:< YourNamespace > Package Name: <YourNamespace> . fragmentation Project Location: <ProjectPath> Fragmentation Target Devices: Phone and Tablet; Min SDK API 23 Add an Activity: Empty Activity Activity Name: MainActivity (check the Generate Layout File box) Layout Name: activity_main |
where you should substitute your namespace for <YourNamespace> (com.lightcone in my case) and <ProjectPath> is the path to the directory where you will store this Android Studio Project (/home/guidry/StudioProjects/ in my case). If you have chosen to use version control for your projects, go ahead and commit this project to version control.
Before we begin filling out the XML and Java files for this project, let's insert some image resources that will be needed. In the Android Studio project bar at the top of the project, right-click on app and select New > Folder > Assets Folder. In the resulting window select Target Sources Set: Main and click Finish. This should create a directory assets, which will appear under app/java in the Android view of the left projects panel and under Fragmentation/app/src/main in the Project view of the projects panel (this is the actual path to the directory on the disk of your computer). This assets directory is a good place to put things like image resources that our app will use because its contents will be exported with the app when it is installed on a device and, as we shall see below, the files in the assets directory can be accessed directly from our app. From the Image and Icon resource directory, copy the files
and paste them into the assets directory of your project that was just created. (You may have to download the files to a local directory and then copy them from there for this paste to work.)
Let us now create and populate the XML and Java files that we need for this project. Note: replace all references to <YourNamespace> with your namespace in the following listings.
Edit res/layout/activity_main.xml to give
<?xml version="1.0" encoding="utf-8"?>
<RelativeLayout xmlns:android="http://schemas.android.com/apk/res/android"
    xmlns:tools="http://schemas.android.com/tools"
    android:layout_width="match_parent"
    android:layout_height="match_parent"
    android:paddingBottom="@dimen/activity_vertical_margin"
    android:paddingLeft="@dimen/activity_horizontal_margin"
    android:paddingRight="@dimen/activity_horizontal_margin"
    android:paddingTop="@dimen/activity_vertical_margin"
    tools:context="<YourNamespace>.fragmentation.MainActivity">

    <fragment
        android:id="@+id/listFragment"
        android:layout_width="match_parent"
        android:layout_height="wrap_content"
        android:layout_marginTop="?android:attr/actionBarSize"
        class="<YourNamespace>.fragmentation.List_Fragment" />
</RelativeLayout>
Switch to the Projects view in the left projects panel (menu at top of the panel). Create the directory res/layout-land by right-clicking on res, selecting New > Directory, and giving the new directory the name layout-land. In this directory create the file res/layout-land/activity_main.xml by right-clicking on layout-land and selecting New > File, specify the file name activity_main.xml (giving the .xml extension explicitly in the file name) and clicking OK.
If you prefer, you can now switch back to the Android view in the projects panel. In Android view the new file will be called res/layout/activity_main/activity_main.xml(land). Don't confuse it with the primary layout file res/layout/activity_main/activity_main.xml; these files will define different layouts for landscape and portrait mode, respectively. Edit the new file activity_main.xml(land) to read
<?xml version="1.0" encoding="utf-8"?>
<LinearLayout xmlns:android="http://schemas.android.com/apk/res/android"
    android:layout_width="match_parent"
    android:layout_height="wrap_content"
    android:layout_marginLeft="5dp"
    android:layout_marginRight="10dp"
    android:baselineAligned="false"
    android:orientation="horizontal" >

    <fragment
        android:id="@+id/listFragment"
        android:layout_width="0dp"
        android:layout_height="match_parent"
        android:layout_marginTop="15dp"
        android:layout_weight="0.8"
        class="<YourNamespace>.fragmentation.List_Fragment" >
    </fragment>

    <fragment
        android:id="@+id/detailFragment"
        android:layout_width="0dp"
        android:layout_height="match_parent"
        android:layout_weight="1.5"
        class="<YourNamespace>.fragmentation.Detail_Fragment" >
    </fragment>

    <!-- Container for dynamically-added 3rd fragment -->

    <FrameLayout
        android:id="@+id/newFragment"
        android:layout_width="0dp"
        android:layout_height="fill_parent"
        android:layout_weight="0.7" />

</LinearLayout>
Create the file res/layout/activity_detail.xml and edit to read
<?xml version="1.0" encoding="utf-8"?>
<LinearLayout xmlns:android="http://schemas.android.com/apk/res/android"
    android:layout_width="match_parent"
    android:layout_height="match_parent"
    android:orientation="vertical" >

    <fragment
        android:id="@+id/detailFragment"
        android:layout_width="match_parent"
        android:layout_height="match_parent"
        class="<YourNamespace>.fragmentation.Detail_Fragment" />

</LinearLayout>
Create the file res/layout/added_fragment.xml and edit to read
<?xml version="1.0" encoding="utf-8"?>
<RelativeLayout xmlns:android="http://schemas.android.com/apk/res/android"
    android:id="@+id/RelativeLayout1"
    android:layout_width="match_parent"
    android:layout_height="wrap_content"
    android:orientation="vertical" >

    <TextView
        android:id="@+id/TextView2"
        android:layout_width="wrap_content"
        android:layout_height="wrap_content"
        android:layout_alignParentTop="true"
        android:layout_centerHorizontal="true"
        android:layout_marginTop="50dp"
        android:text=""
        android:textSize="14sp" />

</RelativeLayout>
Create the file res/layout/fragment_detail.xml and edit to read
<?xml version="1.0" encoding="utf-8"?>
<LinearLayout xmlns:android="http://schemas.android.com/apk/res/android"
    android:layout_width="match_parent"
    android:layout_height="match_parent"
    android:orientation="vertical" >

    <TextView
        android:id="@+id/planetLabel"
        android:layout_width="wrap_content"
        android:layout_height="wrap_content"
        android:layout_gravity="center_horizontal"
        android:layout_marginLeft="5dp"
        android:layout_marginRight="10dp"
        android:layout_marginTop="5dp"
        android:textSize="20sp" />

    <ImageView
        android:id="@+id/image"
        android:layout_width="match_parent"
        android:layout_height="match_parent"
        android:layout_gravity="center"
        android:paddingTop="20dp" />

</LinearLayout>
Create the file res/layout/fragment_overview.xml and edit to read
<?xml version="1.0" encoding="utf-8"?>
<RelativeLayout xmlns:android="http://schemas.android.com/apk/res/android"
    android:id="@+id/RelativeLayout1"
    android:layout_width="match_parent"
    android:layout_height="wrap_content"
    android:orientation="vertical" >

    <!--
    The android:text tags below should be defined in res/values/strings and
    referenced here. We hardwire them in for pedagogical clarity in this example.
    -->

    <TextView
        android:id="@+id/TextView1"
        android:layout_width="wrap_content"
        android:layout_height="wrap_content"
        android:layout_alignParentTop="true"
        android:layout_centerHorizontal="true"
        android:layout_gravity="center_horizontal"
        android:layout_marginTop="0dp"
        android:text="Choose Planet"
        android:textSize="20sp" />

    <Button
        android:id="@+id/button01"
        android:layout_width="match_parent"
        android:layout_height="wrap_content"
        android:layout_alignParentLeft="true"
        android:layout_below="@+id/TextView1"
        android:layout_marginTop="12dp"
        android:paddingLeft="0dp"
        android:paddingRight="0dp"
        android:text="Mars"
        android:textSize="18sp" />

    <Button
        android:id="@+id/button02"
        android:layout_width="match_parent"
        android:layout_height="wrap_content"
        android:layout_alignParentLeft="true"
        android:layout_below="@+id/button01"
        android:layout_marginTop="6dp"
        android:paddingLeft="0dp"
        android:paddingRight="0dp"
        android:text="Jupiter"
        android:textSize="18sp" />

    <Button
        android:id="@+id/button03"
        android:layout_width="match_parent"
        android:layout_height="wrap_content"
        android:layout_alignParentLeft="true"
        android:layout_below="@+id/button02"
        android:layout_marginTop="6dp"
        android:paddingLeft="0dp"
        android:paddingRight="0dp"
        android:text="Saturn"
        android:textSize="18sp" />

    <Button
        android:id="@+id/button04"
        android:layout_width="match_parent"
        android:layout_height="wrap_content"
        android:layout_alignParentLeft="true"
        android:layout_below="@+id/button03"
        android:layout_marginTop="6dp"
        android:paddingLeft="0dp"
        android:paddingRight="0dp"
        android:text="Toggle Frag"
        android:textSize="18sp" />

</RelativeLayout>
That completes entry of image resources and XML files. Let us now insert the Java classes required to implement this project.
Edit the class file MainActivity.java to give
package <YourNamespace>.fragmentation;

import android.os.Bundle;
import android.support.v7.app.AppCompatActivity;
import android.app.FragmentTransaction;
import android.content.Intent;
import android.util.Log;

public class MainActivity extends AppCompatActivity implements List_Fragment.OnItemSelectedListener {

    private final static String TAG = "FRAG";
    public static boolean fragAdded = false;

    private Added_Fragment adder;
    android.app.FragmentManager fm;
    FragmentTransaction ft;

    // Static variable to track index of the current image file
    public static int planetIndex = 0;

    // Array of image files.  Files with these names must be copied into the project
    // assets subdirectory.  The assets directory will be copied to the device when
    // the app is installed. All of the following strings should more properly be
    // defined in strings.xml but they are hardwired in here for clarity.

    public static String planetImage[] = {
            "hst_mars_opp_9709a.jpg",
            "jupiter_gany.jpg",
            "saturn.jpg"};

    // Array of planet labels
    public static String planetLabel[] = {"Mars", "Jupiter", "Saturn"};

    // Array of amplifying remarks
    public static String amplifyRemark[] = {
            "Mars is called the red planet. It has a thin atmosphere and polar ice caps.",
            "Jupiter is the largest planet, and has very strong magnetic fields.",
            "Saturn has the lowest density of any planet, less than that of water."};

    @Override
    protected void onCreate(Bundle savedInstanceState) {

        super.onCreate(savedInstanceState);
        setContentView(R.layout.activity_main);
        Log.i(TAG, "in onCreate, fragAdded =" + fragAdded);

    }

    public void onPause() {
        super.onPause();

        // Remove the amplifying remarks fragment if it exists to set a clean
        // stage if we come back.

        if (fragAdded && adder != null) {

            fm = getFragmentManager();
            ft = fm.beginTransaction();
            ft.remove(adder);
            ft.commit();
            fragAdded = false;
            Log.i(TAG, "Removing fragment in MainActivity.onPause(). fragAdded=" + fragAdded);
        }
    }

    public void onResume() {
        super.onResume();
        Log.i(TAG, "in onResume, fragAdded =" + fragAdded);
    }

    // This callback required because we are implementing List_Fragment.OnItemSelectedListener.
    // See the description of OnItemSelectedListener in List_Fragment.java. It will pass in the
    // id buttonNumber of the button pressed in List_Fragment.

    @Override
    public void onItemSelected(int buttonNumber) {

        Log.i("FRAG", "onItemSelected in MainActivity");

        // Get a reference to the Detail_Fragment (R.id.detailFragment is its ID) if it is in
        // the current view.

        Detail_Fragment fragment =
                (Detail_Fragment) getFragmentManager().findFragmentById(R.id.detailFragment);

        if (fragment == null || !fragment.isInLayout()) {
            Log.i(TAG, "No instance of Detail_Fragment in this view, so launch new screen");
        } else {
            Log.i(TAG, "Instance of Detail_Fragment found in this view, so update the view");
        }

        // Determine which button was pressed and store its index in a static variable
        // for easy reference from other classes. We can do this because, even though
        // the buttons pressed are in the fragment List_Fragment, this callback passes
        // in the id of the button pressed from there.

        switch (buttonNumber) {

            // Choose Mars
            case R.id.button01:
                planetIndex = 0;
                break;

            // Choose Jupiter
            case R.id.button02:
                planetIndex = 1;
                break;

            // Choose Saturn
            case R.id.button03:
                planetIndex = 2;
                break;

            // Toggle adding and removing the third fragment using fragment transactions.

            case R.id.button04:

                if (fragment == null) Log.i(TAG, "fragment is null");

                if (fragment != null && fragment.isInLayout()) {

                    Log.i(TAG, "fragAdded before transaction=" + fragAdded);

                    // If the third fragment has previously been added, remove it
                    if (fragAdded) {
                        fm = getFragmentManager();
                        ft = fm.beginTransaction();
                        ft.remove(adder);
                        // Example of replace
                        //ft.replace(R.id.newFragment, new List_Fragment());
                        ft.commit();
                        fragAdded = false;

                        // If the third fragment is not present, add it. It will go into the
                        // empty framelayout in res/layout-land/activity_main.xml.

                    } else {
                        adder = new Added_Fragment();
                        fm = getFragmentManager();
                        ft = fm.beginTransaction();
                        ft.add(R.id.newFragment, adder);

                        // Add transaction to backstack so the back button will remove the added
                        // fragment instead of taking you out of the app

                        ft.addToBackStack(null);

                        ft.commit();

                        // Bookkeeping to keep track of whether 3rd fragment is added
                        fragAdded = true;
                    }
                    Log.i(TAG, "fragAdded after transaction=" + fragAdded);
                }
                break;
        }

        // If the Detail_Fragment exists and is in the current layout, update its
        // text and image fields. If the 3rd fragment is in the layout, update its
        // text field.

        if (fragment != null && fragment.isInLayout()) {

            fragment.setText(planetLabel[planetIndex]);
            fragment.setImage(planetImage[planetIndex]);
            if (adder != null && adder.isAdded()) adder.setText(amplifyRemark[planetIndex]);

            // If the Detail_Fragment is not in the current layout, we must be in portrait
            // mode.  Launch a new screen to display Detail_Fragment when a button is pressed.

        } else {

            Intent intent = new Intent(getApplicationContext(), Detail_Activity.class);
            startActivity(intent);

        }
    }
}
Create the class file Added_Fragment.java and edit it to give
package <YourNamespace>.fragmentation;

import android.app.Fragment;
import android.content.Context;
import android.content.res.Configuration;
import android.os.Bundle;
import android.util.Log;
import android.view.LayoutInflater;
import android.view.View;
import android.view.ViewGroup;
import android.widget.TextView;

public class Added_Fragment extends Fragment {

    private final static String TAG = "FRAG";
    TextView tv;

    @Override
    public View onCreateView(LayoutInflater inflater, ViewGroup container,
                             Bundle savedInstanceState) {
        View view = inflater.inflate(R.layout.added_fragment, container, false);

        return view;
    }

    @Override
    public void onAttach(Context context) {

        super.onAttach(context);

    }

    @Override
    public void onActivityCreated(Bundle savedInstanceState) {

        super.onActivityCreated(savedInstanceState);

        if (getResources().getConfiguration().orientation == Configuration.ORIENTATION_LANDSCAPE) {
            Log.i(TAG, "planetIndex=" + MainActivity.planetIndex);
            setText(MainActivity.amplifyRemark[MainActivity.planetIndex]);
        }

    }

    @Override
    public void onDestroyView() {
        super.onDestroyView();

        // This seems necessary to manage things when there is the option of using the back button
        // to return to the previous state of the added fragment (because added to backstack in
        // MainActivity).

        MainActivity.fragAdded = false;
        Log.i(TAG, "onDestroyView() in Added_Fragment, fragAdded=" + MainActivity.fragAdded);
    }

    public void setText(String s) {
        tv = (TextView) getActivity().findViewById(R.id.TextView2);
        tv.setText(s);
    }
}
Create the class file Detail_Activity.java and edit it to give
package <YourNamespace>.fragmentation;

import android.content.res.Configuration;
import android.os.Bundle;
import android.support.v7.app.AppCompatActivity;
import android.util.Log;
import android.widget.TextView;

public class Detail_Activity extends AppCompatActivity {

    private final static String TAG = "FRAG";

    @Override
    protected void onCreate(Bundle savedInstanceState) {
        super.onCreate(savedInstanceState);

        Log.i(TAG, "Detail_Activity created");

        // Check if Activity has been switched to landscape mode.
        // If yes, finish and return to the start Activity

        if (getResources().getConfiguration().orientation ==
                Configuration.ORIENTATION_LANDSCAPE) {
            finish();
            return;
        }
        setContentView(R.layout.activity_detail);
        TextView view = (TextView) findViewById(R.id.planetLabel);
        view.setText(MainActivity.planetLabel[MainActivity.planetIndex]);
    }
}
Create the class file Detail_Fragment.java and edit it to give
package <YourNamespace>.fragmentation;

import java.io.IOException;
import java.io.InputStream;

import android.app.Fragment;
import android.content.Context;
import android.graphics.drawable.Drawable;
import android.os.Bundle;
import android.util.Log;
import android.view.LayoutInflater;
import android.view.View;
import android.view.ViewGroup;
import android.widget.ImageView;
import android.widget.TextView;

public class Detail_Fragment extends Fragment {

    private ImageView imageView;
    private final static String TAG = "FRAG";

    // The onCreate method of Fragment is called when the fragment is being
    // created. You cannot inflate fragment views here.  You must wait for
    // the onCreateView method to be called. You can initialize components of
    // the fragment here.

    @Override
    public void onCreate(Bundle savedInstanceState){
        super.onCreate(savedInstanceState);
    }

    // onCreateView() must be implemented by fragment to provide a layout. It
    // will be called when it is time for the fragment to draw its layout.  This
    // method must return a View that is the root of the fragment's layout. The
    // LayoutInflater inflates the view from the XML layout resource. The container
    // argument passed to OnCreateView is the ViewGroup parent into which the fragment
    // view will be inserted. The savedInstanceState bundle passed as an argument
    // contains data about the previous instance of the fragment, if it is being
    // resumed.

    @Override
    public View onCreateView(LayoutInflater inflater, ViewGroup container,
                             Bundle savedInstanceState) {
        View view = inflater.inflate(R.layout.fragment_detail, container, false);

        return view;
    }

    // The onPause method of Fragment is called when the user is no longer interacting
    // with the fragment. This can occur because its activity is being paused, or
    // because a fragment operation is modifying it in the activity. Any changes that
    // should be persisted beyond the current user session should be committed here.

    @Override
    public void onPause(){
        super.onPause();
    }

    // onActivityCreated is called when the activity hosting the fragment has returned
    // from its own Activity.onCreate method. The  view can now be accessed
    // by findViewById(), for example.

    @Override
    public void onActivityCreated(Bundle savedInstanceState){

        super.onActivityCreated(savedInstanceState);
        Log.i(TAG, getActivity().getComponentName().getClassName()+" has started");

        setImage(MainActivity.planetImage[MainActivity.planetIndex]);
        setText(MainActivity.planetLabel[MainActivity.planetIndex]);

    }

    // When a fragment has been associated with an activity, onAttach(activity) is called,
    // passing in the activity as its argument. It is associated with its activity, but
    // may not be fully initialized.

    @Override
    public void onAttach(Context context) {

        super.onAttach(context);
        Log.i(TAG, "Detail_Fragment attached to " + getActivity().getComponentName().getClassName());

    }

    // Set the planet label

    public void setText(String text) {
        TextView view = (TextView) getView().findViewById(R.id.planetLabel);
        view.setText(text);
    }

    // Load an image from file assetFile in the assets directory and display it.  The
    // contents of the assets directory are exported when the app is installed.

    public void setImage(String assetFile){

        try {
            // Get handle to the viewer
            imageView = (ImageView)getView().findViewById(R.id.image);
            // Get an input stream from image file in the assets directory
            InputStream is = getActivity().getAssets().open(assetFile);
            // Create a Drawable from the image stream
            Drawable drawable = Drawable.createFromStream(is, null);
            // Add the Drawable to the ImageView
            imageView.setImageDrawable(drawable);
        }
        catch(IOException ex) {
            return;
        }
    }
}
Create the class file List_Fragment.java and edit it to give
package <YourNamespace>.fragmentation;

import android.app.Fragment;
import android.content.Context;
import android.content.res.Configuration;
import android.os.Bundle;
import android.util.Log;
import android.view.LayoutInflater;
import android.view.View;
import android.view.ViewGroup;
import android.widget.Button;

public class List_Fragment extends Fragment {

    private OnItemSelectedListener listener;
    private static final String TAG = "FRAG";

    // The onCreate method of Fragment is called when the fragment is being
    // created. You cannot inflate fragment views here.  You must wait for
    // the onCreateView method to be called. You can initialize components of
    // the fragment here.

    @Override
    public void onCreate(Bundle savedInstanceState) {
        super.onCreate(savedInstanceState);

    }

    // The onCreateView method of Fragment is called when the fragment is
    // ready to draw its user interface for the first time.  This method must
    // return a View that is the root of the fragment layout, so that the
    // fragment view can be drawn (or it can return null if the fragment is
    // a worker fragment that does not have a layout). Only when this method has
    // been called can we safely inflate the view of the fragment.

    @Override
    public View onCreateView(LayoutInflater inflater, ViewGroup container,
                             Bundle savedInstanceState) {

        View view = inflater.inflate(R.layout.fragment_overview, container, false);

        Button button1 = (Button) view.findViewById(R.id.button01);
        button1.setOnClickListener(new View.OnClickListener() {
            @Override
            public void onClick(View v) {
                listener.onItemSelected(R.id.button01);
            }
        });

        Button button2 = (Button) view.findViewById(R.id.button02);
        button2.setOnClickListener(new View.OnClickListener() {
            @Override
            public void onClick(View v) {
                listener.onItemSelected(R.id.button02);
            }
        });

        Button button3 = (Button) view.findViewById(R.id.button03);
        button3.setOnClickListener(new View.OnClickListener() {
            @Override
            public void onClick(View v) {
                listener.onItemSelected(R.id.button03);
            }
        });

        Button button4 = (Button) view.findViewById(R.id.button04);

        // Only adding the 3rd fragment in landscape mode, so hide the 4th button
        // if not in landscape.

        if (getResources().getConfiguration().orientation != Configuration.ORIENTATION_LANDSCAPE)
            button4.setVisibility(View.INVISIBLE);

        button4.setOnClickListener(new View.OnClickListener() {
            @Override
            public void onClick(View v) {
                listener.onItemSelected(R.id.button04);
            }
        });

        return view;
    }

    // The onPause method of Fragment is called when the user is no longer interacting
    // with the fragment. This can occur because its activity is being paused, or
    // because a fragment operation is modifying it in the activity. Any changes that
    // should be persisted beyond the current user session should be committed here.

    @Override
    public void onPause() {
        super.onPause();
    }

    // When a fragment has been associated with an activity, onAttach(activity) is called,
    // passing in the activity as its argument.


    @Override
    public void onAttach(Context context) {

        super.onAttach(context);

        Log.i(TAG, "List_Fragment attached to " + getActivity().getComponentName().getClassName());

        // Instantiate the OnItemSelectedListener by casting the host activity (MainActivity,
        // in this case).  If the host MainActivity did not implement the interface OnItemSelectedListener,
        // this will throw a ClassCastException (since only if the interface was implemented can
        // MainActivity be cast to type OnItemSelectedListener).  If MainActivity did implement the
        // interface, the variable listener now holds a reference to MainActivity's implementation of
        // OnItemSelectedListener, so the present fragment can share events with the parent
        // activity MainActivity by calling methods defined in the OnItemSelectedListener interface.
        // For example, each time a button is clicked in the present fragment (see the onCreateView method
        // above), it fires the callback listener.onItemSelected(buttonID) in MainActivity.  By overriding the
        // onItemSelected(int buttonNumber) callback in MainActivity, we can then use the argument
        // buttonID that is passed by the callback to choose the image to display in fragment B (Detail_Fragment),
        // according to the button that was clicked in the present fragment.

        try {
            listener = (OnItemSelectedListener) getActivity();
        } catch (ClassCastException e) {
            throw new ClassCastException(getActivity().getComponentName().getClassName()
                    + " must implement ListFragment.OnItemSelectedListener");
        }

    }

	/* When a fragment needs to share events with its host activity, a good approach
     * is to define a callback interface within the fragment and then require that
	 * the host activity implement it. For example, in the present application,
	 * fragment A (the present List_Fragment) displays buttons that choose which image
	 * is displayed in an ImageView in fragment B (Detail_Fragment).  Fragment A (the
	 * present List_Fragment) must tell its host activity (MainActivity) which item has
	 * been selected so that it can tell fragment B (Detail_Fragment) what to display.
	 * So we declare the OnItemSelectedListener interface below in fragment A (the
	 * present List_Fragment), and then require that the container activity (MainActivity
	 * in this case) implement this interface and override its methods (in this case,
	 * there is only one: onItemSelected(int buttonNumber)).
	 */

    // Define an interface that the container activity MainActivity will be  required to implement

    public interface OnItemSelectedListener {
        public void onItemSelected(int buttonNumber);
    }
}
That completes the Java and XML files. The only thing remaining is to ensure that the manifest file contains the correct entries.
Edit the AndroidManifest.xml file to add the lines shown in red below.
<?xml version="1.0" encoding="utf-8"?>
<manifest xmlns:android="http://schemas.android.com/apk/res/android"
    package="<YourNamespace>.fragmentation">

    <application
        android:allowBackup="true"
        android:icon="@mipmap/ic_launcher"
        android:label="@string/app_name"
        android:supportsRtl="true"
        android:theme="@style/AppTheme">
        <activity android:name=".MainActivity">
            <intent-filter>
                <action android:name="android.intent.action.MAIN" />

                <category android:name="android.intent.category.LAUNCHER" />
            </intent-filter>
        </activity>
        <activity
            android:name=".Detail_Activity"
            android:label="Detail_Activity" >
        </activity>
    </application>

</manifest>
That completes input of the code and resources for the Fragmentation project. Let's give it a go and see what it does.
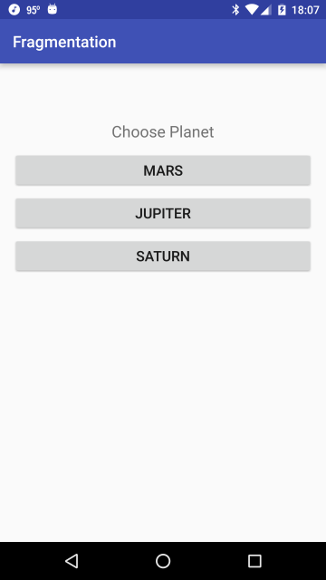
Run the app on a phone (or tablet, but the geometry of our example layouts is optimized for phones), with the phone initially in portrait mode. You should get a screen as displayed below left, and if you click on one of the buttons you should get a screen similar to that below right.
 |
 |
So in portrait mode, when a planet is selected on the first screen a new screen is display with an image of the corresponding planet. On the other hand, if you then shift the phone to landscape (horizontal) mode, you should get a display as in the figure below.
|
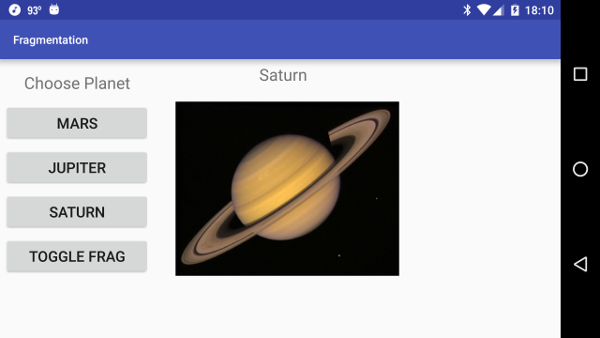
Now, the list of buttons and the images obtained by clicking on the first three buttons are displayed on the same screen, and a fourth button has been added. If you click the Toggle Frag button you should get a display like the one shown below, with an amplifying remark displayed alongside the image of the planet.
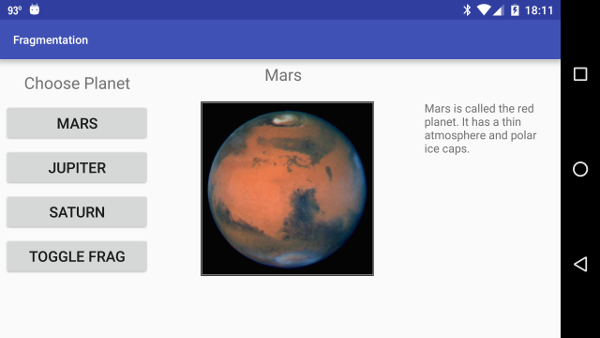
|
You should find that you can toggle the amplifying remarks on and off by clicking the Toggle Frag button. As we now discuss, this rather different layout behavior of the app in portrait and landscape mode is being accomplished by the same set of three Fragments, but organized within their activity containers in different ways, and with the switching handled transparently by the operating system.
How does our code accomplish the tasks demonstrated above? The functionality results primarily from the interplay of
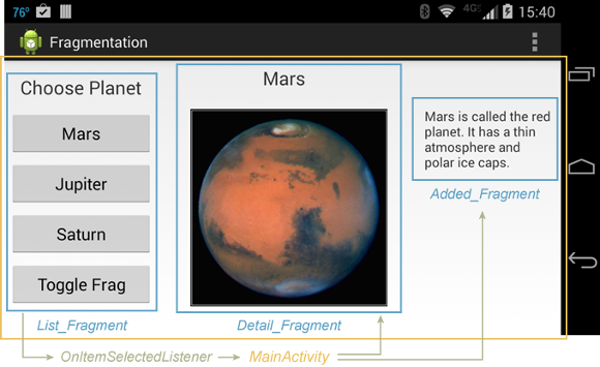
The next figure illustrates how these fragments are displayed in the MainActivity container while in landscape mode. (The following figures are screen shots from an older version of this app running Android KitKat with a Holo theme. The three dots indicating an overflow menu in the toolbar will be missing in the present version, and the theme is a material rather than holo theme in the present version.)
|
where the associated layout files are
and the interface OnItemSelectedListener defined in List_Fragment and implemented by MainActivity
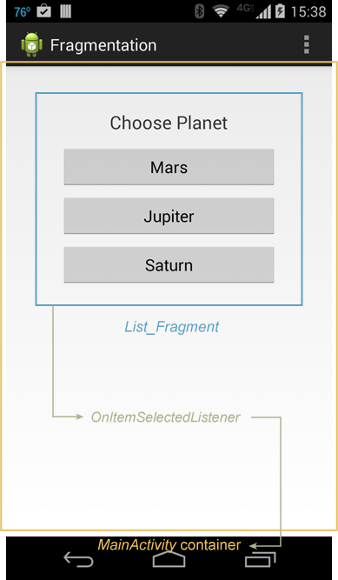
The following two figures illustrate the corresponding workflow for portrait mode.
 |
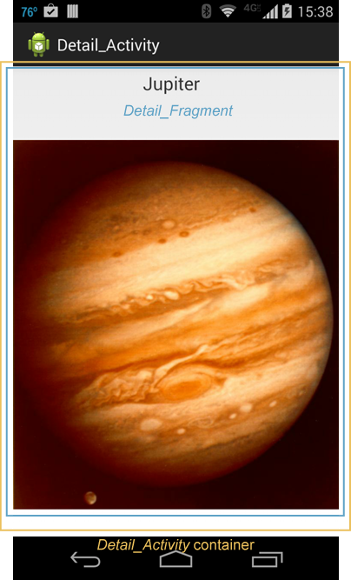 |
where the associated layout files are
the interface OnItemSelectedListener defined in List_Fragment and implemented by MainActivity
Thus we see in the above examples how fragments can be used to give different layouts of the same content for different device geometries.
The fragments List_Fragment and Detail_Fragment are added to their respective container activities through properties in the XML layout files. For example, the layout file activity_main.xml (land) is loaded in landscape mode and contains the fragment tags
<fragment
        android:id="@+id/listFragment"
        android:layout_width="0dp"
        android:layout_height="match_parent"
        android:layout_marginTop="15dp"
        android:layout_weight="0.8"
        class="<YourNamespace>.fragmentation.List_Fragment" >
</fragment>
<fragment
   android:id="@+id/detailFragment"
   android:layout_width="0dp"
   android:layout_height="match_parent"
   android:layout_weight="1.5"
   class="<YourNamespace>.fragmentation.Detail_Fragment" >
</fragment>
where the lines marked in red associate the fragment classes with the layout through the class attribute.
| The fragment reference in the XML file is required to be in a namespace, so it must be specified by a fully-qualified name such as <YourNamespace>.fragmentation.Detail_Fragment. |
On the other hand, the dynamically-added fragment Added_Fragment is associated with a tag in this same layout file res/layout-land/activity_main.xml,
<FrameLayout
      android:id="@+id/newFragment"
      android:layout_width="0dp"
      android:layout_height="fill_parent"
      android:layout_weight="0.7" />
which is empty, since it serves as the container into which we can add or remove the fragment Added_Fragment using code in MainActivity.java that references the id newFragment. This is accomplished through fragment transactions, with representative code in MainActivity.java to add the fragment given by
Added_Fragment adder = new Added_Fragment();
FragmentManager fm = getFragmentManager();
FragmentTransaction ft = fm.beginTransaction();
ft.add(R.id.newFragment, adder);
ft.addToBackStack(null);
ft.commit();
where the reference to the empty FrameLayout container shown above is indicated in red. In this code we
Provided that we retain a reference adder to the Added_Fragment instance that was added to the UI above, the fragment can be removed with code of the form
fm = getFragmentManager();
ft = fm.beginTransaction();
ft.remove(adder);
ft.commit();
Although not used here, one could also replace the fragment rather than remove it by using a statement of the form
ft.replace(R.id.newFragment, myFragment);
where myFragment is the fragment that is to replace adder.
| If a fragment is added to an activity through the layout XML file, as we did for List_Fragment and Detail_Fragment, it cannot be removed at runtime. To swap fragments in and out dynamically the fragment must be added to the activity when the activity first starts, as was described above for the fragment Added_Fragment. |
An important issue in using fragments is how to communicate events that may occur in the fragment (the buttons being pushed in the present example) to its host activity, which will then take some action in response to the events. When a fragment needs to share events with its host activity, a good approach is to
Recall from the discussion in the
WebView Demo project that
an
interface
is similar to, but not the same as, a class. An interface cannot contain any method bodies, only constants, nested types, and method signatures (methods without bodies). An interface cannot be instantiated; it can only be
|
For example, in the present application,
and then require that the container activity (MainActivity) implement this interfacepublic interface OnItemSelectedListener { public void onItemSelected(int buttonNumber); }
and thus is required to override its methods. In this case there is only one, onItemSelected(int buttonNumber), so we implement in MainActivitypublic class MainActivity extends AppCompatActivity implements List_Fragment.OnItemSelectedListener { . . . }
@Override
public void onItemSelected(int buttonNumber) {
   .
   .
   .
}
We do this by casting the host MainActivity to an OnItemSelectedListener. This is done in the List_Fragment callback onAttach(Context context) because when a fragment has been associated with an activity, onAttach(context) is called, passing in the context as its argument. (If we tried to do it before, we would get a nullPointerException, since the fragment likely will not yet be associated with the activity.)@Override public void onAttach(Context context) { super.onAttach(context); try { OnItemSelectedListener listener = (OnItemSelectedListener) getActivity(); } catch (ClassCastException e) { throw new ClassCastException( getActivity().getComponentName().getClassName() + " must implement ListFragment.OnItemSelectedListener"); } }
and this callback passes in the ID of the button that was clicked as the variable buttonID, so that it becomes accessible to MainActivity.Button button3 = (Button) view.findViewById(R.id.button03); button3.setOnClickListener(new View.OnClickListener() { @Override public void onClick(View v) { listener.onItemSelected(R.id.button03); } });
Thus it is seen that interfaces provide a systematic way to communicate information about events occurring in a fragment to the activity that is hosting it.
The classes List_Fragment.java and Detail_Fragment are rather heavily commented for each of the lifecycle methods that they implement, and a number of Log statements output logcat messages that allow the fragment manipulations to be traced. You are urged to study those comments and logcat output, and the discussion in the documentation, because to use and manipulate fragments it is important to understand when particular operations can be carried out on the fragment. For example, one cannot get a reference to the activity hosting a fragment until the onAttach(activity) callback has been called (as noted above), and one cannot inflate views and get a reference to them before the onCreateView() method has fired.
| The complete project for the application described above (limited to API 23 and above) is archived on GitHub at the link Fragmentation. (A version that works for earlier versions back to API 15 may be found at Fragmentation2.) Instructions for installing these projects in Android Studio may be found in Packages for All Projects. |
Last modified: August 2, 2016