In this project the Solar System animation introduced in Animator Demo II is extended to a much more realistic model of the Solar System. A similar animation technique is used but
A significant part of this project uses techniques that have been explained in the Progress Bar Example, Animator Demo I, and Animation Demo II projects. Thus, we will show the full code listing and concentrate our explanation on those things that are new in this implementation.
Following the general procedure in Creating a New Project, either choose Start a new Android Studio project from the Android Studio homepage, or from the Android Studio interface choose File > New > New Project. Fill out the fields in the resulting screens as follows,
|
Application Name:
SolarSystem
Company Domain:< YourNamespace > Package Name: <YourNamespace> . solarsystem Project Location: <ProjectPath> SolarSystem Target Devices: Phone and Tablet; Min SDK API 15 Add an Activity: Empty Activity Activity Name: MainActivity (check the Generate Layout File box) Layout Name: activity_main |
where you should substitute your namespace for <YourNamespace> (com.lightcone in my case) and <ProjectPath> is the path to the directory where you will store this Android Studio Project (/home/guidry/StudioProjects/ in my case). If you have chosen to use version control for your projects, go ahead and commit this project to version control.
This project will use a custom icon, and also will use custom images to implement decision buttons. The images that are required can be found in the images directory. Open this directory, download the images
and place them in the res/drawable directory of this project. (You may have to refresh Android Studio to get it to recognize the new images.)
The entire project will consist of a single screen that animates motion in the Solar System and the motion on this screen will be implemented by a Java class. Thus, this screen will be laid out entirely in Java code (activity_main.xml will not be used). However, we will implement a toolbar menu that we do need to lay out in XML. Switch to Project view in the project pane (select Project in the dropdown menu at the top of the pane) and create the directory .../res/menu, if it doesn't already exist. In the menu subdirectory just created add the file app/src/main/res/menu/main.xml by right-clicking on the menu subdirectory, choosing New > File (Not New > XML, which would cause Android Studio to place the file in the wrong directory), and giving the file the name main.xml (with .xml extension) in the popup window. Switch back to the Android view in the project pane and edit this file to read
 <menu xmlns:android="http://schemas.android.com/apk/res/android"
    xmlns:app="http://schemas.android.com/apk/res-auto">

    <item
        android:id="@+id/speed_decrease"
        android:icon="@drawable/speed_decrease"
        android:orderInCategory="0"
        app:showAsAction="always"
        android:title="" />
    <item
        android:id="@+id/speed_increase"
        android:icon="@drawable/speed_increase"
        android:orderInCategory="10"
        app:showAsAction="always"
        android:title="" />
    <item
        android:id="@+id/zoom_out"
        android:icon="@drawable/zoom_out"
        android:orderInCategory="20"
        app:showAsAction="always"
        android:title=""/>
    <item
        android:id="@+id/zoom_in"
        android:icon="@drawable/zoom_in"
        android:orderInCategory="30"
        app:showAsAction="always"
        android:title=""/>

    <item
        android:id="@+id/toggle_labels"
        android:orderInCategory="40"
        app:showAsAction="never"
        android:title="Toggle Labels"/>

    <item
        android:id="@+id/action_settings"
        android:orderInCategory="100"
        app:showAsAction="never"
        android:title="Settings"/>

</menu>
Next we have to modify the style so that it does not have an ActionBar because we are going to use a Toolbar instead of an ActionBar. Open the file res/values/style.xml and change the theme to one without an ActionBar:
<resources>

    <!-- Base application theme. -->
    <style name="AppTheme" parent="Theme.AppCompat.Light.NoActionBar">

        <!-- Customize your theme here. -->
        <item name="colorPrimary">@color/colorPrimary</item>
        <item name="colorPrimaryDark">@color/colorPrimaryDark</item>
        <item name="colorAccent">@color/colorAccent</item>
    </style>

</resources>
Then, create a new class file KeplerRunner.java (extending View) and edit it to read as follows.
package <YourNamespace>.solarsystem;

import android.content.Context;
import android.graphics.Canvas;
import android.graphics.Color;
import android.graphics.Paint;
import android.graphics.drawable.ShapeDrawable;
import android.graphics.drawable.shapes.OvalShape;
import android.os.Handler;
import android.util.Log;
import android.view.View;
import android.view.View.OnLongClickListener;
import android.view.View.OnClickListener;
import android.widget.Toast;

public class KeplerRunner extends View implements OnClickListener, OnLongClickListener {

    private static final String TAG = "ANIM";         // Diagnostic label

    // class constants defining state of the thread
    private static final int DONE = 0;
    private static final int RUNNING = 1;

    private static final int ORBIT_COLOR = Color.argb(255, 220, 220, 220);
    private static final int PLANET_COLOR = Color.argb(255, 255, 255, 255);
    private static final int LABEL_COLOR = Color.argb(255, 255, 255, 255);
    private static final int SUN_COLOR = Color.YELLOW;
    private static final int nsteps = 600;             // number animation steps around orbit
    private static final int numpoints = 100;           // number points used to draw orbit as line segments
    // angular increment for orbit straight-line segment
    private static final float dphi = (float) (2 * Math.PI / (float) numpoints);
    private static final double THIRD = 1.0 / 3.0;
    private static final int planetRadius = 7;         // radius of spherical planet (pixels)
    private static final int sunRadius = 12;            // radius of sun (pixels)
    private static final float X0 = 0;                 // x offset from center (pixels)
    private static final float Y0 = 0;                 // y offset from center (pixels)
    private static final double direction = -1;        // Orbit direction: counter-clockwise -1; clockwise +1
    private static final double fracWidth = 0.95;      // Fraction of screen width to use for display
    private static final int numObjects = 12;          // Number of bodies to include (max = 12)

      /* Data for 8 planets, dwarf planet Pluto, 2 Apollo (Earth-crossing) asteroids,  and Halley's
      Comet. (See http://neo.jpl.nasa.gov/orbits/ for asteroid and comet orbits.) The semimajor
      elliptical axis a is in astronomical units (AU),  eccentricity epsilon is dimensionless,  period is
      in years, and theta0 (initial angle) is in radians (there are 57.3 degrees per radian), with
      clockwise positive and measured from the 12-o'clock position.  orientDeg[] is the relative
      orientation of the ellipse in degrees.  The variable retroFac controls whether the motion is
      direct (+1) or retrograde (-1). The relative orientations of the ellipses were eyeballed
      from a plot, so are only approximately correct.  Likewise, the initial orientation angles theta0
      were eyeballed from plots and are approximately correct for the date October 6, 2010.
      The period and semimajor axis length are not independent, being related by Kepler's 3rd
      law P = a^{3/2} in these units.  We include them as separate static final arrays for
      computational efficiency. */

    private static final String planetName[] = {"Mercury", "Venus", "Earth", "Mars", "Jupiter", "Saturn",
            "Uranus", "Neptune", "Pluto", "2008 VB4", "2009 FG", "Halley"};
    private static final double epsilon[] = {0.206, 0.007, 0.017, 0.093, 0.048, 0.056,
            0.047, 0.009, 0.248, 0.617, 0.529, 0.967};
    private static final double a[] = {0.387, 0.723, 1.0, 1.524, 5.203, 9.54,
            19.18, 30.06, 39.53, 2.35, 1.97, 17.83};
    private static final double period[] = {0.241, 0.615, 1.0, 1.881, 11.86, 29.46,
            84.01, 164.8, 248.5, 3.61, 2.76, 75.32};
    private static final double theta0[] = {5.1, 1.4, 1.2, 1.6, 1.2, 4.4, 1.2, 2.0, 5.6, 3.1, 3.1, 3.1};
    private static final float orientDeg[] = {0f, 0.0f, 0f, 100f, 0f, 0f, 0f, 0f, 200f, 70f, -45f, 115f};
    private static final double retroFac[] = {1, 1, 1, 1, 1, 1, 1, 1, 1, 1, 1, -1};  // +1 direct; -1 retrograde

    private Paint paint;                           // Paint object controlling format of screen draws
    private ShapeDrawable planet;                  // Planet symbol
    private float X[];                             // Current X position of planet (pixels)
    private float Y[];                             // Current Y position of planet (pixels)
    private float centerX;                         // X for center of display (pixels)
    private float centerY;                         // Y for center of display (pixels)
    private float R0[];                            // Radius of planetary orbit in pixels
    private double theta[];                        // Planet angle (radians clockwise from 12 o'clock)
    private double dTheta[];                       // Angular increment each step (radians)
    private double pixelScale;                     // Scale factor: number of pixels per AU
    private double c1[];                           // The constant distance scale factor a*(1+epsilon^2)
    private double c2[];                           // Constant used to computer dTheta[i] from dt
    private double dt;                             // Animation timestep (years)
    private long delay = 20;                       // Milliseconds of delay in the update loop
    private double zoomFac = 1.0;                  // Zoom factor (relative to 1) for display
    public boolean showLabels = false;             // Whether to show planet labels
    private static int mState = DONE;              // Whether thread runs
    private static boolean isAnimating = true;     // Whether planet motion is updated on screen
    private boolean showOrbits = true;             // Whether to show the orbital paths as curves
    private boolean showToast1 = true;             // Whether to Toast indicating short-press action
    private boolean showToast2 = true;             // Whether to Toast indicating long-press action

    // Handler to implement updates from the background thread to views
    // on the main UI

    private Handler handler = new Handler();


    public KeplerRunner(Context context) {
        super(context);
        X = new float[numObjects];
        Y = new float[numObjects];
        theta = new double[numObjects];
        dTheta = new double[numObjects];
        R0 = new float[numObjects];
        c1 = new double[numObjects];
        c2 = new double[numObjects];
        dt = 1 / (double) nsteps;

        // Add click and long click listeners
        setOnClickListener(this);
        setOnLongClickListener(this);

        for (int i = 0; i < numObjects; i++) {
            theta[i] = -direction * theta0[i];
        }

        // Define the planet as circular shape
        planet = new ShapeDrawable(new OvalShape());
        planet.getPaint().setColor(PLANET_COLOR);
        planet.setBounds(0, 0, 2 * planetRadius, 2 * planetRadius);

        // Set up the Paint object that will control format of screen draws
        paint = new Paint();
        paint.setAntiAlias(true);
        paint.setTextSize(12);
        paint.setStrokeWidth(0);

    }


      /* The View display size is only available after a certain stage of the layout.  Before then
      the width and height are by default set to zero.  The onSizeChanged method of View
      is called when the size is changed and its arguments give the new and old dimensions.
      Thus this can be used to get the sizes of the View after it has been laid out (or if the
      layout changes, as in a switch from portrait to landscape mode, for example). */

    @Override
    protected void onSizeChanged(int w, int h, int oldw, int oldh) {

        // Coordinates for center of screen (X0 and Y0 permit arbitrary offset of center)
        centerX = w / 2 + X0;
        centerY = h / 2 + Y0;

        // Make orbital radius a fraction of minimum of width and height of display and scale
        // by zoomFac.
        pixelScale = zoomFac * fracWidth * Math.min(centerX, centerY) / a[4];

        // Set the initial position of the planet (translate by planetRadius so center of planet
        // is at this position)
        for (int i = 0; i < numObjects; i++) {
            // Compute scales c1[] and c2[] carrying distance units in pixels
            c1[i] = pixelScale * a[i] * (1 - epsilon[i] * epsilon[i]);
            c2[i] = direction * 2 * Math.PI * Math.sqrt(1 - epsilon[i] * epsilon[i])
                    * dt * (pixelScale * a[i]) * (pixelScale * a[i]) / period[i];
            R0[i] = (float) distanceFromFocus(c1[i], epsilon[i], theta[i]);
            // The change in theta consistent with Kepler's 2nd law (equal areas in equal time)
            dTheta[i] = c2[i] / R0[i] / R0[i];
            // New values of X and Y for planet
            X[i] = centerX - R0[i] * (float) Math.sin(theta[i]) - planetRadius;
            Y[i] = centerY - R0[i] * (float) Math.cos(theta[i]) - planetRadius;
        }

        // Start the animation thread now that we have the screen geometry

        startAnimation();
    }

    // Method to start the animation thread

    public void startAnimation() {

        // Operation on background thread that updates the main thread through handler.

        Log.i(TAG, "startAnimation()");

        KeplerRunner.mState = RUNNING;
        KeplerRunner.isAnimating = true;

        new Thread(new Runnable() {
            public void run() {
                while (KeplerRunner.mState == RUNNING && KeplerRunner.isAnimating) {

                    // Update the X and Y coordinates for all planets
                    newXY();

                    // The method Thread.sleep throws an InterruptedException if Thread.interrupt()
                    // were to be issued while thread is sleeping; the exception must be caught.
                    try {
                        // Control speed of update (but precision of delay not guaranteed)
                        Thread.sleep(delay);
                    } catch (InterruptedException e) {
                        Log.e("ERROR", "Thread Interruption");
                    }

                    // Update the animation by invalidating the view to force a redraw.
                    // We cannot update views on the main UI directly from this thread, so we use
                    // handler to do it.

                    handler.post(new Runnable() {
                        public void run() {
                            // Each time through the animation loop,  invalidate the main UI
                            // view to force a redraw.
                            invalidate();
                        }
                    });
                }
            }
        }).start();
    }

      /* Method to increment angle theta and compute the new X and Y .  The orbits of the
      planets are ellipses with the Sun at one focus.   */

    private void newXY() {
        for (int i = 0; i < numObjects; i++) {
            dTheta[i] = retroFac[i] * c2[i] / R0[i] / R0[i];
            theta[i] += dTheta[i];
            R0[i] = (float) distanceFromFocus(c1[i], epsilon[i], theta[i]);
            X[i] = (float) (R0[i] * Math.sin(theta[i])) + centerX - planetRadius;
            Y[i] = centerY - (float) (R0[i] * Math.cos(theta[i])) - planetRadius;
        }
    }

    // Method to change the zoom factor
    void setZoom(double scale) {
        if (!isAnimating) return;
        zoomFac *= scale;
        pixelScale = zoomFac * fracWidth * Math.min(centerX, centerY) / a[4];
        for (int i = 0; i < numObjects; i++) {
            c1[i] = pixelScale * a[i] * (1 - epsilon[i] * epsilon[i]);
            c2[i] = direction * 2 * Math.PI * Math.sqrt(1 - epsilon[i] * epsilon[i])
                    * dt * (pixelScale * a[i]) * (pixelScale * a[i]) / period[i];
        }
    }

    // Method to change the speed of the animation.  Returns long int equal to the new
    // delay, or -1 if no delay change because the animation is not active, or -2 if
    // the requested new delay would be less than 1.

    long setDelay(double factor) {
        if (!isAnimating) return -1;
        if (delay == 1 && factor < 1) return -2;
        // Logic below because delay is long int, so keep it from getting less than 1 and also
        // allow it to increase from small values.
        delay = Math.max((long) (delay * factor), 1);
        if (delay < 10 && factor > 1) delay += 2;
        return delay;
    }


      /* This method will be called each time the screen is redrawn. The draw is
      on the Canvas object, with formatting controlled by the Paint object.
      When to redraw is under Android control, but we can request a redraw
      using the method invalidate() inherited from the View superclass.  In this
      case the method handler() calls invalidate() when it receives a message from
      the animation thread that it has completed one pass through the animation loop. */

    @Override
    public void onDraw(Canvas canvas) {

        super.onDraw(canvas);

               /* The equations we are solving for Kepler's laws define elliptical motion for a planet,
            comet, or asteroid about the Sun at one focus of the ellipse.  But the objects in the
            Solar System generally have different orientations for the long axis of the ellipse, so
            to plot the correct relative orientation of different elliptical orbits on the same plot we
            must rotate each solution by a specific amount (given in the array orientDeg[]).
            This rotation can be implemented in one of two ways.  (1) We can define
            our own 2-dimensional rotation matrix and use it to rotate the coordinates for
            the instantaneous position of each planet, and the shape defining its orbit, before
            plotting it.  (2) We can use the translate(dx, dy) and rotate(angle) methods of the
            Canvas class to transform the canvas appropriately for each object before plotting it.
            Both approaches are complicated by the fact that the origin of the computer graphics
            coordinate system is at the upper left corner, but we are executing elliptical motion
            about a point at the center of the screen, so these transformation involve both
            translations and rotations.  In the following example we employ the 2nd approach and
            use the rotate and translate methods of Canvas to rotate orbits. Notice also that
            we are adopting the fiction that all bodies being considered have the same plane for
            their ellipses.  Except for Pluto and Comet Halley, this is almost true for the objects
            considered here.  Pluto's orbit is tilted about 17 degrees out of the plane of the ecliptic
            (plane defined by the Earth's orbit), Halley's orbit by about 70 degrees, and Mercury's
            orbit by 7 degrees.  All others are within several degrees of the ecliptic plane.  Thus,
            the model in this example is an idealized but almost correct one where the realistic
            elliptical orbits have been tilted when necessary to coincide with the ecliptic plane,
            but their relative orientations within the ecliptic plane are approximately correct.
            To treat the orbits more correctly we need 3D graphics.*/

        // First draw the background (Sun and orbital paths)
        drawBackground(paint, canvas);
        paint.setColor(LABEL_COLOR);  // Label font color
        paint.setTextSize(30);        // Label font size

        // Now loop over the planets, asteroids, dwarf planets, and comets, placing the
        // corresponding symbol at the appropriate position.

        for (int i = 0; i < numObjects; i++) {

            // The nested sets of save() .. restore() below keep the matrix transformations
            // (translations and rotations in this case) from affecting the drawing on the canvas
            // outside of the save() .. restore() blocks.  Note: for each save() there is
            // a matching restore().

            canvas.save();
            canvas.translate(centerX, centerY);
            canvas.rotate(orientDeg[i]);
            canvas.translate(X[i] - centerX, Y[i] - centerY);
            planet.draw(canvas);

            // Rotate the canvas back before drawing label so it will be horizontal instead of
            // having the orientation of the ellipse. This save() .. restore() block is nested inside
            // the outer one, so this inverse rotation affects only the orientation of the label.

            canvas.save();
            canvas.rotate(-orientDeg[i]);
            if (showLabels) canvas.drawText(planetName[i], 10, 0, paint);
            canvas.restore();
            canvas.restore();
        }
    }

    // Called by onDraw to draw the background
    private void drawBackground(Paint paint, Canvas canvas) {

        // Draw the Sun
        paint.setColor(SUN_COLOR);
        paint.setStyle(Paint.Style.FILL);
        canvas.drawCircle(centerX, centerY, sunRadius, paint);

        // Orbits drawn with line segments if showOrbits is true
        if (showOrbits) {
            paint.setStyle(Paint.Style.STROKE);
            paint.setColor(ORBIT_COLOR);
            double phi = 0;

            // Loop over each object, drawing its orbit as a sequence of numpoints line segments
            for (int i = 0; i < numObjects; i++) {

                // Starting points to draw orbit.  Note that the sign of the y coordinate is flipped
                float lastxx = 0;
                float lastyy = -(float) (distanceFromFocus(c1[i], epsilon[i], phi) * Math.cos(phi));

                canvas.save();
                canvas.translate(centerX, centerY);
                canvas.rotate(orientDeg[i]);
                phi = 0;

                // Increase density of plot points for very elliptical orbits to resolve their shapes
                int plotpoints = numpoints;
                double delphi = dphi;
                if (epsilon[i] > 0.7) {
                    plotpoints *= 3;
                    delphi *= THIRD;
                }
                // Draw the orbit for object i
                for (int j = 0; j < plotpoints; j++) {
                    phi += delphi;
                    float rr = (float) distanceFromFocus(c1[i], epsilon[i], phi);
                    float xx = (float) (rr * Math.sin(phi));
                    float yy = -(float) (rr * Math.cos(phi));  // Sign flipped
                    canvas.drawLine(lastxx, lastyy, xx, yy, paint);
                    lastxx = xx;
                    lastyy = yy;
                }
                canvas.restore();
            }
        }
    }

    // Return distance from focus for elliptical orbit (in units of c1)
    private double distanceFromFocus(double c1, double epsilon, double theta) {
        return (c1 / (1 + epsilon * Math.cos(theta)));
    }

    // Stop the thread loop
    public void stopLooper() {
        mState = DONE;
        isAnimating = false;
    }

    // Start the thread loop
    public void startLooper() {
        if (!isAnimating) {
            String ts = "Long-press to toggle motion on/off";
            Toast.makeText(this.getContext(), ts, Toast.LENGTH_LONG).show();
        }
    }

    // Use long-press to toggle motion on and off.

    @Override
    public boolean onLongClick(View v) {
        String ts = "Long-press toggles planet motion on/off";
        isAnimating = !isAnimating;
        if (isAnimating) {
            mState = RUNNING;
            startAnimation();
        } else {
            mState = DONE;
        }
        if (showToast2) Toast.makeText(this.getContext(), ts, Toast.LENGTH_LONG).show();
        showToast2 = false;   // Show only the first time
        return true;          // Consume event so long-press doesn't trigger onClick also
    }

    // Use short press to toggle visibility of orbits

    @Override
    public void onClick(View v) {
        String ts = "Short-press toggles orbit visibility";
        showOrbits = !showOrbits;
        if (showToast1) Toast.makeText(this.getContext(), ts, Toast.LENGTH_LONG).show();
        showToast1 = false;   // Show only the first time
    }
}
Now let us instantiate KeplerRunner.java and lay out the corresponding animation screen and control buttons. Open the file edit MainActivity.java and edit it to have the content
package <YourNamespace>.solarsystem;

import android.support.v7.app.AppCompatActivity;
import android.graphics.Color;
import android.os.Bundle;
import android.util.Log;
import android.view.Menu;
import android.view.MenuItem;
import android.view.ViewGroup.LayoutParams;
import android.widget.LinearLayout;
import android.widget.Toast;
import android.support.v7.widget.Toolbar;

public class MainActivity extends AppCompatActivity {

    private static final double delayScaler = 1.2;
    private static final double zoomScaler = 1.1;
    private static final int BACKGROUND_COLOR = Color.argb(255, 0, 0, 0);
    private KeplerRunner krunner;
    Toolbar toolbar;
    LinearLayout LL1;

    @Override
    public void onCreate(Bundle savedInstanceState) {
        super.onCreate(savedInstanceState);

               /* In the following we lay out the screen entirely in code (activity_main.xml
               * isn't used).  We wish to lay out a stage for planetary motion using LinearLayout.
               * The instance krunner of KeplerRunner is added to a LinearLayout LL1 using addView.
               * Then we use setContent to set the content view to LL1. The formatting of the layouts
               * is controlled using the LinearLayout.LayoutParams lp.
               * */

        LinearLayout.LayoutParams lp = new LinearLayout.LayoutParams(
                LayoutParams.MATCH_PARENT, LayoutParams.MATCH_PARENT, 100);

        LL1 = new LinearLayout(this);
        LL1.setOrientation(LinearLayout.VERTICAL);

        // Create top Toolbar using code rather than xml.  Note that this assumes that in styles.xml
        // a no action bar theme is set: <style name="AppTheme" parent="Theme.AppCompat.Light.NoActionBar">

        // Instantiate a Toolbar from its constructor and add properties to it
	toolbar = new Toolbar(this);

	// Set background color.  Handle method getColor deprecated as of API 23
        if (Build.VERSION.SDK_INT >= Build.VERSION_CODES.M) {
            toolbar.setBackgroundColor(getResources().getColor(R.color.colorPrimary, null));
        } else {
            toolbar.setBackgroundColor(getResources().getColor(R.color.colorPrimary));
        }

        toolbar.setNavigationIcon(R.drawable.solar_system_icon);
        toolbar.setTitle("");

        // Attach the toolbar to the view
        LL1.addView(toolbar);

        // Set the toolbar as the ActionBar for this window
        setSupportActionBar(toolbar);

        // Instantiate the class MotionRunner to define the entry screen display and add it
        // to the view.

        krunner = new KeplerRunner(this);
        krunner.setLayoutParams(lp);
        krunner.setBackgroundColor(BACKGROUND_COLOR);
        LL1.addView(krunner);

        // Set the view as the display

        setContentView(LL1);

    }

    @Override
    public boolean onCreateOptionsMenu(Menu menu) {

        // Inflate the toolbar menu
        toolbar.inflateMenu(R.menu.main);

        return true;
    }

    @Override
    public void onPause() {
        super.onPause();
        // Stop animation loop if going into background
        krunner.stopLooper();
        Log.i("ANIM", "onPause");
    }

    @Override
    public void onResume() {
        super.onResume();
        // Resume animation loop
        krunner.startLooper();
        Log.i("ANIM", "onResume");
    }

    // Process action bar menu items
    @Override
    public boolean onOptionsItemSelected(MenuItem item) {

        Log.i("ANIM", "OptionItemsSelected");
        // Handle item selection
        switch (item.getItemId()) {

            // Run slower
            case R.id.speed_decrease:
                krunner.setDelay(delayScaler);
                return true;

            // Run faster
            case R.id.speed_increase:
                long test = krunner.setDelay(1 / delayScaler);

                // Method setDelay() returns -2 if new delay would be < 1
                if (test == -2) {
                    Toast.makeText(this, "Maximum speed. Can't increase",
                            Toast.LENGTH_SHORT).show();
                }
                return true;

            // Zoom out
            case R.id.zoom_out:
                krunner.setZoom(1 / zoomScaler);
                return true;

            // Zoom in
            case R.id.zoom_in:
                krunner.setZoom(zoomScaler);
                return true;

            // Toggle labels
            case R.id.toggle_labels:
                krunner.showLabels = !krunner.showLabels;
                return true;

            // Settings page
            case R.id.action_settings:
                // Actions for settings page
                return true;

            default:
                return super.onOptionsItemSelected(item);
        }
    }
}
Finally, we need to modify the manifest file to implement a custom icon for our application. Open AndroidManifest.xml and modify the icon attribute for the application tag as indicated below for the line shown in red.
<application
      android:allowBackup="true"
      android:icon="@drawable/solar_system_icon"
      android:label="@string/app_name"
      android:supportsRtl="true"
      android:theme="@style/AppTheme" >
      <activity android:name=".MainActivity"
            <intent-filter>
               <action android:name="android.intent.action.MAIN" />

               <category android:name="android.intent.category.LAUNCHER" />
            </intent-filter>
      </activity>
</application>
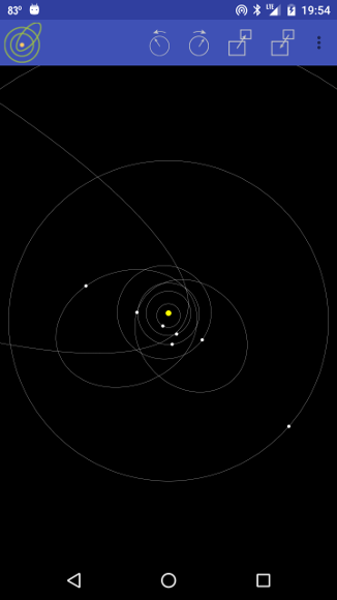
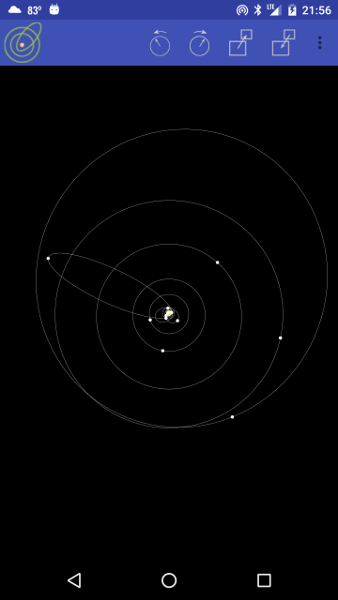
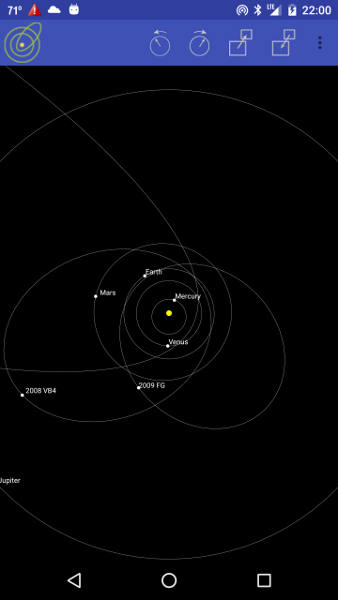
Execute the app on a device or an emulator, which should give a screen that looks like the following figure
|
with the objects in motion on their orbits, and the buttons at the top controlling zoom level, speed, and label display. You should also find that the orbit display can be toggled on and off with a click on the screen and the motion can be toggled on and off with a long-press.
This code is rather heavily commented, so much of its functionality should not be too hard to grasp if the reader is already familiar with the earlier animation examples. However, in the next two sections we outline some of the most important functionality, and things that are new in this more complex animation.
The animation layout is accomplished entirely by the code in MainActivity.java, as now described.
LinearLayout.LayoutParams lp = new LinearLayout.LayoutParams(
      LayoutParams.MATCH_PARENT, LayoutParams.MATCH_PARENT, 100);
LinearLayout LL1 = new LinearLayout(this);
LL1.setOrientation(LinearLayout.VERTICAL);
where the Resources method getColor(id) was deprecated in API 23. The AppCompatActivity method setSupportActionBar(Toolbar toolbar) sets a Toolbar to act as the ActionBar for the Activity window.// Create top toolbar using code rather than xml. Note that this assumes that in styles.xml // a no action bar theme is set: <style name="AppTheme" parent="Theme.AppCompat.Light.NoActionBar"> // Instantiate a Toolbar from its constructor and add properties to it toolbar = new Toolbar(this); // Set background color. Handle method getColor deprecated as of API 23 if (Build.VERSION.SDK_INT >= Build.VERSION_CODES.M) { toolbar.setBackgroundColor(getResources().getColor(R.color.colorPrimary, null)); } else { toolbar.setBackgroundColor(getResources().getColor(R.color.colorPrimary)); } toolbar.setNavigationIcon(R.drawable.solar_system_icon); toolbar.setTitle(""); // Attach the toolbar to the view LL1.addView(toolbar); // Set the toolbar as the ActionBar for this window setSupportActionBar(toolbar);
(See this nice tutorial for an overview of using the Toolbar and ActionBar in Android.)public boolean onCreateOptionsMenu(Menu menu) { // Inflate the toolbar menu toolbar.inflateMenu(R.menu.main); return true; }
Finally, in the onPause() and onResume() methods we implement some standard life-cycle management to stop the animation thread when the app is in the background.
The class KeplerRunner implements the entire initial display and subsequent animation. Most of its features should be familiar from the preceding Animator Demo 2 project:
Most of our specific discussion will center on new features required because of the increased reality and thus complexity of the animation
| An overview of Kepler's laws and the equations that we are using for this project may be found in the Wikipedia articles Kepler's Laws and Ellipses. Data for orbits of objects in the Solar System used here (and many additional ones) can be obtained from the NASA sites Near Earth Objects and Solar System Bodies. |
 |
 |
| In this exercise we are adopting the fiction that all bodies being considered have the same plane for their ellipses. Except for Pluto, Mercury, and Comet Halley, this is almost true for the objects considered here. Pluto's orbit is tilted about 17 degrees out of the plane of the ecliptic (plane defined by the Earth's orbit), Halley's orbit by about 70 degrees, and Mercury's orbit by 7 degrees. All others are within several degrees of the ecliptic plane. Thus, the model in this example is an idealized but almost correct one where the realistic elliptical orbits have been rotated when necessary to coincide with the ecliptic plane, but their relative orientations within the ecliptic plane are approximately correct. To treat the orbits correctly we need 3D graphics, which is beyond the scope of the present project illustrating 2D graphical techniques. |
| The complete project for the application described above is archived on GitHub at the link SolarSystem. Instructions for installing it in Android Studio may be found in Packages for All Projects. |
Last modified: July 7, 2016