A very useful feature of the Android API (available in Android 1.6 and later) is a rich and easy to use set of text to speech (TTS) resources that allow conversion of text strings to spoken voice. These capabilites are implemented primarily through the TextToSpeech class. By employing methods and class constants of the Locale class, it is generally possible to customize both the language and dialect of the spoken voice (subject to availability of language data on the device). Since the device can be self-aware of position if it has access to Location services, it is even possible to automatically switch the default language to correspond to the present location of the device. This project gives a concise introduction to the basics of text to speech conversion.
Following the general procedure in Creating a New Project, either choose Start a new Android Studio project from the Android Studio homepage, or from the Android Studio interface choose File > New > New Project. Fill out the fields in the resulting screens as follows,
|
Application Name:
SpeakToMe
Company Domain:< YourNamespace > Package Name: <YourNamespace> . speaktome Project Location: <ProjectPath> SpeakToMe Target Devices: Phone and Tablet; Min SDK API 21 Add an Activity: Empty Activity Activity Name: MainActivity (check the Generate Layout File box) Layout Name: activity_main |
where you should substitute your namespace for <YourNamespace> (com.lightcone in my case) and <ProjectPath> is the path to the directory where you will store this Android Studio Project (/home/guidry/StudioProjects/ in my case). If you have chosen to use version control for your projects, go ahead and commit this project to version control.
Now we modify this skeleton project to accomplish the following.
Let us now create and populate the XML and Java files needed for this project.
Let's first define the main layout and some strings that will be required. Open res/values/strings.xml and edit it to read
<?xml version="1.0" encoding="utf-8"?>
<resources>

<string name="app_name">Speak To Me</string>
<string name="goLabel">Speak</string>
<string name="clearLabel">Clear Text</string>
<string name="enter_text">(Enter text)</string>
<string name="action_settings">Settings</string>

</resources>
Then open res/layout/activity_main.xml and implement the layout for an EditText field and two Buttons:
<?xml version="1.0" encoding="utf-8"?>
<LinearLayout xmlns:android="http://schemas.android.com/apk/res/android"
android:layout_width="fill_parent"
android:layout_height="fill_parent"
android:orientation="vertical" >

<EditText
	android:id="@+id/speak_input"
	android:layout_width="fill_parent"
	android:layout_height="wrap_content"
	android:hint="@string/enter_text"
	android:inputType="text" />

<LinearLayout
	android:layout_width="fill_parent"
	android:layout_height="wrap_content"
	android:orientation="horizontal" >

	<Button
	android:id="@+id/speak_button"
	android:layout_width="fill_parent"
	android:layout_height="wrap_content"
	android:layout_weight="1.0"
	android:text="@string/goLabel" />

	<Button
	android:id="@+id/clear_button"
	android:layout_width="fill_parent"
	android:layout_height="wrap_content"
	android:layout_weight="1.0"
	android:text="@string/clearLabel" />
</LinearLayout>

</LinearLayout>
Now we implement the Java code that will allow text entered in the text field to be converted to speech when the Speak button is pressed.
Open the file MainActivity.java and edit it to read
package <YourNamespace>.speaktome;

import android.os.Bundle;
import android.support.v7.app.AppCompatActivity;
import android.view.Menu;
import java.util.Locale;
import android.content.Intent;
import android.speech.tts.TextToSpeech;
import android.speech.tts.TextToSpeech.OnInitListener;
import android.util.Log;
import android.view.View;
import android.view.View.OnClickListener;
import android.widget.EditText;

//Class to test text-to-speech capabilities

public class MainActivity extends AppCompatActivity implements OnInitListener, OnClickListener {

	private static final int CHECK_DATA = 0;
	private static final Locale defaultLocale = Locale.UK;   // British English
	private static final String TAG = "TTS";
	private TextToSpeech tts;
	private boolean isInit = false;
	private View speakButton;
	private View clearButton;
	private EditText speakText;

	@Override
	protected void onCreate(Bundle savedInstanceState) {
		super.onCreate(savedInstanceState);
		setContentView(R.layout.activity_main);

		// Identify buttons and add click listeners
		speakButton = findViewById(R.id.speak_button);
		speakButton.setOnClickListener(this);
		clearButton = findViewById(R.id.clear_button);
		clearButton.setOnClickListener(this);

		// Identify EditText field
		speakText = (EditText) findViewById(R.id.speak_input);

		// Disable text field and speak button until text to speech initialization is done
		// (See method onInit() below)

		speakButton.setEnabled(false);
		speakText.setEnabled(false);

		// Use an Intent and startActivityForResult to check whether TTS data installed on the
		// device. Result returned and acted on in method onActivityResult(int, int, Intent) below.

		Intent checkIntent = new Intent();
		checkIntent.setAction(TextToSpeech.Engine.ACTION_CHECK_TTS_DATA);
		startActivityForResult(checkIntent, CHECK_DATA);
	}

	// Create the TTS instance if TextToSpeech language data are installed on device.  If not
	// installed, attempt to install it on the device.

	protected void onActivityResult(int requestCode, int resultCode, Intent data) {
		if (requestCode == CHECK_DATA) {
			if (resultCode == TextToSpeech.Engine.CHECK_VOICE_DATA_PASS) {

				// Success, so create the TTS instance.  But can't use it to speak until
				// the onInit(status) callback defined below runs, indicating initialization.

				Log.i(TAG, "Success, let's talk");
				tts = new TextToSpeech(this,  this);

				// Use static Locales method to list available locales on device
				Locale locales [] = Locale.getAvailableLocales();
				Log.i(TAG,"Locales Available on Device:");
				for(int i=0; i<locales.length; i++){
					String temp = "Locale "+i+": "+locales[i]+" Language="
							+locales[i].getDisplayLanguage();
					if(locales[i].getDisplayCountry() != "") {
						temp += " Country="+locales[i].getDisplayCountry();
					}
					Log.i(TAG, temp);
				}

			} else {
				// missing data, so install it on the device
				Log.i(TAG, "Missing Data; Install it");
				Intent installIntent = new Intent();
				installIntent.setAction(TextToSpeech.Engine.ACTION_INSTALL_TTS_DATA);
				startActivity(installIntent);
			}
		}
	}

	// Must wait for initialization before any speech can be synthesized.  The class
	// implements OnInitListener and the following callback has been overridden to
	// implement actions that will be executed once initialized.

	@Override
	public void onInit(int status) {
		if(status == TextToSpeech.SUCCESS){
			isInit = true;

			// Enable input text field and speak button now that we are initialized
			speakButton.setEnabled(true);
			speakText.setEnabled(true);

			// Set to a language locale after checking availability
			Log.i(TAG, "available="+tts.isLanguageAvailable(Locale.UK));
			tts.setLanguage(defaultLocale);
			// Examples of voice controls.  Set to defaults of 1.0.
			tts.setPitch(1.0F);
			tts.setSpeechRate(1.0F);
			// Issue a greeting and instructions in the default language
			speakGreeting(defaultLocale.getDisplayLanguage());
		} else {
			isInit = false;
			Log.i(TAG, "Failure: TTS instance not properly initialized");
		}
	}

	// Method to issue greeting and instructions

	public void speakGreeting(String currentLanguage){
		String text1 = "Let's test text to speech in "+currentLanguage+". ";
		text1 += "Enter some "+currentLanguage+" text and press the speak button.";
		sayIt(text1, true);
	}

	// Implement text to speech for an arbitrary string entered in the EditText field
	// for the Speak button and text clear for the Clear button.

	@Override
	public void onClick(View v) {
		switch(v.getId()){
		case R.id.speak_button:
			String speakString = speakText.getText().toString();
			sayIt(speakString,true);
			break;
		case R.id.clear_button:
			speakText.setText("");
			break;
		}
	}

	// Method to speak a string.  The boolean flushQ determines whether the text is
	// appended to the queue (if false), or if the queue is flushed first (if true).

	public void sayIt(String text, boolean flushQ){
		if(isInit){
			if(flushQ){
				tts.speak(text, TextToSpeech.QUEUE_FLUSH, null, null);
			} else {
				tts.speak(text, TextToSpeech.QUEUE_ADD, null, null);
			}
		} else {
			Log.i(TAG, "Failure: TTS instance not properly initialized");
		}
	}

	// Release TTS resources when finished
	@Override
	protected void onDestroy(){
		super.onDestroy();
		Log.i(TAG,"Destroy");
		tts.shutdown();
	}
}
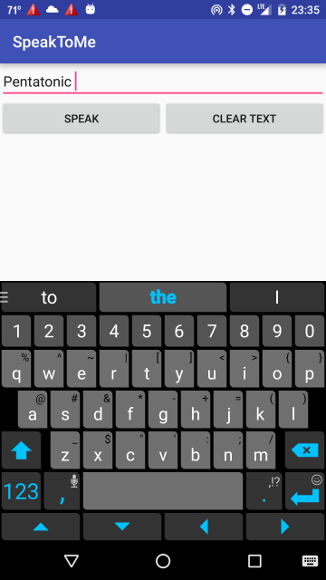
If this is now executed in a emulator or on a phone with TTS capability, you should see the following display (the keyboard may not be displayed until you touch the text input field)
|
and the TTS synthesizer should speak brief instructions. If you enter some text and click Speak, the synthesizer should voice the text entered (with the present locale set to British English).
Let's summarize how MainActivity.java implements this functionality.
where ACTION_CHECK_TTS_DATA is a constant of the TextToSpeech.Engine class that starts an activity to verify proper installation and availability of language resource files on the system. We then use the Intent in thecheckIntent.setAction(TextToSpeech.Engine.ACTION_CHECK_TTS_DATA);
statement, where the startActivityForResult(Intent intent, int requestCode) method of Activity is like the startActivity (Intent) method except that it returns a result: when the activity that was started exits, our onActivityResult() method (discussed below) will be called with the requestCode specified above as one argument and a resultCode as another argument.startActivityForResult(checkIntent, CHECK_DATA);
|
The language options may be device dependent, and may depend on where the device is deployed. They may also be overridden by current phone settings.
For example, when I first wrote this code, Android 2.1 was current. The present example spoke with a British voice (as requested) when run on an Android 2.1 emulator, but when run on an AT&T Captivate (Samsung Galaxy S) phone in the United States it defaulted to U.S. English, even though the checks output to logcat indicated that Locale.UK was installed. This was because for the Captivate the option Settings > Text-to-speech > Always use my settings was checked by default. This caused the phone to override app Locale commands and always use the language specified in Settings > Text-to-speech > Language. When I unchecked this option, the phone began speaking with a British English voice.
In this example the listing of available Locales output to logcat had about 80 entries for the emulator versus only a little more than half of that for the Captivate phone back in the Android 2.1 days. On the other hand, in 2014 with a Moto-X phone running Android 4.4.2 the logcat output indicated 596 Locales available. Finally, if you run on a device, you may be presented with an initial choice for TTS engines when you run the app. |
to create an Intent called installIntent, set its action to install TTS data through the TextToSpeech.Engine class constant ACTION_INSTALL_TTS_DATA, and launch a new Activity using startActivity(installIntent) with this Intent as argument. This should trigger the platform TextToSpeech engine to start the activity that installs the resource files on the device that are required for TTS to be operational.Intent installIntent = new Intent(); installIntent.setAction(TextToSpeech.Engine.ACTION_INSTALL_TTS_DATA); startActivity(installIntent);
| Because the user could interrupt this process at any point, it should not generally be assumed that the preceding step will always be carried out. We won't worry about that here, but in a realistic application one should use the constant CHECK_VOICE_DATA_PASS as above to confirm that the data have been installed on the device before proceeding. |
| The onDestroy() method is generally used to perform any final cleanup before an activity is destroyed, either because something called finish() on it, or because the system is temporarily destroying this instance of the activity to save space. onDestroy() is not guaranteed to be called (the system may kill the activity's process directly without calling this method), so it is not a good place to save data. However, it is a good place to free resources like threads or TTS engines associated with an activity, so that a destroyed activity does not leave such things about when not needed. Note that Android generally requires a call through to the superclass method (super.onDestroy() in this case) when a lifecycle method is overridden. |
This simple exercise illustrates many of the basic features of TextToSpeech and should serve as a starting template for more ambitious applications. Three possibilities are suggested below in the Exercises. A project implementing a Spinner permitting the user to choose a language (Exercise 1) may be found at this Exercise solution.
| The complete project for the application described above is archived on GitHub at the link SpeakToMe. Instructions for installing it in Android Studio may be found in Packages for All Projects. |
Last modified: July 8, 2016