Previous  | Next  | Home

Select Exercise Solutions


WebView Demo

1. See the sample code listings under the WebView documentation.

2. Modify Webscreen.java by adding the red lines in the following listing:

package com.lightcone.webviewdemo; import android.app.Activity; import android.os.Bundle; import android.webkit.WebSettings; import android.webkit.WebView; import android.util.Log; public class Webscreen extends Activity { public static final String URL = ""; private static final String TAG = "Class Webscreen"; WebSettings wset; /** Called when the activity is first created. */ @Override public void onCreate(Bundle savedInstanceState) { super.onCreate(savedInstanceState); setContentView(R.layout.webscreen); String turl = getIntent().getStringExtra(URL); Log.i(TAG, "Recipe url = "+turl); WebView webview = new WebView(this); setContentView(webview); wset = webview.getSettings(); wset.setBuiltInZoomControls(true); // Simplest usage: No exception will be thrown for a page-load error webview.loadUrl(turl); } }
Now if you drag on a web page opened by the app, zoom controls should pop up. This solution is implemented in the project
WebViewDemo2.


Animal Sounds

1. We begin from the basic
AnimalSounds app. Let's customize it for a particular small child so that
  1. The app has a custom launch icon that is a picture of the child.

  2. We add more animal pictures and sounds (in the demo shown here, we won't actually add new animals---just a child; see below---but we will set things up in arrays so that adding additional animals will just be a matter of adding to the length of the arrays).

  3. We modify the app so that each time an animal sound is played the button that was clicked changes to a new animal.

  4. We add the child's picture and sound to the mix of animals, so that sometimes an animal is replaced by a picture of the child, and clicking that button will then play a sound associated with the child.

  5. When a button is clicked, the selection of the new picture is random among the possibilities, except that we require the image to be replaced with a different image, and we require that at any one time each button on the screen corresponds to a different image.
This solution is implemented in the GitHub project AnimalSounds2. (This is a project created originally in Eclipse that was imported into Android Studio; instructions for installing it in Android Studio may be found in Packages for All Projects.) The primary modifications of AnimalSounds to obtain AnimalSounds2 were:
  1. Add new animal images, the child icon image, and the child image for the button to the drawable directory of the project (all images used in AnimalSounds2 may be found in the course images resource page).

  2. Add the required new sounds to the raw directory (all sounds used in AnimalSounds2 may be found in the course audio/video resource page).

  3. Change AndroidManifest.xml to point to the image of the child as the app icon:

    <application android:icon="@drawable/del_icon" android:label="@string/app_name">
  4. Add buttonBaby.xml to the drawable directory to define the button states for the new child image.

  5. In AnimalSounds2.java, import required new classes such as android.widget.ImageView, android.media.MediaPlayer, and java.util.Random.

  6. Move variables such as button1, button2, button3 out of onCreate to give them class scope, and define them to be of type ImageView.

  7. Add corresponding casts to ImageView in the findViewById statements.

  8. Create the integer arrays pictures and sounds to hold the image and sound choices, respectively. Make these arrays of dimension 4 for now, but they can be expanded to larger to hold more animal sound choices. pictures holds references to button image states like R.drawable.button1; sounds holds references to sound resources such as R.raw.cow.

  9. Create the integer array currentChoice of dimension 3 to hold the index of the current image/sound choice for each of the three buttons.

  10. Add an integer variable buttonPressed to keep track of which button was pressed.

  11. Change the MediaPlayer instance mp references to point to the new names for the sounds.

  12. Define a method switchMedia to process changing picture and sound after a button press plays sound. Have it change image/sound randomly for button that was pressed after sound plays, but don't let same image appear twice on screen at once. Import the java.util.Random class and use its methods to choose random integer from 0-3 to implement this.

  13. Add implements MediaPlayer.OnCompletionListener to the class definition (with corresponding import), and add a completion listener for the MediaPlayer with mp.setOnCompletionListener(this). Then override the onCompletion (MediaPlayer mp) method to call the method switchMedia, but only after the sound has played for the earlier button press.

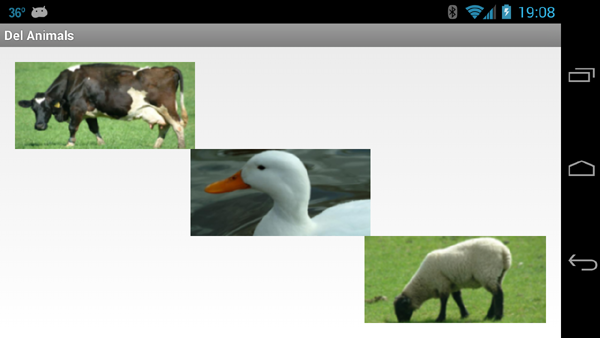
The following screen shot shows AnimalSounds2 in action on a Galaxy Nexus phone in horizontal mode.


The complete project may be found at AnimalSounds2. I have found this app to trend well in the 1-year-old grandchild demographic :)


2. In AnimalSounds.java, modify the restriction

// Play only one sound at a time if(mp != null) mp.release();
to permit several media players (but not too many) to exist at once, and see the MediaPlayer method
setLooping(boolean).


Solar System

1. See the project SolarSystem2 on GitHub, which implements a solution. The essential changes are in the methods onDraw and drawBackground, and these are well commented in the code. This version was originally written for an older version of Android, so the look of the interface will be different than in the Solar System project, but the functionality should be similar.

2. The essential requirement is to extend the length of the data arrays for objects and increase the value of numObjects. Data for orbital elements in the Solar System may be found at the NASA sites Near Earth Objects and Solar System Bodies. Approximate initial orientation angles for objects, and relative orientation angles for their ellipses, can be estimated by looking at the orbital plots that can be made from those pages.


Speak To Me

1. See the project SpeakToMe2, which implements a solution allowing the user to choose among U. S. English, British English, French, German, and Italian, as illustrated in the following Spinner display.


The essential new ingredients in SpeakToMe2 relative to SpeakToMe are
  1. Addition of a Spinner component with id langSpinner in the res/layout/main.xml layout (an example of implementing a Spinner may be found in the Spinner Tutorial).

  2. Definition of an array language in res/values/arrays.xml that corresponds to the Spinner entries.

  3. Definition of the array localeArray[] in TalkToMe2.java that holds the language locale options that will be associated with the Spinner choices.

  4. Use of findViewById() to associate the XML Spinner component R.id.langSpinner with the Java Spinner variable langSpinner, and attachment to langSpinner of the listener setOnItemSelectedListener(this) that Spinner inherits from AdapterView to listen for Spinner selections.

  5. Population of Spinner entries using the ArrayAdapter aa to associate the Spinner entries with the XML array language defined in arrays.xml. This is accomplished through the static method ArrayAdapter.createFromResource(...), which creates an ArrayAdapter from an XML resource. The method setDropDownViewResource(int) of ArrayAdapter sets the layout resource to be used to create the Spinner dropdown menu. The android.R.layout class constants simple_spinner_item and simple_spinner_dropdown_item specify View layouts associated with the Spinner.


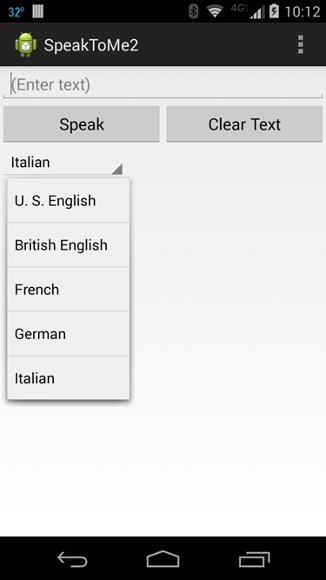
    Note that all these Spinner manipulations are done inside the onInit() method of the OnInitListener interface. This is to ensure that no Locale changes are attempted before the TTS engine is initialized, since this would throw an exception and lead to a Forced Close.


  6. Having TalkToMe2.java implement the AdapterView.OnItemSelectedListener interface to deal with Spinner selections.

  7. Addition of the methods onItemSelected(...) and onNothingSelected(...) that are required if the AdapterView.OnItemSelectedListener interface is implemented. The second plays no role here but the first implements the logic that sets the language when the Spinner choice is made.


Accessing the File System

1. This task is relatively easy because the File class has methods isDirectory() and isFile() that allow us to determine whether an entity is a file or a directory, and because Java (and thus Android) allows a method to call itself (recursion). The following method (and two utility methods that it uses) will go down the directory tree and list all files and directories on the SD card, with the sizes in bytes for the files:


/** Recursive method to list all files and their complete paths in dir and its subdirectories. Adapted from java code at http://www.javamex.com/tutorials/techniques/recursion.shtml */ private void listFilesInDirectory (File dir) { File[] files = dir.listFiles(); if (files != null) { for (File f : files) { // Absolute path to file or directory and number of recursions filePath = f.getAbsolutePath(); recursionLevel = numberOfOccurrences(filePath, File.separator) - 1; String printString = printSpacer(recursionLevel) + filePath; if ( f.isDirectory() ) { Log.i(TAG, printString); listFilesInDirectory (f); // Recursion if it is a directory } else { Log.i(TAG, printString + " " +f.length() + " bytes"); // If a file } } } } /** Utility method to return the number of occurrences of "substring" in "string" */ private int numberOfOccurrences(String string, String substring){ int len = string.length(); int num = 0; int c = -1; while(c < len){ c = string.indexOf(substring, c+1); if (c == -1) break; num ++; } return num; } /** Utility method to add spaces before printed path according to recursion level */ private String printSpacer(int recursions){ String spacer = ""; String increment = " "; for(int i=0; i<recursions; i++){ spacer = increment + spacer; } return spacer; }

if it is invoked from the onCreate() method using


listFilesInDirectory (Environment.getExternalStorageDirectory());

A brief exerpt from output to the logcat stream generated by this method executed on an actual phone is shown below


02-13 21:49:35.083 I/MEDIA (15600): /sdcard/Nook 02-13 21:49:35.088 I/MEDIA (15600): /sdcard/Nook/Images 02-13 21:49:35.088 I/MEDIA (15600): /sdcard/Nook/Images/.nomedia 0 bytes 02-13 21:49:35.088 I/MEDIA (15600): /sdcard/Nook/Images/2981429945104_thumb.png 3916 bytes 02-13 21:49:35.088 I/MEDIA (15600): /sdcard/Nook/Images/2981402785932_thumb.png 4831 bytes 02-13 21:49:35.093 I/MEDIA (15600): /sdcard/Nook/Images/9781411432963_thumb.png 2728 bytes 02-13 21:49:35.093 I/MEDIA (15600): /sdcard/Nook/Images/9781411432574_thumb.png 2861 bytes 02-13 21:49:35.093 I/MEDIA (15600): /sdcard/Nook/Images/9781411431645_thumb.png 2747 bytes 02-13 21:49:35.093 I/MEDIA (15600): /sdcard/Nook/Content 02-13 21:49:35.098 I/MEDIA (15600): /sdcard/Nook/Content/Temp 02-13 21:49:35.098 I/MEDIA (15600): /sdcard/Nook/Content/2981402785932_Three_Seconds.epub 382173 bytes

The key to the functionality of the method listFilesInDirectory (dir) is that if the object is a file, it's path is listed, but if it is a directory, the method calls itself (recursion) to go one level deeper in the file tree until all levels have been accessed and all directories and files listed. The logic involving the variable recursionLevel is to indent the output consistent with the recursion level. In this example we just output to the logcat stream, but it would be simple to write the output to a file on the SD card using the techniques described elsewhere in this project. A project that modifies WriteSDCard to implement the above methods may be downloaded from WriteSDCardList at GitHub.

Last modified: July 14, 2016


Previous  | Next  | Home