In this project we shall illustrate a second method of running an animation on a thread separate from the main UI thread. Again we will animate an idealized Solar System with circular orbits for planets as in the Animator Demo example, but now we will allow the motion of all 8 planets (Pluto is no longer considered the 9th planet). Much of the basic technique will be similar to the Animator Demo example, except that
In this project, as in the previous Animation Demo, the screen display will be created entirely by Java classes that we will write, so it makes sense to lay the display out entirely in code (activity_main.xml will not play a role in this project).
Following the general procedure in Creating a New Project, either choose Start a new Android Studio project from the Android Studio homepage, or from the Android Studio interface choose File > New > New Project. Fill out the fields in the resulting screens as follows,
|
Application Name:
AnimatorDemo2
Company Domain:< YourNamespace > Package Name: <YourNamespace> . animatordemo2 Project Location: <ProjectPath> AnimatorDemo2 Target Devices: Phone and Tablet; Min SDK API 15 Add an Activity: Empty Activity Activity Name: MainActivity (check the Generate Layout File box) Layout Name: activity_main |
where you should substitute your namespace for <YourNamespace> (com.lightcone in my case) and <ProjectPath> is the path to the directory where you will store this Android Studio Project (/home/guidry/StudioProjects/ in my case). If you have chosen to use version control for your projects, go ahead and commit this project to version control.
Now we create the Java class that will run the animation, and then modify MainActivity.java to use this new class as the screen layout. First create a new class file MotionRunner2, having it extend View. Then edit this file to read as follows.
package <YourNamespace>.animatordemo2;

import android.content.Context;
import android.graphics.Canvas;
import android.graphics.Color;
import android.graphics.Paint;
import android.graphics.drawable.ShapeDrawable;
import android.graphics.drawable.shapes.OvalShape;
import android.os.Handler;
import android.util.Log;
import android.view.View;

public class MotionRunner2 extends View {

      // Class constants defining state of the thread
      private static final int DONE = 0;
      private static final int RUNNING = 1;

      private static final int ORBIT_COLOR = Color.argb(255, 66, 66, 66);
      private static final int PLANET_COLOR = Color.argb(255, 0, 0, 0);
      private static final int SUN_COLOR = Color.argb(255, 255, 0, 0);
      private static final int nsteps = 600;                 // Number animation steps around circle
      private static final int planetRadius = 8;             // Radius of each planet (pixels)
      private static final int sunRadius = 14;               // Radius of Sun (pixels)
      private static final float X0 = 0;                     // X offset from center (pixels)
      private static final float Y0 = 0;                     // Y offset from center (pixels)
      private static final long delay = 20;                  // Milliseconds of delay in the update loop
      private static final double RAD_CIRCLE = 2*Math.PI;    // Number radians in a circle
      private static final double direction = -1;            // Orbit direction: counter-clockwise -1; clockwise +1
      private static final double fracWidth = 0.97;          // Fraction of screen width to use for display
      private static final int numPlanets = 5;               // Number of planets to include (up to 8)


      /* Data for planets.  Note that Pluto is no longer considered a planet, so there are only
      eight planets in the list.  The semimajor elliptical axis is denoted by a and is
      in units of astronomical units (AU), the eccentricity epsilon is dimensionless, the period is
      in years, and theta0 (initial angle) is in radians (there are 57.3 degrees per radian), with
      clockwise positive and measured from the 12-o'clock position.  For circular orbits (the
      approximation we will use in this example) the radius of the planetary orbit is equal to the
      semimajor axis a and the eccentricity epsilon plays no role. For more realistic elliptical
      orbits it would. */

      private static final double epsilon[] = {0.206,0.007,0.017,0.093,0.048,0.056,0.047,0.009};
      private static final double  a[] = {0.387,0.723,1.0,1.524,5.203,9.54,19.18,30.06};
      private static final double period[] = {0.241,0.615,1.0,1.881,11.86,29.46,84.01,164.8};
      private static final double theta0[] = {5.2, 1.8, 1.4, 3.6, 1.6,4.5,1.6,2.4};


      private Paint paint;                        // Paint object controlling format of screen draws
      private ShapeDrawable planet;               // Planet symbol
      private float X[];                          // Current X position of planet (pixels)
      private float Y[];                          // Current Y position of planet (pixels)
      private float centerX;                      // X for center of display (pixels)
      private float centerY;                      // Y for center of display (pixels)
      private float R0[];                         // Radius of planetary orbit in pixels
      private double theta[];                     // Planet angle (radians clockwise from 12 o'clock)
      private double dTheta[];                    // Angular increment each step (radians)
      private double dTheta0;                     //  Base angular increment each step (radians)
      private double pixelScale;                  // Scale factor: number of pixels per AU
      private double zoomFac = 1.0;               // Zoom factor (relative to 1) for display

      // Following declared static so we can access from the anonymous inner class
      // running the animation loop.

      private static int mState;

      // Handler to implement updates from the background thread to views
      // on the main UI

      private Handler handler = new Handler();

      // Constructor
      public MotionRunner2(Context context) {

               super(context);

               // Initialize angle and angle step (in radians)
               dTheta0 = RAD_CIRCLE/((double) nsteps);     // Angle increment in radians

               X = new float[numPlanets];
               Y = new float[numPlanets];
               theta = new double[numPlanets];
               dTheta = new double[numPlanets];
               R0 = new float[numPlanets];

               for(int i=0; i<numPlanets; i++){
                        dTheta[i] = direction*dTheta0/period[i];
                        theta[i] = -direction*theta0[i];
               }

               // Define the planet as circular shape
               planet = new ShapeDrawable(new OvalShape());
               planet.getPaint().setColor(PLANET_COLOR);
               planet.setBounds(0, 0, 2*planetRadius, 2*planetRadius);

               // Set up the Paint object that will control format of screen draws
               paint = new Paint();
               paint.setAntiAlias(true);
               paint.setTextSize(14);
               paint.setStrokeWidth(1);

               // Operation on background thread that updates the main
               // thread through handler.

               mState = RUNNING;

               new Thread(new Runnable() {
                        public void run() {
                              while (MotionRunner2.mState == RUNNING) {

                                       // Update the X and Y coordinates for all planets
                                       newXY();

                                       // The method Thread.sleep throws an InterruptedException if Thread.interrupt()
                                       // were to be issued while thread is sleeping; the exception must be caught.
                                       try {
                                                // Control speed of update (but precision of delay not guaranteed)
                                                Thread.sleep(delay);
                                       } catch (InterruptedException e) {
                                                Log.e("ERROR", "Thread Interruption");
                                       }

                                       // Update the animation by invalidating the view to force a redraw.
                                       // We cannot update views on the main UI directly from this thread, so we use
                                       // handler to do it.

                                       handler.post(new Runnable() {
                                                public void run() {
                                                      // Each time through the animation loop,  invalidate the main UI
                                                      // view to force a redraw.
                                                      invalidate();
                                                }
                                       });
                              }
                        }
               }).start();

      }

      /* The View display size is only available after a certain stage of the layout.  Before then
   the width and height are by default set to zero.  The onSizeChanged method of View
   is called when the size is changed and its arguments give the new and old dimensions.
   Thus this can be used to get the sizes of the View after it has been laid out (or if the
   layout changes, as in a switch from portrait to landscape mode, for example). */

      @Override
      protected void onSizeChanged  (int w, int h, int oldw, int oldh){
               // Coordinates for center of screen
               centerX = w/2;
               centerY = h/2;
               // Make orbital radius a fraction of minimum of width and height of display and scale
               // by zoomFac
               pixelScale= zoomFac*fracWidth*Math.min(centerX, centerY)/a[numPlanets-1];
               // Set the initial position of the planet (translate by planetRadius so center of planet
               // is at this position)
               for(int i=0; i<numPlanets; i++){
                        // Compute R0[] in pixels
                        R0[i] = (float)(pixelScale*a[i]);
                        X[i] = centerX - R0[i]*(float)Math.sin(theta[i]) - planetRadius ;
                        Y[i] = centerY - R0[i]*(float)Math.cos(theta[i]) - planetRadius;
               }
      }


      /* This method will be called each time the screen is redrawn. The draw is
   on the Canvas object, with formatting controlled by the Paint object.
   When to redraw is under Android control, but we can request a redraw
   using the method invalidate() inherited from the View superclass. */

      @Override
      public void onDraw(Canvas canvas) {
               super.onDraw(canvas);
               drawBackground(paint, canvas);
               for(int i=0; i<numPlanets; i++){
                        canvas.save();
                        canvas.translate(X[i] + X0, Y[i] + Y0);
                        planet.draw(canvas);
                        canvas.restore();
               }
      }

      // Called by onDraw to draw the background
      private void drawBackground(Paint paint, Canvas canvas){
               paint.setColor(SUN_COLOR);
               paint.setStyle(Paint.Style.FILL);
               canvas.drawCircle(centerX + X0, centerY + Y0, sunRadius, paint);
               paint.setStyle(Paint.Style.STROKE);
               paint.setColor(ORBIT_COLOR);
               for(int i=0; i<numPlanets; i++){
                        canvas.drawCircle(centerX + X0, centerY + Y0, R0[i], paint);
               }
      }

      // Stop the thread loop
      public void stopLooper(){
               mState = DONE;
      }


      /* Method to increment angle theta and compute the new X and Y .  The orbits of the
   planets are actually ellipses with the Sun at one focus, but for this example we
   approximate them as circles with the Sun at the center but with the correct periods.
   The constant distance from the Sun is set to the semimajor axis a[i], which is the
   average separation of the planet from the Sun.  Only Mercury has  significant
   eccentricity; the orbits for the other planets are very nearly circles with the Sun at
   the center. */

      private void newXY(){
               for(int i=0; i<numPlanets; i++){
                        theta[i] += dTheta[i];
                        X[i] =  (float)(R0[i]*Math.sin(theta[i])) + centerX - planetRadius;
                        Y[i] =  centerY - (float)(R0[i]*Math.cos(theta[i])) - planetRadius;
               }
      }
}
Then edit the file MainActivity.java to create an instance mrunner of the MotionRunner2 class and set it as the display for the main screen (the only screen for this example).
package <YourNamespace>.animatordemo2;

import android.os.Bundle;
import android.support.v7.app.AppCompatActivity;
import android.view.ViewGroup;

public class MainActivity extends AppCompatActivity {

      MotionRunner2 mrunner;

      @Override
      protected void onCreate(Bundle savedInstanceState) {
               super.onCreate(savedInstanceState);
               startAnimation();
      }

      @Override
      public void onPause() {
               super.onPause();
               // Stop animation if going into background
               mrunner.stopLooper();
      }

      @Override
      public void onResume() {
               super.onResume();
               // Resume animation
               startAnimation();
      }

      // Method to start the animation

      private void startAnimation(){
               // Instantiate the class MotionRunner to define the entry screen display
               mrunner = new MotionRunner2(this);
               mrunner.setLayoutParams(new ViewGroup.LayoutParams(
                              ViewGroup.LayoutParams.MATCH_PARENT, ViewGroup.LayoutParams.MATCH_PARENT));
               setContentView(mrunner);
      }

}
Let's now see what this code does.
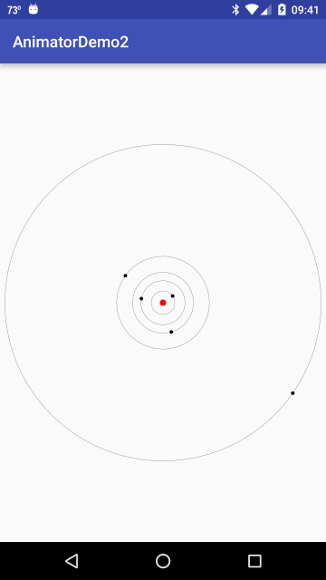
Execute the app on a device or emulator. The following figure shows a snapshot of the resulting motion for the 5 innermost planets of the Solar System (Mercury, Venus, Earth, Mars, and Jupiter; the orbits for Saturn, Uranus, and Neptune are well off-scale) assuming circular motion.
|
The number of planets displayed can be controlled by adjusting the parameters numPlanets, zoomFac, and fracWidth in MotionRunner2. Depending on the speed and resolution of your device, you may also want to adjust the variables nsteps, delay, planetRadius, and sunRadius to optimize the display on your device.
In this section we give a description of how the preceding functionality is implemented. Much of the preceding code is similar to that for Animator Demo I and similar explanation applies. The essential new things are
In the Solar System project this app will be extended to become much more realistic, putting the planets on elliptical orbits governed by Kepler's laws, adding orbits for some asteroids, comets, and dwarf planets, and permitting retrograde (opposite sense of Earth) orbital motion for some objects.
| The complete project for the application described above is archived on GitHub at the link AnimatorDemo2. Instructions for installing it in Android Studio may be found in Packages for All Projects. |
Last modified: July 7, 2016