For many applications, particularly those that are scientific or educational in nature, or games that implement realistic physics, it is important to be able to simulate precise motion of objects governed by mathematical equations. In this project we introduce the basics of how to use a Java thread to implement motion of objects on the screen governed by mathematical models. For an introduction to some of the graphics methods discussed here, see the Android Animation and Graphics document.
We have several options for 2D graphical animation in Android, varying in complexity and speed:
| A tweened animation can perform a series of simple position, size, rotation, and transparency transformations on the contents of a View object. A frame animation is a "traditional" animation in that is corresponds to displaying a sequence of related images ("flip-book animation"). Both of these kinds of animation can be implemented either in code or in XML resources, but often it is simplest to do it entirely within XML. |
| We shall use the second method in the project Animator Demo 2. We used the first method in the Progress Bars example.) |
Let's now implement these ideas in some basic 2D animation. The example that we choose is to animate the motion of a planet around the Sun, assuming the planet to be in a circular orbit around a fixed Sun. The method that we shall use for this illustration is to implement the animation update on a dedicated thread and use postInvalidate( ) from that thread to force periodic screen updates.
Following the general procedure in Creating a New Project, either choose Start a new Android Studio project from the Android Studio homepage, or from the Android Studio interface choose File > New > New Project. Fill out the fields in the resulting screens as follows,
|
Application Name:
AnimatorDemo
Company Domain:< YourNamespace > Package Name: <YourNamespace> . animatordemo Project Location: <ProjectPath> AnimatorDemo Target Devices: Phone and Tablet; Min SDK API 15 Add an Activity: Empty Activity Activity Name: MainActivity (check the Generate Layout File box) Layout Name: activity_main |
where you should substitute your namespace for <YourNamespace> (com.lightcone in my case) and <ProjectPath> is the path to the directory where you will store this Android Studio Project (/home/guidry/StudioProjects/ in my case). If you have chosen to use version control for your projects, go ahead and commit this project to version control.
As discussed in Progress Bars, there are two basic ways to implement threading:
In Progress Bars we used the first approach and created a new class extending Thread. In this project we shall use the second approach and produce thread-based animation by creating a class that implements the Runnable interface.
Use Android Studio to create a new public class MotionRunner.java, having it subclass View and implement Runnable:
package <YourNamespace>.animatordemo;
import android.view.View;

public class MotionRunner extends View implements Runnable {


}
This should indicate an error in the line defining MotionRunner (it will be underlined with a wiggly red line). Let Android Studio fix it: click on the line and execute Alt-Enter. This indicates that we should implement methods (associated with the Runnable interface). Select that and select the run() method from the popup menus and Android Studio should insert a stub defining the method. But the first line still will have a wiggly red line under it. Repeat the Alt-Enter magic trick, which will indicate that we need to create a constructor matching super. Select that and from the resulting popup select View(context:Context). Android Studio should insert another method and now everything should compile, with the code now reading
package <YourNamespace>.animatordemo;

import android.content.Context;
import android.view.View;

public class MotionRunner extends View implements Runnable {

   public MotionRunner(Context context) {
      super(context);

   }

   @Override
   public void run() {

   }

}
This should compile with no errors. Now edit MotionRunner.java so that it reads
package <YourNamespace>.animatordemo;

import android.content.Context;
import android.util.Log;
import android.view.View;

public class MotionRunner extends View implements Runnable {

   private Thread animator = null;      // The thread that will hold the animation
   private long delay;                  // Delay in ms controlling speed of thread looping
   private boolean please_stop = false; // Boolean controlling whether thread loop is running

   public MotionRunner(Context context) {
      super(context);
   }

   @Override
   public void run() {
      while(!please_stop) {
            Log.i("ANIMATOR","  ..... LOOPED");
            // Wait then execute it again
            try { Thread.sleep(delay); } catch (InterruptedException e) { ; }
      }
   }

   // Method to start animation loop
   public void startIt(long delay) {
      this.delay = delay;
      animator = new Thread(this);
      animator.start();
   }

   // Method to stop animation loop
   public void stopLooper(){
      please_stop = true;
   }

   // Method to resume animation loop
   public void startLooper(long delay){
      please_stop = false;
      if(animator == null) {
            startIt(delay);
      }
   }
}
where the required changes are highlighted in red. Let's describe briefly the functionality of this code.
Now let's modify MainActivity.java to run the animation thread.
Open MainActivity.java and modify it to read
package <YourNamespace>.animatordemo;

import android.support.v7.app.AppCompatActivity;
import android.os.Bundle;
import android.view.ViewGroup;

public class MainActivity extends AppCompatActivity  {

  private long delay = 40;      // Delay in ms controlling speed of thread looping
  MotionRunner mrunner;

   @Override
   public void onCreate(Bundle savedInstanceState) {
      super.onCreate(savedInstanceState);
        // Instantiate the class MotionRunner to define the entry screen display
      mrunner = new MotionRunner(this);
      mrunner.setLayoutParams(new ViewGroup.LayoutParams(ViewGroup.LayoutParams.MATCH_PARENT,
               ViewGroup.LayoutParams.MATCH_PARENT));
      setContentView(mrunner);
      mrunner.startIt(delay);
   }

   @Override
   public void onPause() {
      super.onPause();
      // Stop animation loop if going into background
      mrunner.stopLooper();
   }

   @Override
   public void onResume() {
      super.onResume();
      // Resume animation loop
      mrunner.startLooper(delay);
   }
}
where changes are highlighted in red. This segment of code
If this app is now run on a phone or emulator you should see a blank screen (since we haven't told it to display anything yet), but in the logcat output there should be a sequence of "LOOPED" strings indicating that the while-loop in the thread is executing. By changing the value of the variable delay you should be able to approximately control how often this string is output. You also should find that the loop stops if you send the app to the background by hitting the back button or the home button.
We now have a basic animation thread running, so lets animate something with it by using the methods that mrunner inherits from View to implement the motion of objects on the screen.
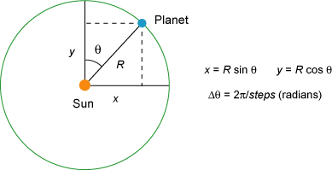
The geometry that will be assumed for the planetary orbit is illustrated in the following figure,
|
where the Sun is positioned at the center of the display screen, which is taken as the origin of the coordinate system (more realistic geometries for planetary orbits will be considered in the later projects Animator Demo II and Solar System).
The animation will consist of moving the planet by a small increment Δθ on the circular orbit each time through the while-loop of the run() method, with the size of the increment Δθ controlled by the integer steps and the clockwise direction corresponding to positive Δθ increments. This may be implemented through the following additions and modifications.
First, add the imports and new variables indicated in red in the following listing to MotionRunner.java.
package <YourNamespace>.animatordemo;
import android.content.Context;
import android.util.Log;
import android.view.View;

import android.graphics.Canvas;
import android.graphics.Color;
import android.graphics.Paint;
import android.graphics.drawable.ShapeDrawable;
import android.graphics.drawable.shapes.OvalShape;

public class MotionRunner extends View implements Runnable {

   private Thread animator = null;              // The thread that will hold the animation
   private long delay;                          // Delay in ms controlling speed of thread looping
   private boolean please_stop = false;         // Boolean controlling whether thread loop is running

  private static final int ORBIT_COLOR = Color.argb(255, 66, 66, 66);
  private static final int PLANET_COLOR = Color.argb(255, 0, 0, 0);
  private static final int SUN_COLOR = Color.argb(255, 255, 0, 0);
  private static final double RAD_CIRCLE = 2*Math.PI;  // Number radians in a circle
  private Paint paint;                 // Paint object controlling screen draw format
  private ShapeDrawable planet;        // Planet symbol
  private int planetRadius = 7;        // Radius of spherical planet (pixels)
  private int sunRadius = 12;          // Radius of Sun (pixels)
  private float X0 = 0;                // X offset from center (pixels)
  private float Y0 = 0;                // Y offset from center (pixels)
  private float X;                     // Current X position of planet (pixels)
  private float Y;                     // Current Y position of planet (pixels)
  private float centerX;               // X for center of display (pixels)
  private float centerY;               // Y for center of display (pixels)
  private float R0;                    // Radius of circular orbit (pixels)
  private int nsteps = 600;            // Number animation steps around circle
  private double theta;                // Angle around orbit (radians)
  private double dTheta;               // Angular increment each step (radians)
  private double direction = -1;       // Direction: counter-clockwise -1; clockwise +1


   public MotionRunner(Context context) {
         super(context);
   }
where the purpose of each variable is defined in the comments.
Next, add to the constructor of MotionRunner.java the statements in red in the following listing.
public MotionRunner(Context context) {
     super(context);

   // Initialize angle and angle step (in radians)
   theta = 0;
   dTheta = RAD_CIRCLE/((double) nsteps);     // Angle increment in radians

   // Define the planet as circular shape
   planet = new ShapeDrawable(new OvalShape());
   planet.getPaint().setColor(PLANET_COLOR);
   planet.setBounds(0, 0, 2*planetRadius, 2*planetRadius);

   // Set up the Paint object that will control format of screen draws
   paint = new Paint();
   paint.setAntiAlias(true);
   paint.setTextSize(14);
   paint.setStrokeWidth(1);

}
where the purpose of the statements should be clear from the comments and the documentation for the methods of the classes ShapeDrawable and Paint.
Since we will need to know the display size of the view to calculate geometries, let's get the height and width of the full display. This may be accomplished by overriding the View method onSizeChanged(int w, int h, int oldw, int oldh), adding to MotionRunner the new method
/*
The View display size is only available after a certain stage of the layout.  Before then
the width and height are by default set to zero.  The onSizeChanged method of View is called
when the size is changed and its arguments give the new and old dimensions.  Thus this can be
used to get the sizes of the View after it has been laid out (or if the layout changes, as in a
switch from portrait to landscape mode, for example).
*/

@Override
protected void onSizeChanged  (int w, int h, int oldw, int oldh){
   // Coordinates for center of screen
   centerX = w/2;
   centerY = h/2;
   // Make orbital radius a fraction of minimum of width and height of display
   R0 = (float) (0.90*Math.min(centerX, centerY));
   // Set the initial position of the planet (translate by planetRadius so center of planet
   // is at this position)
   X = centerX - planetRadius ;
   Y = centerY - R0 - planetRadius;
}
You might wonder why we use this method to get the view height and width. Why not just call the View methods getWidth() and getHeight() in the constructor, for example? Recall that we are generally using layouts that adapt to the device in use, so the geometry is known only at runtime. Furthermore, the screen geometry may change during execution if, for example, the device is switched from portrait to landscape display.
The qualifier protected required for the method
onSizeChanged is an access-level modifier in Java (an alternative to public, private, or the default package-level access if no qualifier is specified).
A protected method is visible to all classes in the package and to classes outside the package that inherit the class.
In writing your own classes, there are various (often strongly-held) views on declaring access levels.
There is fairly common agreement that it is best to restrict access to methods and fields
as much as possible. One approach to this is to
|
Next we add a method newXY() that will increment the angle θ and compute the corresponding screen coordinates X and Y for the planet. Add to MotionRunner.java the following code:
// Method to increment theta and compute the new X and Y

private void newXY(){
   theta += dTheta;
   if(theta > RAD_CIRCLE) theta -= RAD_CIRCLE;  // For convenience, keep angle 0-2pi
   X =  (float)(R0*Math.sin(direction*theta)) + centerX - planetRadius;
   Y =  centerY - (float)(R0*Math.cos(direction*theta)) - planetRadius;
   Log.i("ANIMATOR", "X="+X+" Y="+Y);
}
Notice the use of the variable direction to control whether the motion is clockwise or counterclockwise, and that for convenience we have implemented some logic so that at any time in the animation the angle (which is specified in radians in the calculation, since the trigonometric methods expect radians for the angles) lies in the interval 0 to 2π.
Now we modify run() to invoke the newXY() method that increments the position of the planet. The required changes are indicated in red in the following listing.
@Override
public void run() {
   while(!please_stop) {

   //Log.i("ANIMATOR","  ..... LOOPED");

   // Move planet by dTheta and compute new X and Y

   newXY();

   // Must use postInvalidate() rather than invalidate() to request redraw since
   // this is invoked from different thread than the one that created the View

   postInvalidate();

      // Wait, then execute it again
      try { Thread.sleep(delay); } catch (InterruptedException e) { ; }
   }
}
Note that the View method postInvalidate( ), which causes the invalidate to happen on a subsequent cycle through the event loop, must be used rather than invalidate( ) to request a redraw from a thread other than the one that created the View (see the discussion above).
Finally, we must override the onDraw(Canvas canvas) method inherited from View to reflect the updated position of the planet when the screen is redrawn in response to the postInvalidate( ) request in run( ). To do so, add the following two methods to MotionRunner.java.
/*
This method will be called each time the screen is redrawn. The draw is
on the Canvas object, with formatting controlled by the Paint object.
When to redraw is under Android control, but we can request a redraw
using the method invalidate() or postInvalidate() inherited from the View superclass.
In this case we must use postInvalidate(), since we are updating on a thread separate
from the main UI thread.
*/

@Override
public void onDraw(Canvas canvas) {
   super.onDraw(canvas);
   drawBackground(paint, canvas);
   canvas.save();
   canvas.translate(X + X0, Y + Y0);
   planet.draw(canvas);
   canvas.restore();
}

// Called by onDraw to draw the background
private void drawBackground(Paint paint, Canvas canvas){
   paint.setColor(SUN_COLOR);
   paint.setStyle(Paint.Style.FILL);
   canvas.drawCircle(centerX + X0, centerY + Y0, sunRadius, paint);
   paint.setStyle(Paint.Style.STROKE);
   paint.setColor(ORBIT_COLOR);
   canvas.drawCircle(centerX + X0, centerY + Y0, R0, paint);
}
The techniques used here are documented under the methods for the Android classes Canvas, Paint, and Color, and are similar to those already discussed in conjunction with the onDraw method in the DraggableSymbols project. Notice that the Canvas on which were are drawing is supplied as the argument canvas, so we don't have to manage the Canvas; we only have to draw on it. The formatting of our drawing is controlled by the Paint object paint that was initialized in the MotionRunner constructor.
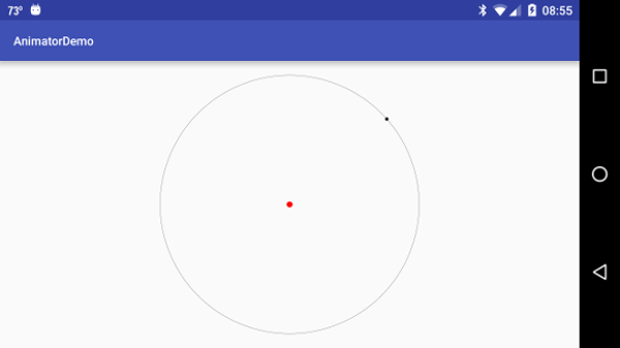
If this code is compiled and run it on an emulator, phone, or tablet, you should see the planet moving around the Sun in a circle, as in the following figure.
|
A look at the logcat output should reveal a steady stream of X and Y position updates because of the Log.i( ) statement that we inserted, and if you hit the back or home buttons the screen animation and this stream of position updates should halt, indicating that the onPause( ) method of MainActivity has stopped execution of the update thread by invoking the stopLooper( ) method of MotionRunner.
| With the integer direction set to -1, the motion is counterclockwise; change it to +1 to give clockwise motion. The speed and smoothness of the animation are controlled by the parameters nsteps, which specifies the number of animation steps to take each time around the circle, and delay, which specifies the delay in milliseconds for each animation step. |
| The complete project for the application described above is archived on GitHub at the link AnimatorDemo. Instructions for installing it in Android Studio may be found in Packages for All Projects. |
Last modified: July 7, 2016