The projects to this point have emphasized that Android devices are highly-connected computers and data processors. But smartphones are also phones, so in this project we show how we can use an application to implement a phone call by loading the Android phone dialer with a number pre-inserted. Of course, you could do the same thing manually by opening the dialer screen and typing in the desired phone number, or invoking the number from a stored contacts list. So what is the advantage of having the computer do it?
The primary advantage of having the computer do it is that it can deal automatically with a dynamically-updated list of phone numbers, which need not be in the contacts list for the particular phone. Let's give two representative examples.
Both examples have the disadvantage that they require network data access. But even that issue can be dealt with by having the system cache its most recently acquired data, so that if the data network is down it is still likely that correct data will be used for the phone call. (Of course, if the voice wireless network is also down, you'll have to communicate by other means like landline phones or smoke signals.)
We will deal in separate projects with the issue of accessing data over the network and concentrate in this project on how to get an app to dial numbers, assuming that the numbers and associated data already are stored in arrays on the device.
Following the general procedure in Creating a New Project, either choose Start a new Android Studio project from the Android Studio homepage, or from the Android Studio interface choose File > New > New Project. Fill out the fields in the resulting screens as follows,
|
Application Name:
SimpleDialer
Company Domain:< YourNamespace > Package Name: <YourNamespace> . simpledialer Project Location: <ProjectPath> SimpleDialer Target Devices: Phone and Tablet; Min SDK API 15 Add an Activity: Empty Activity Activity Name: MainActivity (check the Generate Layout File box) Layout Name: activity_main |
where you should substitute your namespace for <YourNamespace> (com.lightcone in my case) and <ProjectPath> is the path to the directory where you will store this Android Studio Project (/home/guidry/StudioProjects/ in my case). If you have chosen to use version control for your projects, go ahead and commit this project to version control.
In the project that you have just created, open res/values/strings.xml and edit it to read
<?xml version="1.0" encoding="utf-8"?>
<resources>

   <string name="app_name">SimpleDialer</string>
   <string name="action_settings">Settings</string>
   <string name="hello_world">Hello world!</string>
   <string name="hello">SimpleDialer</string>
   <string name="main_label">My Friends</string>

</resources>
Then edit res/layout/activity_main.xml to read
<?xml version="1.0" encoding="utf-8"?>
<LinearLayout xmlns:android="http://schemas.android.com/apk/res/android"
   android:layout_width="fill_parent"
   android:layout_height="fill_parent"
   android:orientation="vertical"
   android:padding="15dip" >

   <TextView
      android:layout_width="wrap_content"
      android:layout_height="wrap_content"
      android:layout_gravity="center"
      android:layout_marginBottom="25dip"
      android:text="@string/main_label"
      android:textColor="@color/colorPrimary"
      android:textSize="22sp" />

   <Button
      android:id="@+id/button1"
      android:layout_width="fill_parent"
      android:layout_height="wrap_content"
      android:textSize="18sp" />

   <Button
      android:id="@+id/button2"
      android:layout_width="fill_parent"
      android:layout_height="wrap_content"
      android:textSize="18sp" />

   <Button
      android:id="@+id/button3"
      android:layout_width="fill_parent"
      android:layout_height="wrap_content"
      android:textSize="18sp" />

   <Button
      android:id="@+id/button4"
      android:layout_width="fill_parent"
      android:layout_height="wrap_content"
      android:textSize="18sp" />

   <Button
      android:id="@+id/button5"
      android:layout_width="fill_parent"
      android:layout_height="wrap_content"
      android:textSize="18sp" />

   <Button
      android:id="@+id/button6"
      android:layout_width="fill_parent"
      android:layout_height="wrap_content"
      android:textSize="18sp" />

</LinearLayout>
Finally, open src/<YourNamespace>.simpledialer/MainActivity.java and edit it to read
package <YourNamespace>.simpledialer;

import android.os.Bundle;
import android.support.v7.app.AppCompatActivity;
import android.content.Intent;
import android.net.Uri;
import android.view.View;
import android.view.View.OnClickListener;
import android.widget.Button;

public class MainActivity extends AppCompatActivity implements OnClickListener {

      private int entries = 6;
      private String phoneNum[];
      private String buttonLabels[];

      @Override
      protected void onCreate(Bundle savedInstanceState) {
               super.onCreate(savedInstanceState);
               setContentView(R.layout.activity_main);

               phoneNum = new String[entries];
               buttonLabels = new String[entries];

               // Populate the data arrays
               populateArrays();

               // Set up buttons and attach click listeners

               Button button1 = (Button)findViewById(R.id.button1);
               button1.setText(buttonLabels[0]);
               button1.setOnClickListener(this);

               Button button2 = (Button)findViewById(R.id.button2);
               button2.setText(buttonLabels[1]);
               button2.setOnClickListener(this);

               Button button3 = (Button)findViewById(R.id.button3);
               button3.setText(buttonLabels[2]);
               button3.setOnClickListener(this);

               Button button4 = (Button)findViewById(R.id.button4);
               button4.setText(buttonLabels[3]);
               button4.setOnClickListener(this);

               Button button5 = (Button)findViewById(R.id.button5);
               button5.setText(buttonLabels[4]);
               button5.setOnClickListener(this);

               Button button6 = (Button)findViewById(R.id.button6);
               button6.setText(buttonLabels[5]);
               button6.setOnClickListener(this);
      }

      // Launch the phone dialer

      public void launchDialer(String number){
               String numberToDial = "tel:"+number;
               startActivity(new Intent(Intent.ACTION_DIAL, Uri.parse(numberToDial)));
      }


      /** Method to populate the data arrays */

      public void populateArrays(){

               /** In a practical application the arrays phoneNum and buttonLabels could be
                  * updated dynamically from the Web in this method.  For this project we just
                  * hard-wire in some values to illustrate how to use such data, once obtained,
                  * to make phone calls. The names and numbers are made up.*/

               phoneNum[0] = "999-000-0001";
               phoneNum[1] = "999-000-0002";
               phoneNum[2] = "999-000-0003";
               phoneNum[3] = "999-000-0004";
               phoneNum[4] = "999-000-0005";
               phoneNum[5] = "999-000-0006";

               buttonLabels[0] = "Jane D. Arc";
               buttonLabels[1] = "John Doe";
               buttonLabels[2] = "Jane Doe";
               buttonLabels[3] = "Abraham Linking";
               buttonLabels[4] = "Mona Liza";
               buttonLabels[5] = "Issac Nuton";
      }

      /** Process button events */

      @Override
      public void onClick(View v) {
               switch (v.getId()) {

               case R.id.button1:
                        launchDialer(phoneNum[0]);
                        break;

               case R.id.button2:
                        launchDialer(phoneNum[1]);
                        break;

               case R.id.button3:
                        launchDialer(phoneNum[2]);
                        break;

               case R.id.button4:
                        launchDialer(phoneNum[3]);
                        break;

               case R.id.button5:
                        launchDialer(phoneNum[4]);
                        break;

               case R.id.button6:
                        launchDialer(phoneNum[5]);
                        break;
               }
      }
}
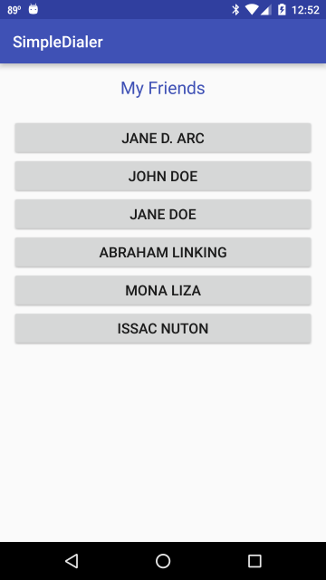
If you try this out on a device or emulator you should get the left screen below as the initial screen, and clicking on say the third button should give you something like (depending on the device) the screen below on the right.
 |
 |
At this point, (if the phone numbers were real and not made up) the user has only to hit the phone symbol at the bottom of the right screen to initiate the call, and also has options near the top to add the number to her list of contacts, create a new contact with it, or send an SMS message instead.
|
The details of the screen presented with the dialer will depend on the device, since our app is handing the task of dialing the call off to the dialer app already resident on the phone. (The example above is for a Nexus 6P phone running Android 6.0.1.) Also, since the phone may have more than one app on it that has declared an ability to handle dialer applications, the above screens may be preceded by one asking which app you would like to handle your request, and whether the choice is for just this time, or in all cases.
In the above example I was given a choice between the Phone app and Skype. The above screens resulted from choosing the Phone app, but for just this case. Then the next time the app was run, I was asked again. This time I chose the Phone for all cases. After that selecting a name from the menu went directly to the phone dialer screen. |
Most of the above should be familiar: the layout in activity_main.xml, attaching click listeners to the buttons in MainActivity.java, and processing the corresponding events are all tasks that we have implemented in previous examples. Thus we reserve our comments for how the dialer works, and even these can be rather brief.
As noted above, the approach described here is most useful in dealing with a list of phone numbers updated dynamically over the network. We will discuss methods for accessing data over the network in other projects (one example is given in the Map Example project). Here we just have populateArrays() fill the arrays phoneNum[] and buttonLabels[] with some hardwired pseudo-data to illustrate how to make phone calls using the data contained in the arrays. The method launchDialer(String) initiates the phone call.
That's it. Everything else is fairly standard Android that we have discussed in other projects.
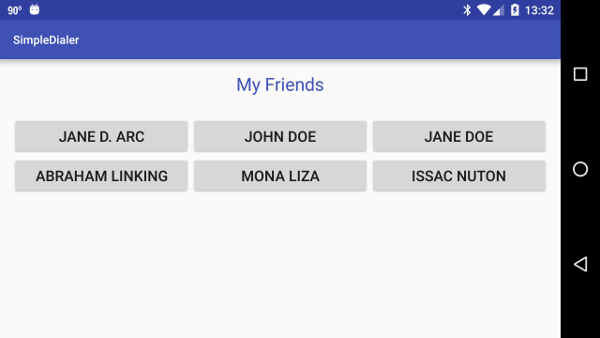
Before quitting, let's make one final improvement. If you flip the phone to horizontal display mode while the button menu is being displayed, depending on the size of your phone some of the six buttons may be off the screen. Following the discussion in the Animal Sounds project, let's specify alternative resources so that the menu of buttons displays better in horizontal mode:
<LinearLayout xmlns:android="http://schemas.android.com/apk/res/android"
   android:layout_width="fill_parent"
   android:layout_height="wrap_content"
   android:orientation="vertical"
   android:padding="15dip" >

   <TextView
      android:layout_width="wrap_content"
      android:layout_height="wrap_content"
      android:layout_gravity="center"
      android:layout_marginBottom="25dip"
      android:text="@string/main_label"
      android:textColor="@color/colorPrimary"
      android:textSize="22sp" />

   <LinearLayout
      android:layout_width="fill_parent"
      android:layout_height="fill_parent"
      android:orientation="horizontal" >

      <Button
            android:id="@+id/button1"
            android:layout_width="fill_parent"
            android:layout_height="wrap_content"
            android:layout_weight="1"
            android:textSize="18sp" />

      <Button
            android:id="@+id/button2"
            android:layout_width="fill_parent"
            android:layout_height="wrap_content"
            android:layout_weight="1"
            android:textSize="18sp" />

      <Button
            android:id="@+id/button3"
            android:layout_width="fill_parent"
            android:layout_height="wrap_content"
            android:layout_weight="1"
            android:textSize="18sp" />
   </LinearLayout>

   <LinearLayout
      android:layout_width="fill_parent"
      android:layout_height="fill_parent"
      android:orientation="horizontal" >

      <Button
            android:id="@+id/button4"
            android:layout_width="fill_parent"
            android:layout_height="wrap_content"
            android:layout_weight="1"
            android:textSize="18sp" />

      <Button
            android:id="@+id/button5"
            android:layout_width="fill_parent"
            android:layout_height="wrap_content"
            android:layout_weight="1"
            android:textSize="18sp" />

      <Button
            android:id="@+id/button6"
            android:layout_width="fill_parent"
            android:layout_height="wrap_content"
            android:layout_weight="1"
            android:textSize="18sp" />
   </LinearLayout>

</LinearLayout>
Now if you flip the phone horizontal when the menu is showing, Android should switch automatically to the following display.
|
The reasons for switching to Project view in the above machinations has been described in Animal Sounds, and is reproduced in the following box.
| If the AS Projects panel is in Android view (see the dropdown menu above the left panel) the new directory just added will not appear in the tree structure. If you switch to Project mode using the dropdown menu it should appear as app > src > main > res > layout-land. It will also appear in the same place in the directory structure for the project in your computer file system. The reason for this potentially confusing difference is that in Android mode the project display tree does not literally mirror the project structure on the disk but in Project view it does. Once a file is added to the new layout-land directory it will appear in the Project pane in Android mode, but under app > res > layout > filename (land). |
When you click a button and go to the dialer though, whether it is displayed in portrait or landscape mode depends on the device and the app displaying the dialer (remember, we did not write that app, so we are at the mercy of its conventions). On a Moto-X that I used to have the dialer always displayed in portrait mode, but on an old Motorola Backflip that I used in the days when dinosaurs still roamed the Earth the dialer switched between portrait and landscape mode if the phone was rotated or the physical keyboard was opened or closed. On the Nexus 6P that I currently use, the dialer rotates between portrait and horizontal mode.
| The complete project for the application described above is archived on GitHub at the link SimpleDialer. Instructions for installing it in Android Studio may be found in Packages for All Projects. |
Last modified: July 8, 2016