Android devices are computers, with file systems that can be accessed using many of the same methods as for standard computers (see Transferring Files). In this project we give two examples of using the Android file system.
In later projects we shall use these methods and others to give additional examples of storing and retrieving information.
Following the general procedure in Creating a New Project, either choose Start a new Android Studio project from the Android Studio homepage, or from the Android Studio interface choose File > New > New Project. Fill out the fields in the resulting screens as follows,
|
Application Name:
WriteSDCard
Company Domain:< YourNamespace > Package Name: <YourNamespace> . writesdcard Project Location: <ProjectPath> WriteSDCard Target Devices: Phone and Tablet; Min SDK API 15 Add an Activity: Empty Activity Activity Name: MainActivity (check the Generate Layout File box) Layout Name: activity_main |
where you should substitute your namespace for <YourNamespace> (com.lightcone in my case) and <ProjectPath> is the path to the directory where you will store this Android Studio Project (/home/guidry/StudioProjects/ in my case). If you have chosen to use version control for your projects, go ahead and commit this project to version control.
We first insert all the Java and XML that we shall need and then we shall explain its functionality.
Edit the res/values/strings.xml file to read
<resources>
<string name="app_name">WriteSDCard</string>
<string name="action_settings">Settings</string>
<string name="hello">FILE SYSTEM I/O</string>
</resources>
and edit the res/layout/activity_main.xml file so that it reads:
<?xml version="1.0" encoding="utf-8"?>
<RelativeLayout xmlns:android="http://schemas.android.com/apk/res/android"
   xmlns:tools="http://schemas.android.com/tools"
   android:layout_width="match_parent"
   android:layout_height="match_parent"
   android:paddingBottom="@dimen/activity_vertical_margin"
   android:paddingLeft="@dimen/activity_horizontal_margin"
   android:paddingRight="@dimen/activity_horizontal_margin"
   android:paddingTop="@dimen/activity_vertical_margin"
   tools:context=".MainActivity" >

   <TextView
      android:id="@+id/TextView01"
      android:layout_width="fill_parent"
      android:layout_height="wrap_content"
      android:textSize="15sp"
      android:textColor="@color/colorPrimary"
      android:text="@string/hello" />

</RelativeLayout>
Next, we must modify the manifest file because we are going to need explicit permission to write to external files. Open AndroidManifest.xml and edit it to read
<?xml version="1.0" encoding="utf-8"?>
<manifest xmlns:android="http://schemas.android.com/apk/res/android"
    package="<YourNamespace>.writesdcard">

  <uses-permission android:name="android.permission.WRITE_EXTERNAL_STORAGE"
     android:maxSdkVersion="18" />

    <application
        android:allowBackup="true"
        android:icon="@mipmap/ic_launcher"
        android:label="@string/app_name"
        android:supportsRtl="true"
        android:theme="@style/AppTheme">
        <activity android:name=".MainActivity">
            <intent-filter>
                <action android:name="android.intent.action.MAIN" />

                <category android:name="android.intent.category.LAUNCHER" />
            </intent-filter>
        </activity>
    </application>

</manifest>
where the added permission WRITE_EXTERNAL_STORAGE is highlighted in red.
|
Before Android 4.4 (API 19), reading files on the external file system required the
READ_EXTERNAL_STORAGE permission, and writing to external storage required the
WRITE_EXTERNAL_STORAGE. (If you needed to do both, the read permission is implicit in the write permission, so it was only necessary to acquire the write permission in that case.)
Beginning with Android 4.4, these permissions are not required if you are are reading or writing only files that are private to your app. This is why the android:maxSdkVersion="18" attribute is included in the permission request in the manifest file. We shall explain this app-specific storage that does not require write permission further below . You should be aware that there are some limitations associated with this convenience. For example, if the user uninstalls your app, all of these app-specific data directories are erased, and the system media scanner does not scan these directories, making them inaccessible to the MediaStore content provider (see saving files that are app-private). Hence you should not use these app-specific directories for media that belongs ultimately to the user. Examples: user photos captured or edited with your app, or music the user has purchased with your app. In that case, the files should be saved in the shared public directories (see saving files that can be shared with other apps for further information). This project will concentrate on how to save and read files in the data area specific to this app. |
Next, open the file java/<YourNamespace>.writesdcard/MainActivity.java and edit it to read
package <YourNamespace>.writesdcard;

import android.os.Bundle;
import android.support.v7.app.AppCompatActivity;

import java.io.BufferedReader;
import java.io.File;
import java.io.FileNotFoundException;
import java.io.FileOutputStream;
import java.io.IOException;
import java.io.InputStream;
import java.io.InputStreamReader;
import java.io.PrintWriter;

import android.os.Environment;
import android.util.Log;
import android.widget.TextView;

public class MainActivity extends AppCompatActivity {

    private static final String TAG = "MEDIA";
    private TextView tv;

    @Override
    protected void onCreate(Bundle savedInstanceState) {
        super.onCreate(savedInstanceState);
        setContentView(R.layout.activity_main);

        tv = (TextView) findViewById(R.id.TextView01);
        checkExternalMedia();
        writeToSDFile();
        readRaw();
    }

    /**
     * Method to check whether external media available and writable. This is adapted from
     * http://developer.android.com/guide/topics/data/data-storage.html#filesExternal
     */

    private void checkExternalMedia() {
        boolean mExternalStorageAvailable = false;
        boolean mExternalStorageWriteable = false;
        String state = Environment.getExternalStorageState();

        if (Environment.MEDIA_MOUNTED.equals(state)) {
            // Can read and write the media
            mExternalStorageAvailable = mExternalStorageWriteable = true;
        } else if (Environment.MEDIA_MOUNTED_READ_ONLY.equals(state)) {
            // Can only read the media
            mExternalStorageAvailable = true;
            mExternalStorageWriteable = false;
        } else {
            // Can't read or write
            mExternalStorageAvailable = mExternalStorageWriteable = false;
        }
            tv.append("\n\nEXTERNAL MEDIA: readable="
                + mExternalStorageAvailable + " writable=" + mExternalStorageWriteable);
    }

    /**
     * Method to write ascii text characters to file on SD card. In earlier versions of Android a
     * WRITE_EXTERNAL_STORAGE permission must be added to the manifest file or this method will throw
     * a FileNotFound Exception because you won't have write permission. But not true after
     * API 18 for files in storage area of app (then no write permission required).
     */

    private void writeToSDFile() {

        // Root of the external file system

        File root0 = android.os.Environment.getExternalStorageDirectory();

        /* Now find the root of the external storage for this app (where the app can place
        * persistent files that it owns internal to the application and not typically visible
        * to the user as media).  See
        *
        *    http://developer.android.com/guide/topics/data/data-storage.html#filesExternal
        *
        * The method getExternalFilesDir (string) returns the user storage associated with the
        * app, which doesn't require write permissions after API 18.  The string argument specifies various
        * regions of this storage.  For example,
        *
        * - null specifies the root of the storage for this app
        * - Environment.DIRECTORY_NOTIFICATIONS specifies the Notifications directory of app storage
        * - Environvment.DIRECTORY_DOWNLOADS specifies standard directory for files downloaded by user
        * - Environment.DIRECTORY_PICTURES specifies standard directory for pictures available to the user
        * - Environment.DIRECTORY_DOCUMENTS specifies standard directory for documents produced by user
        * etc.
        *
        * See the fields of the Environment class at
        *    https://developer.android.com/reference/android/os/Environment.html
        * for other possibilities.  For example, on my phone (running Android 6.0.1) the root of
        * the user storage for this specific app is found at
        *
        *    /storage/emulated/0/Android/data/com.lightcone.writesdcard/files
        * */

        // Root of the data directories Documents subdirectory specific to this app, for which no write
        // permission is required for Android 4.4 and later.

        File root = this.getExternalFilesDir(Environment.DIRECTORY_DOCUMENTS);

        tv.append("\n\nEXTERNAL FILE SYSTEM ROOT DIRECTORY:\n" + root0);

        tv.append("\n\nEXTERNAL APP DATA ROOT DIRECTORY:\n" + root);

        // Create a Documents/download subdirectory in the data area for this app
        // See http://stackoverflow.com/questions/3551821/android-write-to-sd-card-folder

        File dir = new File(root.getAbsolutePath() + "/download");
        dir.mkdirs();
        File file = new File(dir, "myData.txt");

        // Must catch FileNotFoundException and IOException
        try {
            FileOutputStream f = new FileOutputStream(file);
            PrintWriter pw = new PrintWriter(f);
            pw.println("Howdy do to you,");
            pw.println("and the horse you rode in on.");
            pw.flush();
            pw.close();
            f.close();
        } catch (FileNotFoundException e) {
            e.printStackTrace();
            Log.i(TAG, "File not found");
        } catch (IOException e) {
            e.printStackTrace();
            Log.i(TAG, "I/O exception");
        }
        tv.append("\n\nFILE WRITTEN TO:\n" + file);
    }

    /**
     * Method to read in a text file placed in the res/raw directory of the application. The
     * method reads in all lines of the file sequentially.
     */

    private void readRaw() {
        tv.append("\n\nDATA READ FROM res/raw/textfile.txt:\n");
        InputStream is = this.getResources().openRawResource(R.raw.textfile);
        InputStreamReader isr = new InputStreamReader(is);
        BufferedReader br = new BufferedReader(isr, 8192);    // 2nd arg is buffer size

        // More efficient (less readable) implementation of above is the composite expression
        //    BufferedReader br = new BufferedReader(new InputStreamReader(
        //             this.getResources().openRawResource(R.raw.textfile)), 8192);

        try {
            String test;
            while (true) {
                test = br.readLine();
                // readLine() returns null if no more lines in the file
                if (test == null) break;
                tv.append("\n" + "    " + test);
            }
            isr.close();
            is.close();
            br.close();
        } catch (IOException e) {
            e.printStackTrace();
        }
        tv.append("\n\nTHAT IS ALL");
    }
}
Finally, to test part of our application we need to create the res/raw directory and place a file containing some lines of text in it.
    Now is the time
    for all good men
    to come to the aid
    of their country.
but you can put whatever you wish.
That completes our application. Now let's test it and explain what it does.
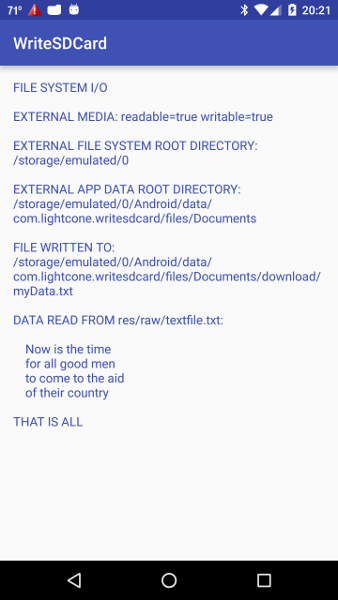
Execution of the application on a phone or emulator should produce a display like the following figure
|
indicating that several tasks have been carried out:
Let us now explain how the code in our XML and Java files carries this out.
First, we set up the ability to output results to our main display:
Besides the onCreate() method, there are three methods in MainActivity.java. Each implements a basic functionality:
Let us now explain in turn how each of these methods works.
To check the status of external storage media in the method checkExternalMedia(), we first invoke the getExternalStorageState() method of Environment to return a string that is stored in the variable state. This string is then compared, using the equals() method of the String class, with various String constants of the Environment class to determine the state of the external media.
| Notice that in Android, as in Java more generally, the logical comparison operator == cannot be used to compare two strings. Instead we must use an operator like the equals() method to return a boolean indicating whether two strings are equivalent. |
If the check is successful, we display the line on the screen
EXTERNAL MEDIA: readable=true writable=true
Assuming this to be the case, in the next section we shall write to a file on the external storage medium.
| "External" means media/shared storage. It is a filesystem with relatively large capacity that does not enforce permissions (so it can be shared across applications). Traditionally this is an SD card, but it might also be built-in storage that is distinct from the protected internal storage and can be mounted as a filesystem on the device. For a more extensive discussion of data storage in Android, see the Storage Options document. |
Assuming that we have a writable external medium, the method writeSDCard() illustrates how to output a file to that storage.
First, we use the getExternalStorageDirectory() method of Environment to return the root of the file system for the external medium, assigning the returned string to the Java File object root.
| A File is an abstract representation of a filesystem entity that is identified by a path. It can be a normal file, but it can also be a directory or some other entity. For our usage it will typically be a file or directory that either exists or that we wish to create. |
For example, when executed on a Nexus 6P phone running Android 6.0.1, the line
EXTERNAL FILE SYSTEM ROOT DIRECTORY: /storage/emulated/0
was written to the screen, indicating that the external medium was mounted and writable, with the root of the filesystem at /storage/emulated/0.
| Some earlier discussions of Android programming assume that the root of the external storage will be /sdcard (since it commonly was on earlier devices) and give examples of hardwiring that into an application. It is more bullet-proof to use the getExternalStorageDirectory() method, as described above, to have the device itself tell you the filesystem root. This is particularly true for the Android file system beginning with Jelly Bean (Android 4.2) and following, which introduced the option of multiple users for the same device. This required the introduction of various Linux symbolic links (symlinks) that produce symbolic directories pointing to real physical directories. For the most part this is transparent to the ordinary user, but for applications such as those discussed here where we are programatically manipulating the file system it becomes more relevant. This will be discussed further below. |
But what is more relevant to the present application is the location of the user-writable storage allocated for this app (where the app can place persistent files that it owns internal to the application and not typically visible to the user as media). This is obtained using the getExternalFilesDir(String string) method of Context to return the root directory for writing app-specific data to the external medium, assigning the returned string to the Java File object root.
The method getExternalFilesDir(String string) returns the user storage associated with the
app, which doesn't require write permissions after API 18. The string argument specifies various
regions of this storage. For example,
/storage/emulated/0/Android/data/com.lightcone.writesdcard/files ,
which was located by passing the null argument to getExternalFilesDir(string).
|
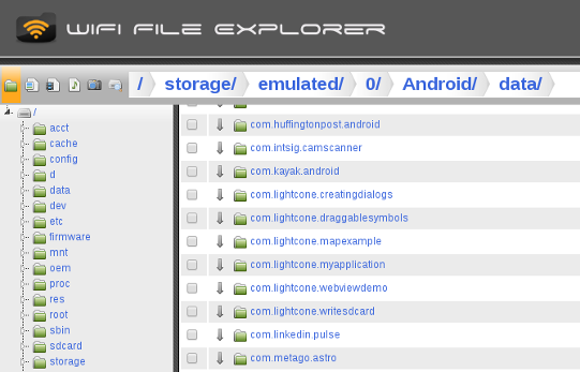
The following screenshot shows part of the file structure on my phone in the directory /storage/emulated/0/Android/data.
|
We see that /storage/emulated/0/Android/data contains a whole set of directories associated with different package names. For example, there are six directories associated with the com.lightcone package name that I use for my apps, each distinguished by a different app name (including com.lightcone.writesdcard, which corresponds to the present app). Generally, for Android 4.4 and later external storage read/write permission is not required within the same package space but paths belonging to other packages require read/write external media permissions (see the documentation associated with getExternalFilesDir).
Now suppose that we wish create and write to a file called myData.txt in a subdirectory download of the root directory on the SD card for our app. The statements in MainActivity.java that set up the path up for that output are
File dir = new File (root.getAbsolutePath() + "/download");
dir.mkdirs();
File file = new File(dir, "myData.txt");
/storage/emulated/0/Android/data/com.lightcone.writesdcard/files/Documents/download
Thus file now specifies the absolute path
/storage/emulated/0/Android/data/com.lightcone.writesdcard/files/Documents/download/myData.txt
to the file into which we wish to write.
In the discussion above two different forms of the constructor for File were used that have the same name
but different argument lists:
The name and list of argument types for a method is called its signature. Thus the first method above has the signature File(String) while the second has the signature File(File, String). Even though the overloaded methods share the same name, they have different signatures and the compiler can distinguish among them by examining their argument lists. NOTE: Java does not consider the return type in distinguishing methods, so you cannot define an overloaded method having the same signature but different return types. |
To write to the file standard Java i/o stream capability is used, implemented in terms of the classes
The relevant code excerpted from the method writeToSDFile() is
try {
   FileOutputStream f = new FileOutputStream(file);
   PrintWriter pw = new PrintWriter(f);
   pw.println("Howdy do to you.");
   pw.println("Here is a second line.");
   pw.flush();
   pw.close();
   f.close();
} catch (FileNotFoundException e) {
   e.printStackTrace();
   Log.i(TAG, "File not found");
} catch (IOException e) {
   e.printStackTrace();
   Log.i(TAG, "I/O exception");
}
which creates a FileOutputStream, wraps it in a PrintWriter, and then appends lines to a file through this stream.
Note that all of the functional code above for the FileOuputStream is enclosed in a try-catch block. This is standard exception handling in Java.
Java requires that these exceptions be handled . The standard way to do that is in a try-catch block, which has the general form
try {
   // Code in which an exception might be thrown
   .
   .
} catch (ExceptionType name1) {
   // Code to process exception type name1
   .
   .
} catch (ExceptionType name2) {
   // Code to process exception type name2
   .
   .
}
where one or more appended catch blocks process the named exceptions thrown in the try block. For a more extensive discussion of try-catch blocks, start with the Java Tutorials. In the present code the two catch blocks deal respectively with any FileNotFoundException or IOException that might be thrown in the try block.
For the catch block corresponding to FileNotFoundException we first invoke the printStackTrace() method that FileNotFoundException inherits from Throwable, which sends a human-readable form of the Throwable's stack trace to the System.err stream.
Throwable is the superclass of all Java errors and exceptions that can be thrown by the virtual machine. It has two direct subclasses:
The alert Androider will object that there are two other exceptions thrown by code contained in the try block that we have ignored. Indeed, if you check the documentation you will find that
|
Within the try-catch block we then instantiate a FileOutputStream f using the constructor with the File file as argument, and create a PrintWriter pw using the just-created FileOutputStream f as argument. Now we can write to the file using the print methods of PrintWriter. In this case we use println(String s) to output lines of text to the file. When we are through writing, the flush() method of PrintWriter is called to ensure that all pending data have been sent to the file, and then the PrintWriter pw and FileOutputStream f are closed.
For output of large datasets, performance may be enhanced by using a
BufferedOutputStream to
wrap an existing OutputStream and buffer the output.
A typical construction is
Since most requests can be satisfied by accessing the buffer alone, this minimizes costly interaction with the underlying stream at the (usually smaller) expense of the extra space holding the buffer and time consumed in copying when the buffer is flushed. Likewise, input streams can be wrapped in a BufferedInputStream. We won't use BufferedOutputStream in the present example, but below in readRaw() we will give an example of buffering an input stream. |
If this application is executed on a real device or emulator, the screen output shown above should result and you should find that the file
/storage/emulated/0/Android/data/com.lightcone.writesdcard/files/Documents/download/myData.txt
has been written to the SD card (or equivalent external storage). You can check the content of the file by copying it to your computer using ADB or Android Studio, as described in Transferring Files, or by using a file-management app like WiFi File Explorer. For example, on my Linux Fedora 23 system connected to an Android phone I used ADB to give
   [guidry@m33 ~]$ adb -d pull /storage/emulated/0/Android/data/com.lightcone.writesdcard/files/Documents/download/myData.txt
   0 KB/s (40 bytes in 0.081s)
   [guidry@m33 ~]$ cat myData.txt
   Howdy do to you,
   and the horse you rode in on.
   [guidry@m33 ~]$
indicating that our application has indeed written the requested output to the file on the phone's external storage, and that this file is publicly accessible. (The adb -d pull command copies the file from the device to the computer and the Unix cat command displays the content of the file on the computer.)
|
The Android
file hierarchy (which is a variant of the Linux file hierarchy) became somewhat confusing with the advent of Jelly Bean (Android 4.2). The reason is that Jelly Bean introduced the option of multiple users on a device, and to separate those
multiple users the file system was restructured so that each user effectively has a different portion of the "sdcard" (external storage). For example, the address /storage/emulated/0/download/ represents a directory on external storage allocated for the first user (user 0).
This restructuring employs various symbolic links. It is these symbolic links that cause different addresses to appear for different ways to access a file on the post-4.1 file system. For a more extensive (but I think not very clear) discussion, see The bottom line seems to be that (1) These changes are transparent to the actual users (at least of unrooted devices), but matter for programmers if they access the file system directly, or for users with rooted devices for issues like backup. (2) The Android SDK finds the appropriate file locations, whether on earlier devices or newer devices, as long as methods like getExternalStorageDirectory and not hard-wired addresses are used. (3) File-management apps like Astro File Manager or WiFi File Explorer allow correct navigation to files on old and new devices. (4) The ADB often follows the symbolic links properly to an address returned by getExternalStorageDirectory. |
The default behavior of the output stream that we created above is to overwrite the file if it already exists. We can instead append to the file if it already exists by substituting for the constructor FileOutputStream (File file) the constructor FileOutputStream(File file, boolean append), where the file will be overwritten if append is false and appended to if append is true.
The method readRaw() illustrates one way to set up an input stream to read in an external file. In this example we assume the external file to be ascii text in the res/raw directory of the application, and read it in line by line until no lines remain.
We begin by defining a buffered reader using the following code sequence.
InputStream is = this.getResources().openRawResource(R.raw.textfile);
InputStreamReader isr = new InputStreamReader(is);
BufferedReader br = new BufferedReader(isr, 8192);    // 2nd arg is buffer size
| A file that is stored in the res/raw directory of the project will be exported with the application when it is packaged in the APK file and thus can be accessed from the application by this approach. (The res/raw directory is not compressed when it is stored in the application.) The method openRawResource(int resourceID) can be used to open only drawable, sound, and raw resources; it will fail if you try to open string or color resources with it. A file stored in the res/raw directory is readable by the application at runtime, but not writable. |
Our BufferedReader is an example of the buffered streams discussed above.
Note that in production code we would commonly replace
with the compound, chained expression since this is more compact and requires defining fewer variables. But it is also less readable, and for our pedagogical purposes in the projects presented here we often write expressions out as individual statements rather than compounding them into more efficient expressions so that what is happening is clearer for the reader. |
If you execute the application, you should find the lines that you put in the file res/raw/textfile.txt displayed on the screen because of the tv.append() statement in the while-loop. As seen in the figure above, for my example I obtained
    Now is the time
    for all good men
    to come to the aid
    of their country.
which corresponds exactly to the four lines that I inserted in the file res/raw/textfile.txt when it was created.
| The complete project for the application described above is archived on GitHub at the link WriteSDCard. Instructions for installing it in Android Studio may be found in Packages for All Projects. |
Last modified: July 8, 2016