In this simple project we gain some more familiarity with the UI widgets, and will also learn to play audio in Android. We shall use ImageButton, which is a kind of widget that acts like a button but accepts an image rather than text to define the visible face of the button, to present some animal images to the user and play animal sounds when a button is pressed.
Following the general procedure in Creating a New Project, either choose Start a new Android Studio project from the Android Studio homepage, or from the Android Studio interface choose File > New > New Project. Fill out the fields in the resulting screens as follows,
|
Application Name:
Animal Sounds
Company Domain:< YourNamespace > Package Name: <YourNamespace> .animalsounds Project Location: <ProjectPath> AnimalSounds Target Devices: Phone and Tablet; Min SDK API 15 Add an Activity: Empty Activity Activity Name: MainActivity (check the Generate Layout File box) Layout Name: activity_main |
where you should substitute your namespace for <YourNamespace> (com.lightcone in my case) and <ProjectPath> is the path to the directory where you will store this Android Studio Project (/home/guidry/StudioProjects/ in my case). If you have chosen to use version control for your projects, go ahead and commit this project to version control.
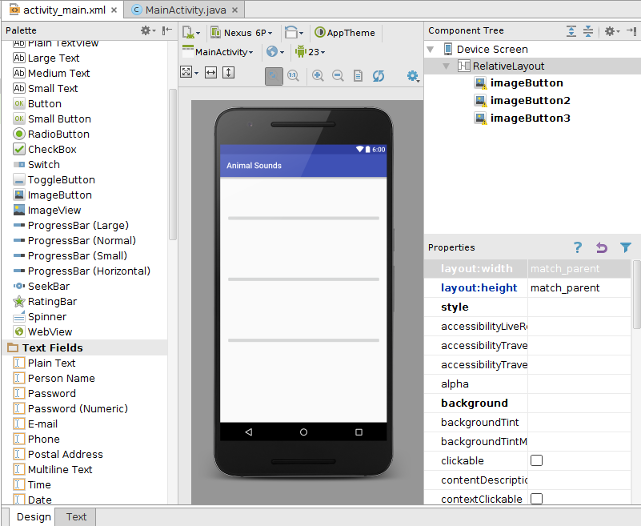
Let's use the visual layout editor of Android Studio to lay out the main screen. In the new project, open app/res/layout/activity_main.xml and select the Design tab at the bottom. At the top of the layout window, select a device skin (I will use the Nexus 6P for this example). The layout window should now look as follows.
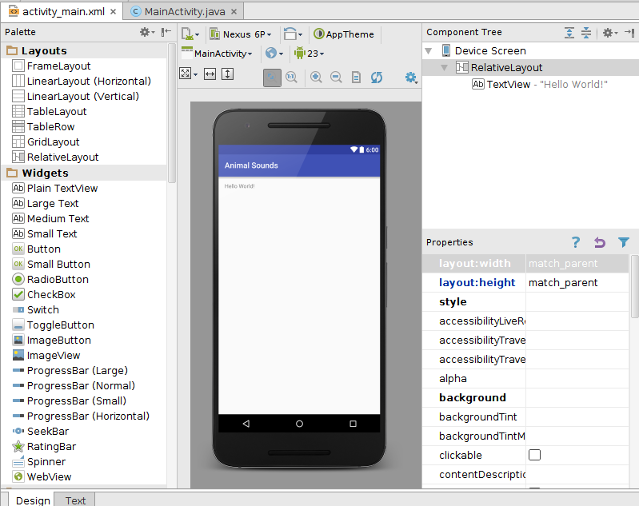
|
Right-click on the displayed "Hello World" TextField, select Delete from the popup menu, which should remove this widget.
Next, from the Palette panel to the left of the layout, drag an ImageButton (under Widgets) from the panel on the left to the layout area. This will give a small gray box indicating the position of the widget. Repeat this twice more. Use the mouse to center the three widgets left to right, and to space them equally vertically. Then select all three widgets and click the Set layout_width to wrap_content button above the phone display (the button with a left-right arrow symbol). At this point the layout manager should look like the following image
|
with three buttons on stage. Now switch back to the Text tab for activity_main.xml, which should read
<?xml version="1.0" encoding="utf-8"?>
   <RelativeLayout xmlns:android="http://schemas.android.com/apk/res/android"
    xmlns:tools="http://schemas.android.com/tools"
    android:layout_width="match_parent"
    android:layout_height="match_parent"
    android:paddingBottom="@dimen/activity_vertical_margin"
    android:paddingLeft="@dimen/activity_horizontal_margin"
    android:paddingRight="@dimen/activity_horizontal_margin"
    android:paddingTop="@dimen/activity_vertical_margin"
    tools:context="com.lightcone.animalsounds.MainActivity">

    <ImageButton
        android:layout_width="match_parent"
        android:layout_height="wrap_content"
        android:id="@+id/imageButton"
        android:layout_alignParentTop="true"
        android:layout_centerHorizontal="true"
        android:layout_marginTop="75dp" />

    <ImageButton
        android:layout_width="match_parent"
        android:layout_height="wrap_content"
        android:id="@+id/imageButton2"
        android:layout_marginTop="130dp"
        android:layout_below="@+id/imageButton"
        android:layout_alignParentLeft="true"
        android:layout_alignParentStart="true" />

    <ImageButton
        android:layout_width="match_parent"
        android:layout_height="wrap_content"
        android:id="@+id/imageButton3"
        android:layout_below="@+id/imageButton2"
        android:layout_alignParentLeft="true"
        android:layout_alignParentStart="true"
        android:layout_marginTop="130dp" />
</RelativeLayout>
So now there are three ImageButtons wrapped within the parent RelativeLayout, with IDs imageButton1, imageButton2, and imageButton3, respectively, that we will be able to reference later from our Java code.
If you execute this in an emulator or on a device, you should get a display very similar to the preceding figure, with three non-descript gray buttons (actually just gray boxes) on the screen. Pretty boring so far. But these are not ordinary buttons! ImageButton is not actually a subclass of Button but rather is a subclass of ImageView, which in turn subclasses View and thus inherits image-display properties:
We now use these attributes to jazz up our buttons.
| Alternatively, these image files may be pasted directly into app/res/drawable in the Android Studio interface (you can paste multiple files at once), which will give a dialog asking you to confirm the storage location. Note that current best practices for Android suggest pasting image files into app/res/mipmap instead of app/res/drawable. This will then give a dialog asking you to choose the resolutions to store (hdpi, mdpi, ..., xxhdpi). However, for the images being used here, if stored under mipmaps the resulting displayed image in the app is rather small. Hence, I have used the drawable directory for the image resources in this app. |
 |
 |
where the lines added by specifying the src attribute are highlighted in red and, for example, @drawable/cow is Android's reference to the drawable resource app/res/drawable/cow.png. (If the image resources had been placed in app/res/mipmaps instead of app/res/drawable, this reference would change to @mipmaps/cow.)<?xml version="1.0" encoding="utf-8"?> <RelativeLayout xmlns:android="http://schemas.android.com/apk/res/android" xmlns:tools="http://schemas.android.com/tools" android:layout_width="match_parent" android:layout_height="match_parent" android:paddingBottom="@dimen/activity_vertical_margin" android:paddingLeft="@dimen/activity_horizontal_margin" android:paddingRight="@dimen/activity_horizontal_margin" android:paddingTop="@dimen/activity_vertical_margin" tools:context="com.lightcone.animalsounds.MainActivity"> <ImageButton android:layout_width="match_parent" android:layout_height="wrap_content" android:id="@+id/imageButton" android:layout_marginTop="55dp" android:src="@drawable/cow" android:layout_alignParentTop="true" android:layout_alignParentLeft="true" android:layout_alignParentStart="true" /> <ImageButton android:layout_width="match_parent" android:layout_height="wrap_content" android:id="@+id/imageButton2" android:src="@drawable/duck" android:layout_centerVertical="true" android:layout_alignParentRight="true" android:layout_alignParentEnd="true" /> <ImageButton android:layout_width="match_parent" android:layout_height="wrap_content" android:id="@+id/imageButton3" android:src="@drawable/sheep" android:layout_alignParentBottom="true" android:layout_centerHorizontal="true" android:layout_marginBottom="50dp" /> </RelativeLayout>
| As with most things in Android, it is also possible to specify the button image resource directly in the Java code; in this case by using the setImageResource(int) method of ImageView, where the argument is the drawable resource identifier. You would also have obtained the same result if you had edited directly the file activity_main.xml to give the listing displayed above. |
which defines a black color that is fully transparent (24-bit color format #AARRGGBB, where AA is alpha transparency, RR is red, GG is green, and BB is blue).<?xml version="1.0" encoding="utf-8"?> <resources> <color name="colorPrimary">#3F51B5</color> <color name="colorPrimaryDark">#303F9F</color> <color name="colorAccent">#FF4081</color> <color name="transparent">#00000000</color> </resources>
android:background="@color/transparent"
which references the color "transparent" that we just defined in res/values/colors.xml.
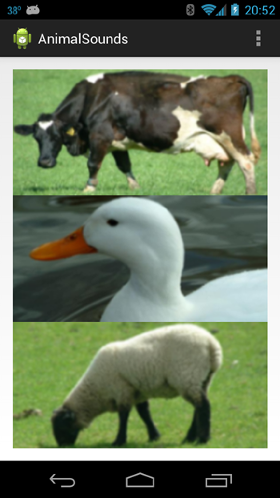
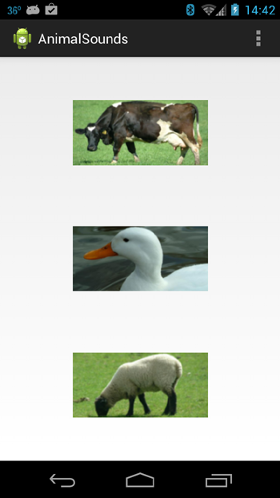
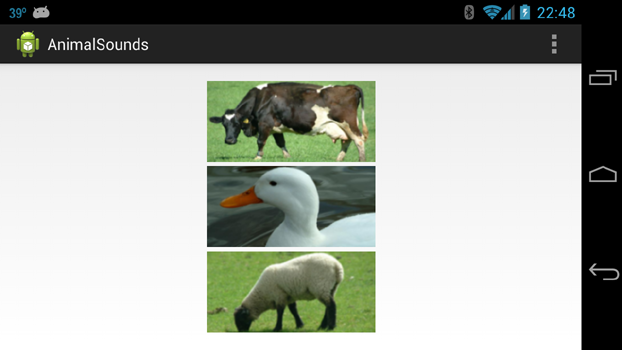
Now if the app is executed the visible representation of our buttons should consist
only of the animal images with no background, as illustrated in the following figure.
|
Since the button background has been set to transparent, the default behavior of the button background turning color when pressed is no longer operative and a standard visual clue to the state of a button has been lost. We shall remedy that in the next section.
Visual clues to the state of the image buttons can be added back by defining different images corresponding to different button states (for example, different color shadings of the same image), and having Android choose among them automatically according to the button state using a drawable "selector" defined in XML.
(Note: it is important to order the pressed, focused, and default items in the file exactly as given.) Likewise, create the file button2.xml in the same directory with the same content as above, except change all occurrences of the string or substring "cow" to "duck", and create the file button3.xml in the same directory with all occurrences of the "cow" in the above listing changed to "sheep".<?xml version="1.0" encoding="utf-8"?> <selector xmlns:android="http://schemas.android.com/apk/res/android"> <item android:state_pressed="true" android:drawable="@drawable/cow_pressed" /> <!-- pressed --> <item android:state_focused="true" android:drawable="@drawable/cow_focused" /> <!-- focused --> <item android:drawable="@drawable/cow" /> <!-- default --> </selector>
| Be certain that the button1.xml, button2.xml, and button3.xml files are in the app/res/drawable directory. This is why the file was created using New > File, rather than New > XML. Android Studio will put the file in the wrong directory if the latter is used. |
<ImageButton
      android:layout_width="match_parent"
      android:layout_height="wrap_content"
      android:id="@+id/imageButton"
      android:layout_marginTop="55dp"
      android:src="@drawable/button1"
      android:layout_alignParentTop="true"
      android:layout_alignParentLeft="true"
      android:layout_alignParentStart="true"
      android:background="@color/transparent"
      android:scaleType="center" />

<ImageButton
   android:layout_width="match_parent"
   android:layout_height="wrap_content"
   android:id="@+id/imageButton2"
   android:src="@drawable/button2"
   android:layout_centerVertical="true"
   android:layout_alignParentRight="true"
   android:layout_alignParentEnd="true"
   android:background="@color/transparent"
   android:scaleType="center" />

<ImageButton
   android:layout_width="match_parent"
   android:layout_height="wrap_content"
   android:id="@+id/imageButton3"
   android:src="@drawable/button3"
   android:layout_alignParentBottom="true"
   android:layout_centerHorizontal="true"
   android:layout_marginBottom="50dp"
   android:background="@color/transparent"
   android:scaleType="center" />
Now Android will see the XML files that we just created rather than a direct image name when it looks at the src attribute of the ImageButtons (it knows to interpret @drawable/button1 as a reference to the file button1.xml in the res/drawable directory, for example). Android will then read these files, determine the state of the button (normal, pressed, or focused), and use the appropriate image (as specified in the XML file) to represent the button.
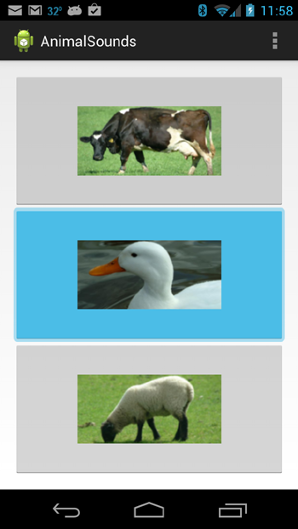
For example, the above code from button1.xml would cause Android to choose the image resource res/drawable/cow_pressed.png if it detects that button 1 is pressed and res/drawable/cow.png if it determines that button 1 is neither pressed nor receiving focus. If the app is executed we now obtain the following display,
 |
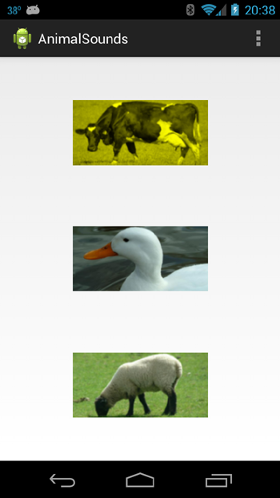 |
where the left image is for no buttons selected and the right image is with the cow image being pressed on the phone (which causes Android to substitute the yellow-tinted image cow_pressed.png for the default cow.png).
This example corresponds to screenshots from a touch-screen phone in portrait mode, for which there is no "focused" state (corresponding to a green-tinted image); only normal and pressed. On a phone with a physical keyboard the up and down keys on the physical keyboard can be used to change focus between buttons and then one sees the the green-tinted state indicating the button has focus, and the yellow-tinted state when the button is pressed on the touchscreen, or OK is clicked on the physical keyboard when the button has focus.
The ImageView
attributes can be used to modify the look of the buttons. For example, changing the scaleType to
android:scaleType="centerCrop" for each of the ImageButton tags in main.html produces the following screen-filling buttons.
|
Some of the view aspects of ImageButton have been used to control the look of the widgets. Let's now exploit the button aspect to cause some things to happen. Open MainActivity.java and make the following changes.
where R.id.ImageButton is the identifier for the first ImageButton, etc. This requires importing android.view.View.View button1 = findViewById(R.id.ImageButton); button1.setOnClickListener(this);
After these changes, MainActivity.java should read (with the additions displayed in red)
package <YourNamespace>.animalsounds;

import android.support.v7.app.AppCompatActivity;
import android.os.Bundle;
import android.util.Log;
import android.view.View;
import android.view.View.OnClickListener;

public class MainActivity extends AppCompatActivity implements OnClickListener {

   @Override
   protected void onCreate(Bundle savedInstanceState) {
      super.onCreate(savedInstanceState);
      setContentView(R.layout.activity_main);

      // Add click listeners to all the ImageButtons

      View button1 = findViewById(R.id.imageButton);
      View button2 = findViewById(R.id.imageButton2);
      View button3 = findViewById(R.id.imageButton3);
      button1.setOnClickListener(this);
      button2.setOnClickListener(this);
      button3.setOnClickListener(this);
   }

   // Required method if OnClickListener is implemented

   @Override
   public void onClick(View v) {

      // Find which ImageButton was pressed and take appropriate action

      switch(v.getId()){

            // The cow button
            case R.id.imageButton:
               Log.i("Test", "Cow Button");
               break;

            // The duck button
            case R.id.imageButton2:
               Log.i("Test", "Duck Button");
               break;

            // The sheep button
            case R.id.imageButton3:
               Log.i("Test", "Sheep Button");
               break;

      }
   }
}
Now if the app is executed and the three buttons are pressed in succession, there should be output in the logcat stream indicating that the appropriate button has been pushed. Once you have confirmed that the buttons are responding correctly to events the log.i statements may be removed or commented out.
Finally, let's modify the onClick method so that pressing an animal image plays a sound characteristic of that animal. The key Android class for implementing audio playback is MediaPlayer, and an overview of using the MediaPlayer for audio (and video) may be found in the Media and Camera Android document. Teaching our buttons to moo, quack, and bleat requires the following steps.
| Resources in the res/raw directory are not compressed when the .apk executable archive is packaged, so it is an appropriate place to put resources like sound or video that have their own compression. In this example the sounds will be packaged with the app, but it is also possible to use MediaPlayer to play a sound from a stand-alone file in the device file system (for example, on the SD card), or a stream from a network source; see the overview in the Media Playback Android document. |
| This example will use both MP3 and WAV files, which are among the formats that Android supports. The core media formats for images, audio, and video that are built into the Android platform may be found in this table. Specific hardware devices may offer additional formats not contained in this list. Applications may use any media codec available on an Android-powered device---both those provided by the Android platform and those that are device-specific. However, particularly with audio and video, a developer should test target devices extensively to determine which formats work well in practice. For short sounds, as in this example, WAV and MP3 are good choices. For longer audio MP3 is a good choice because of favorable quality versus compression. |
| This example uses only very short audio clips so we will not be too concerned with other MediaPlayer methods like stop() or setLooping(Boolean) that would be important in managing more extensive audio resources. You should call release() on a MediaPlayer as soon as it is no longer needed since the MediaPlayer may tie up hardware accelerators. Release of the MediaPlayer will be addressed in the section Lifecycle Management Issues below. |
If these changes are implemented for each of the three cases represented by our three buttons, the listing of MainActivity.java becomes (the Log.i diagnostic statements have been commented out)
package <YourNamespace>.animalsounds;

import android.support.v7.app.AppCompatActivity;
import android.os.Bundle;
import android.util.Log;
import android.view.View;
import android.view.View.OnClickListener;
import android.media.MediaPlayer;

public class MainActivity extends AppCompatActivity implements OnClickListener {

   private MediaPlayer mp;

   @Override
   protected void onCreate(Bundle savedInstanceState) {
      super.onCreate(savedInstanceState);
      setContentView(R.layout.activity_main);

      // Add click listeners to all the ImageButtons

      View button1 = findViewById(R.id.imageButton);
      View button2 = findViewById(R.id.imageButton2);
      View button3 = findViewById(R.id.imageButton3);
      button1.setOnClickListener(this);
      button2.setOnClickListener(this);
      button3.setOnClickListener(this);
   }

   // Required method if OnClickListener is implemented

   @Override
   public void onClick(View v) {

      // Find which ImageButton was pressed and take appropriate action

      switch(v.getId()){

            // The cow button
            case R.id.imageButton:
               //Log.i("Test", "Cow Button");
               mp = MediaPlayer.create(this, R.raw.cow);
               break;

            // The duck button
            case R.id.imageButton2:
               //Log.i("Test", "Duck Button");
               mp = MediaPlayer.create(this, R.raw.duck);
               break;

            // The sheep button
            case R.id.imageButton3:
               //Log.i("Test", "Sheep Button");
               mp = MediaPlayer.create(this, R.raw.sheep);
               break;

      }
      mp.seekTo(0);
      mp.start();
   }
}
where, for example, R.raw.sheep is Android's reference to the audio resource app/res/raw/sheep.mp3. Now if the app is executed on a device or emulator we should find that when the buttons are pressed the cow moos, the duck quacks, and the sheep goes baaah!
Our app does what we set out to accomplish, but there is one problem. On a phone, if the app just created is started and the buttons are pressed in random order many times in rapid succession, it may eventually crash (although there is a pretty cool animal symphony going on before that happens). This is presumably because, even though we are doing something simple with short sounds, failure to release the MediaPlayer between invocations eventually can overtax the system.
In this context this isn't too serious since I forced the error by rather abusive use of the app. But in a more complex setting such problems could be much more serious, cropping up even in more normal usage. So let's learn to be better Android citizens by releasing the MediaPlayer object before we start another sound if it has already played a sound, and also by releasing the MediaPlayer (if it was instantiated) when the app goes into the background. This can be accomplished by inserting a statement
if(mp != null) mp.release();
in the onClick method before the switch statement, and overriding the onPause() method and adding the same statement there. (We must test for null because the MediaPlayer instance mp might not have been created yet.) Thus the completed listing for MainActivity.java is
package <YourNamespace>.animalsounds;
import android.support.v7.app.AppCompatActivity;

import android.os.Bundle;
import android.util.Log;
import android.view.View;
import android.view.View.OnClickListener;
import android.media.MediaPlayer;

public class MainActivity extends AppCompatActivity implements OnClickListener {

   private MediaPlayer mp;

   @Override
   protected void onCreate(Bundle savedInstanceState) {
      super.onCreate(savedInstanceState);
      setContentView(R.layout.activity_main);

      // Add click listeners to all the ImageButtons

      View button1 = findViewById(R.id.imageButton);
      View button2 = findViewById(R.id.imageButton2);
      View button3 = findViewById(R.id.imageButton3);
      button1.setOnClickListener(this);
      button2.setOnClickListener(this);
      button3.setOnClickListener(this);
   }

   // Required method if OnClickListener is implemented

   @Override
   public void onClick(View v) {

      // Play only one sound at a time
      if(mp != null) mp.release();

      // Find which ImageButton was pressed and take appropriate action

      switch(v.getId()){

            // The cow button
            case R.id.imageButton:
               //Log.i("Test", "Cow Button");
               mp = MediaPlayer.create(this, R.raw.cow);
               break;

            // The duck button
            case R.id.imageButton2:
               //Log.i("Test", "Duck Button");
               mp = MediaPlayer.create(this, R.raw.duck);
               break;

            // The sheep button
            case R.id.imageButton3:
               //Log.i("Test", "Sheep Button");
               mp = MediaPlayer.create(this, R.raw.sheep);
               break;

      }
      mp.seekTo(0);
      mp.start();
   }

   @Override
   public void onPause() {
      super.onPause();
      // Release the MediaPlayer if going into background if it isn't null
      if(mp != null) mp.release();
   }
}
(For this simple example it isn't necessary to restore the MediaPlayer by overriding onResume() when coming back to the foreground, since it will be instantiated and initialized within onClick anyway.) With this version, even if I hit the buttons many times in rapid succession on my phone, there is never more than one sound playing and the system is stable, and if the app is sent to the background and then brought back to the foreground it still functions correctly.
Best practices in Android programming encourage externalizing resources: separation of function and content from display, which is facilitated by putting layout in XML resource files separate from the Java programming. This permits these resources to be maintained separate from the actual code, but equally important is that this makes it easy for a programmer to provide app resources supporting different device configurations (for example, different screen sizes, orientations, or default languages) that are managed automatically by Android.
This works in the following way. For any type of resource (strings, images, sound files ...), the programmer has the option of supplying two categories of resources:
To specify that a group of resources are alternative resources designed for a specific configuration, we append an appropriate qualifier to the directory (folder) name.
| The list of valid directory qualifiers may be found in the Providing Resources Android document. |
For example, the default UI layout is placed in the res/layout directory, but you can specify a different UI layout for landscape orientation simply by creating a res/layout-land directory and saving the alternative resource there. Then Android automatically applies the appropriate resources by matching the device's current configuration to your resource directory names: if it senses that a portrait layout is appropriate for the current configuration of the device it automatically uses the resources that you supplied in res/layout, and if it senses that the current device configuration corresponds to landscape mode it instead uses the resources that you have supplied in the res/layout-land directory. It really is that simple!
Let's illustrate for our current project. There are two common ways to cause smartphones to switch between vertical (portrait) mode and horizontal (landscape) mode:
If the phone is switched to horizontal mode by one of these actions the AnimalSounds app as presently written gives the following display
|
which is functional but not an optimal use of the horizontal screen space. (Depending on how your app was laid out and the display device, there might not even be enough space to display all three images vertically in landscape mode.) To provide an alternative view for when the screen of the device is in the landscape display mode
| Warning: if the AS Projects panel is in Android mode (see the dropdown menu above the left panel) the new directory just added will not appear in the tree structure. If you switch to Project mode using the dropdown menu it should appear as app > src > main > res > layout-land. It will also appear in the same place in the directory structure for the project in your computer file system. The reason for this potentially confusing difference is that in Android mode the project display tree does not literally mirror the project structure on the disk but in Project mode it does. Once a file is added to the new layout-land directory (see below) it will appear in the Project pane in Android mode, but under app > res > layout > filename (land). |
Now if the app is executed, while the device is in portrait mode we get the same display as before (because Android is using the default res/layout/activity_main.xml resource to format the screen), but if the device is flipped to horizontal mode---the reason and means are irrelevant for us as developers---we get a different display according to the new landscape layout just implemented. (For a device, be sure that the autorotate mode is chosen in Settings; for an emulator there is a rotation icon in the menu on the right side that allows flipping between landscape and portrait mode, though I have found that for emulators the behavior under rotation is not always a faithful representation of the behavior on a device.) For example,

|
because now Android has sensed that the device is in horizontal mode and has selected the layout in res/layout-land/activity_main.xml to format the screen. If the buttons are pushed we find exactly the same functionality as before, but now the display is at least a little more appropriate visually for a landscape layout.
|
Obviously one could do better aesthetically than the above image, for example by using in the landscape layout different images with aspect ratios better suited to a horizontal display, or a different number of images. But this exercise illustrates the essential point that it is very easy as a developer to supply alternative resources that Android will manage without our intervention.
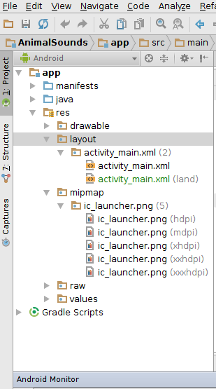
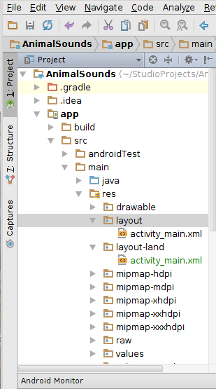
The differences in Project panel display in Android mode and in Project mode mentioned above for this project are displayed in the following two images.
The Project-mode display in the above-right figure illustrates the actual directory and file structure of the project. There the landscape layout file appears at its literal location in the file structure: app/res/layout-land/activity_main.xml. The Android-mode display in the above-left figure is instead organized according to Android coding and runtime logic. There the portrait layout file and the landscape layout file both appear under app > res > layout >activity_main.xml with the same names, but with the landscape layout file distinguished by a (land) label. This is more in keeping with the Android alternative-resource logic that it has two equally-viable main layout files and it will select the optimal one to use in real time by sensing the orientation of the device. Notice in these figures another example of alternative resources for different environments that our projects have been supplying automatically all along. The mipmap directories contain icon bitmaps at different resolution (hdpi, mdpi, ...). Android decides which to use depending on the screen resolution of the device. (See the example of managing these mipmap resources in the project WebViewDemo.) |
For many other potential applications of alternative resources, see the overviews in Providing Alternative Resources and Localizing with Resources.
| The complete project for the application described above is archived on GitHub at the link AnimalSounds. Instructions for installing it in Android Studio may be found in Packages for All Projects. |
Last modified: July 25, 2016