We want to get started writing our own programs as soon as possible, but let's begin by installing a sample Android application in the Android Studio IDE, compiling it, and running it. Installing and running a sample package will serve several useful purposes:
In addition, running a sample package will test the correctness of our Android Studio installation.
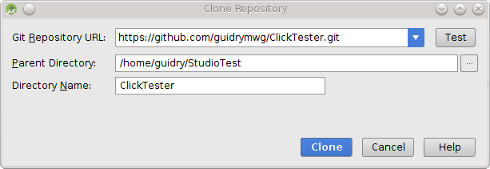
A number of packages corresponding to Android sample code along with instructions for downloading may be found at Samples and at the GitHub Google Samples Page. You may explore these but for this demonstration we will instead install a sample corresponding to a completed project that you will build yourself later in this course.
|
Note that when installing sample packages in Android Studio you may sometimes get error messages indicating that the required SDK version or build tool version for the project are not compatible with those that you currently have installed. Usually these error messages will have links that you can click that will either fix the problem automatically or give instructions on how to fix it. If this does not provide a solution, Google the error message (paste the string into a Google search field), which will usually provide links to further information on how to fix the problem.
You may also get error messages about missing files. Usually these are innocuous because in storing a project on a repository some files that are recreated in each build of the project are deliberately omitted and it is not important if they are missing. If the project runs when executed, these missing files may be ignored. (But if the project will not compile and run, then the missing files may correspond to real errors.) |
To illustrate we will install a package corresponding to a simple app, ClickTester, which illustrates the basics of programming buttons for an Android application. The sample is stored on the repository GitHub, which Android Studio can connect to automatically, so the procedure is straightforward.
| In its default mode Android Studio builds open projects continuously as they are installed or modified. You can always force a manual build at any time by selected Build > Clean Project. Whenever Android Studio is building, progress will be displayed in the lower bar. |
To execute this project we need to either attach an Android device to the development computer, or configure an emulator (Android Virtual Device or AVD). In Installing on a Device you will find instructions for setting up an Android device for development, but for our example here let's use an AVD. Follow the instructions in Configuring an AVD to set up a basic Android virtual device.
Once the AVD is configured, execute the app by clicking the Run button in the toolbar at the top of Android Studio (the right-pointing green triangle), or equivalently by selecting Run > Run 'app' from the top menu. If the Android emulator just configured is in the list of running android devices, select it. Otherwise, select it from the list of available emulators. Click OK. This should launch an emulator displaying the running app:

|
(It may take a while before the emulator displays the program; be patient.) If you click the colored squares or the button (equivalent of a touch on an actual touchscreen device) a brief message will indicate which was clicked, and if you long-click a colored square (equivalent of a long-press on an actual touchscreen device) you should get a popup menu allowing the color of the square to be changed.
You can explore the code used to accomplish this by opening the files displayed in the left (project) panel of the project in Android Studio. (In Click Tester we will describe in detail how to build this project from scratch.)
| Tip: Because emulators are very slow to launch, you will probably want to leave them open once they are launched, if you intend to use them again soon. |
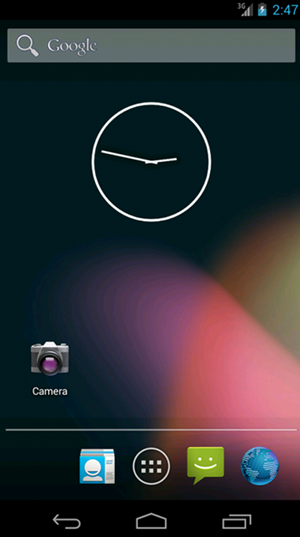
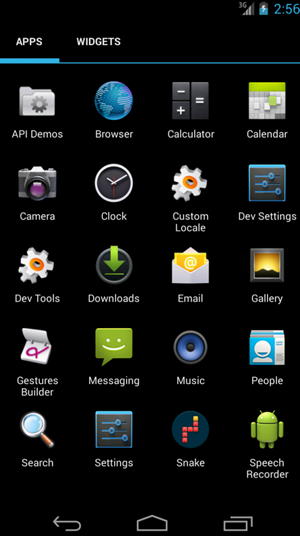
The Applications Menu in the emulator will likely contain a folder called API Demos that will allow you to explore examples of API applications without having to install them yourself as in the above example. On the emulator configured above, clicking the Home button (the circle symbol bottom center on the display) should give a display as in the left figure below, and then clicking the central bottom button on the display having the circle with multiple dots in it (Launcher icon) should give the applications folder illustrated in the right figure below.
 |
 |
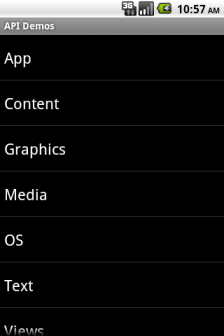
If you click on the API Demos folder you should get a scrollable menu (drag it vertically with the mouse) as in the left figure below. Try selecting Graphics > Open GL ES > Kube, which should give the example of Open GL 3D animated graphics illustrated in the right figure below.
 |
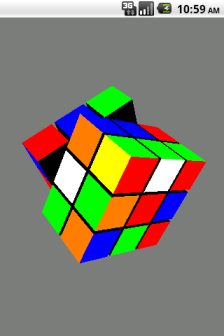 |
Other examples from the API illustrating Android capabilities may be explored by selecting other options from this menu.
Last modified: June 8, 2016