One of the most powerful features of Android is the capability to use Intents to share content and trigger actions within and among applications. An excellent and concise introduction may be found in the post Share With Intents by Android Developer Advocate Lucas Alexander. There are two basic kinds of intents in Android:
(see the Intents and Intent Filters developer guide and Sending Content to Other Apps for an overview of their uses). Because of the properties that we now discuss, explicit intents find their primary use for communication between components of a single application, but the most interesting uses of implicit intents enable interoperability between different applications.
Explicit intents specify by name the class that is expected to handle it. We have encountered many examples of using explicit intents, most commonly to launch new activities. For example, the following event-handling code taken from the project WebView Demo uses explicit Intents to launch a new Activity (associated with the class Webscreen) with different possibilities for the data passed to the new Activity using the putExtra() method, with the code implementing the intents highlighted in red.
public void onClick(View v) {
	switch(v.getId()){

		case R.id.button1:
		Intent j = new Intent(this, Webscreen.class);
		j.putExtra(com.lightcone.webviewdemo.Webscreen.URL,
		"http://eagle.phys.utk.edu/guidry/recipes/mojito.html");
		startActivity(j);
		break;

		case R.id.button2:
		Intent k = new Intent(this, Webscreen.class);
		k.putExtra(com.lightcone.webviewdemo.Webscreen.URL,
		"http://www.ssec.wisc.edu/data/east/latest_eastir.gif");
		startActivity(k);
		break;
	}
}
Explicit intents require that a specific named class implement the desired action. Since the class structure of an application is not generally known outside the application, explicit intents are usually used for actions that occur within a single application.
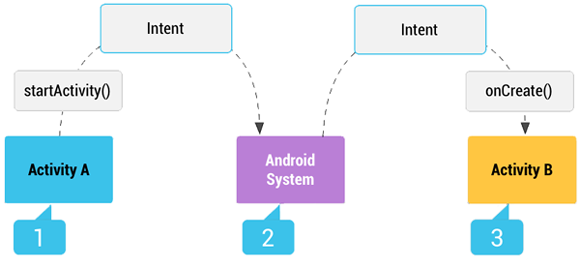
An implicit intent specifies in general terms an action and may supply some data, but does not determine the component that is expected to handle the request. Instead, the Android system will decide which components are registered to implement that action and will present to the user a choice of components that have declared that they can handle the requested action. (The user has the option of specifying one of these components to be the default one, so that the choice does not have to be made each time this action is requested.) The schematic way that an implicit intent is handled by the system is illustrated in the following figure.
|
In this example Activity A creates an Intent describing a desired action and passes it to startActivity(). The Android System searches all apps for an intent filter that matches the intent request. When a match is found, the system starts the matching activity (Activity B) by invoking its onCreate() method and passing it the Intent.
The determination by Android of which components can handle a given request issued through an implicit intent is implemented through an IntentFilter. An IntentFilter specifies the types of intents that an activity, service, or broadcast receiver can respond to. IntentFilters are typically defined in the AndroidManifest.xml file. (For a BroadcastReceiver they also can be defined in the Java code.) For example, consider the following manifest file.
<?xml version="1.0" encoding="utf-8"?>
<manifest xmlns:android="http://schemas.android.com/apk/res/android"
    package="com.lightcone.sharingintents" android:versionCode="1" android:versionName="1.0" >

    <application android:icon="@drawable/ic_launcher" android:label="@string/app_name" >
        <activity android:name=".SharingIntents" android:label="@string/app_name" >
            <intent-filter>
                     <action android:name="android.intent.action.MAIN" />
                     <category android:name="android.intent.category.LAUNCHER" />
          </intent-filter>
        </activity>
        <activity android:name=".MyLittleBrowser" android:label="@string/little_browser_name">
            <intent-filter>
            <action android:name="android.intent.action.VIEW" />
            <category android:name="android.intent.category.DEFAULT" />
            <data android:scheme="http"/>
       </intent-filter>
        </activity>
    </application>

</manifest>
There are two intent filters defined in this manifest file, denoted by the snippets highlighted in red.
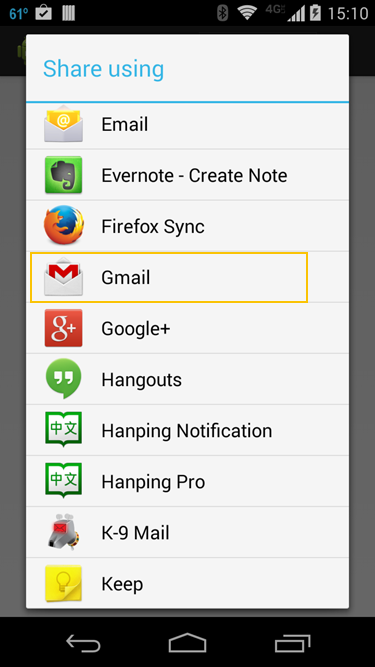
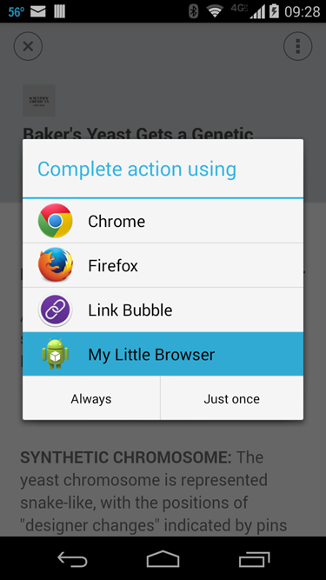
This second capability is illustrated in the following popup menu (which was triggered by clicking on a web link in some application).

|
As can be seen explicitly, our app SharingIntents is now listed right up there with the big boys as capable of handling the webpage request (through its class MyLittleBrowser). Of course, the manifest file only declares that our app has this capability; it will be up to us as programmers to ensure that it actually can handle a webpage in a useful way if the user chooses it from this menu. We will describe the basics of how to do that below.
|
NOTE: You will not be presented with this choice menu if you have previously selected a default by choosing the "Always" action in the above image. In that case, clicking on the web link will probably launch directly the browser previously declared to be the default choice on your device for the calling application.
You can disable the default choice (so that the above menu will be presented) in the Settings > Apps menu. For example, if Chrome has been set previously as the default web browser, Settings > Apps > Chrome > Open by default > Clear Defaults will unregister Chrome as the default browser. |
We also should mention in this context PendingIntents, which are wrappers around intents. They grant permission for another application to use the wrapped intent as if it were being executed from the application responsible for the PendingIntent. The most common usage of PendingIntents occurs in three categories:
In this project we shall not be concerned with PendingIntents but they are used in some of our other projects. For example, AppWidgets uses PendingIntents to declare intents that will be executed when a user performs some action with an AppWidget. In this case a PendingIntent is necessary because the homescreen or lockscreen app, not the app in which you created the AppWidget, executes the intent. Normally the homescreen or lockscreen would not have permission to do so, but the PendingIntent is the mechanism by which we grant the required permission. We also used PendingIntents to implement the notifications example in the Dialogs, Alerts, & Notifications project.
A powerful class for facilitating sharing called ShareActionProvider was introduced with Ice Cream Sandwich (Android 4.0; API 14). As we shall see, with ShareActionProvider and a very small amount of code the sharing menus become adaptive, with the choices for a task that are used most commonly floating to the top and those seldom used relegated to a secondary menu. This will make it simple to manage implicit sharing in a sleek and user-friendly manner.
With the preceding as basic introduction, let us now turn to writing an app that demonstrates some of the ways in which we can use intents to share information and enable interoperability between applications. Because we wish to take advantage of ShareActionProvider and some other newer things, our app will be restricted to run under Android API 21 and later.
Following the general procedure in Creating a New Project, either choose Start a new Android Studio project from the Android Studio homepage, or from the Android Studio interface choose File > New > New Project. Fill out the fields in the resulting screens as follows,
|
Application Name:
SharingIntents
Company Domain:< YourNamespace > Package Name: <YourNamespace> . sharingintents Project Location: <ProjectPath> SharingIntents Target Devices: Phone and Tablet; Min SDK API 21 Add an Activity: Empty Activity Activity Name: MainActivity (check the Generate Layout File box) Layout Name: activity_main |
where you should substitute your namespace for <YourNamespace> (com.lightcone in my case) and <ProjectPath> is the path to the directory where you will store this Android Studio Project (/home/guidry/StudioProjects/ in my case). If you have chosen to use version control for your projects, go ahead and commit this project to version control.
| For the demonstration of barcode scanning in this app you will need to have installed on the test device an app that can read barcodes. There are various possibilities but we will use the free apps Barcode Scanner or Google Goggles. The app that we shall develop will warn you if your device does not have a compatible barcode scanner and give you the option of installing Barcode Scanner from the Google Play Store. |
Let us now create and populate the XML and Java files that we need for this project. Note: You should insert your namespace for <YourNamespace> in the following listings.
Edit the file res/values/colors.xml to read
<?xml version="1.0" encoding="utf-8"?>
<resources>
    <color name="colorPrimary">#ff9800</color>
    <color name="colorPrimaryDark">#f57c00</color>
    <color name="colorAccent">#ffc107</color>
    <color name="barColor">@color/colorPrimary</color>
    <color name="barTextColor">#ffffff</color>color>
    <color name="bkg">#99ffe0b2</color>
    <color name="textbkg">#bbffffff</color>
    <color name="browserPrimary">#9e9e9e</color>
    <color name="browserPrimaryDark">#616161</color>
    <color name="browserAccent">#607d8b</color>

</resources>
Edit the file res/values/styles.xml to read
<resources>

    <!-- Base application theme. NoActionBar because we are using a Toolbar -->
    <style name="AppTheme" parent="Theme.AppCompat.Light.NoActionBar">
        <item name="colorPrimary">@color/colorPrimary</item>
        <item name="colorPrimaryDark">@color/colorPrimaryDark</item>
        <item name="colorAccent">@color/colorAccent</item>
    </style>

    <style name="BrowserTheme" parent="AppTheme">
        <item name="colorPrimary">@color/browserPrimary</item>
        <item name="colorPrimaryDark">@color/browserPrimaryDark</item>
        <item name="colorAccent">@color/browserAccent</item>
    </style>

</resources>
Edit the file res/values/dimens.xml to read
<resources>
    <!-- Default screen margins, per the Android Design guidelines. -->
    <dimen name="activity_horizontal_margin">16dp</dimen>
    <dimen name="activity_vertical_margin">16dp</dimen>

    <dimen name="buttonWidth">320dp</dimen>
    <dimen name="textFieldWidth">350dp</dimen>
</resources>
Edit res/values/strings.xml to give
<resources>
    <string name="app_name">SharingIntents</string>
    <string name="action_settings">Settings</string>
    <string name="little_browser_name">My Little Browser</string>
    <string name="displayPick">Display Picked Image</string>
    <string name="button1_label">Share Input Text</string>
    <string name="button2_label">Scan and Share Barcode</string>
    <string name="button3_label">Select an Image</string>
    <string name="button4_label">Share this Image</string>
    <string name="browserButtonLabel">Test Browser Share</string>
    <string name="shareInvite">Share using</string>
    <string name="subject">My custom subject</string>
    <string name="websubject">Webpage share</string>
    <string name="hintText">(Input some text to share)</string>
    <string name="address1">andy@mayberry.org</string>
    <string name="address2">barney@mayberry.org</string>
    <string name="CC1">auntBee@mayberry.org</string>
    <string name="BCC1">gomerPyle@mayberry.org</string>
    <string name="shareImage">Share image using</string>
    <string name="errorTitle1">We have a problem</string>
	<string name="errorString1">ActivityNotFoundException: No app found to handle the
		barcode intent. One possibility: install the free app Barcode Scanner from the Play Store.
        Google Goggles is another free app that can handle the barcode intent."</string>
    <string name="playStoreAddress">https://play.google.com/store/apps/details?</string>
    <string name="bsString">id=com.google.zxing.client.android</string>
    <string name="toaster">Select share app from top bar menu</string>
    <string name="barcode_cancel">Barcode intent canceled</string>
</resources>
Create the directory res/menu if it doesn't exist. Right-click on res/menu and select New > File, entering the file name main.xml (with the explicit .xml extension). Edit res/menu/main.xml to read
<menu xmlns:android="http://schemas.android.com/apk/res/android"
    xmlns:app="http://schemas.android.com/apk/res-auto">

    <item android:id="@+id/menu_share"
        android:title="@string/shareInvite"
        app:showAsAction="ifRoom"
        app:actionProviderClass="android.support.v7.widget.ShareActionProvider"/>

    <item
        android:id="@+id/action_settings"
        android:orderInCategory="100"
        app:showAsAction="never"
        android:title="@string/action_settings"/>

</menu>
Edit res/layout/activity_main.xml to give
<?xml version="1.0" encoding="utf-8"?>
<LinearLayout xmlns:android="http://schemas.android.com/apk/res/android"
    android:layout_width="match_parent"
    android:layout_height="match_parent"
    android:layout_marginBottom="0dp"
    android:layout_marginLeft="0dp"
    android:layout_marginRight="0dp"
    android:layout_marginTop="0dp"
    android:background="@color/bkg"
    android:orientation="vertical" >

    <android.support.v7.widget.Toolbar
        android:id="@+id/toolbar"
        android:layout_height="wrap_content"
        android:layout_width="match_parent"
        android:elevation="0dp"
        android:minHeight="?attr/actionBarSize"
        android:background="@color/barColor" />

    <EditText
        android:id="@+id/editText1"
        android:layout_width="@dimen/textFieldWidth"
        android:layout_height="wrap_content"
        android:layout_marginTop="20dp"
        android:layout_gravity="center_horizontal"
        android:hint="@string/hintText"
        android:background="@color/textbkg"
        android:inputType="textMultiLine"
        android:padding="8dp">

        <requestFocus />
    </EditText>

    <Button
        android:id="@+id/button01"
        android:layout_width="@dimen/buttonWidth"
        android:layout_height="wrap_content"
        android:layout_gravity="center_horizontal"
        android:layout_marginTop="15dp"
        android:paddingLeft="20dp"
        android:paddingRight="20dp"
        android:text="@string/button1_label"
        android:textSize="18sp" />

    <Button
        android:id="@+id/button02"
        android:layout_width="@dimen/buttonWidth"
        android:layout_height="wrap_content"
        android:layout_gravity="center_horizontal"
        android:layout_marginTop="5dp"
        android:paddingLeft="0dp"
        android:paddingRight="0dp"
        android:text="@string/button2_label"
        android:textSize="18sp" />

    <Button
        android:id="@+id/button03"
        android:layout_width="@dimen/buttonWidth"
        android:layout_height="wrap_content"
        android:layout_gravity="center_horizontal"
        android:layout_marginTop="5dp"
        android:paddingLeft="0dp"
        android:paddingRight="0dp"
        android:text="@string/button3_label"
        android:textSize="18sp" />

    <Button
        android:id="@+id/browserButton"
        android:layout_width="@dimen/buttonWidth"
        android:layout_height="wrap_content"
        android:layout_gravity="center_horizontal"
        android:layout_marginTop="5dp"
        android:paddingLeft="0dp"
        android:paddingRight="0dp"
        android:text="@string/browserButtonLabel"
        android:textSize="18sp" />

</LinearLayout>
Create the XML file res/layout/mylittlebrowser.xml and edit it to give
<?xml version="1.0" encoding="utf-8"?>
<LinearLayout xmlns:android="http://schemas.android.com/apk/res/android"
    android:layout_width="match_parent"
    android:layout_height="match_parent"
    android:layout_marginBottom="0dp"
    android:layout_marginLeft="0dp"
    android:layout_marginRight="0dp"
    android:layout_marginTop="0dp"
    android:background="@color/bkg"
    android:orientation="vertical" >

    <android.support.v7.widget.Toolbar
        xmlns:android="http://schemas.android.com/apk/res/android"
        android:id="@+id/toolbar3"
        android:layout_height="wrap_content"
        android:layout_width="match_parent"
        android:elevation="0dp"
        android:minHeight="?attr/actionBarSize"
        android:background="@color/browserPrimary" />

    <WebView
        android:layout_width="match_parent"
        android:layout_height="match_parent"
        android:id="@+id/webView"
        android:layout_gravity="center_horizontal" />

</LinearLayout>
Create the XML file res/layout/pickanimage.xml and edit it to give
<?xml version="1.0" encoding="utf-8"?>
<LinearLayout xmlns:android="http://schemas.android.com/apk/res/android"
    android:layout_width="match_parent"
    android:layout_height="match_parent"
    android:layout_marginBottom="0dp"
    android:layout_marginLeft="0dp"
    android:layout_marginRight="0dp"
    android:layout_marginTop="0dp"
    android:background="@color/bkg"
    android:orientation="vertical" >

    <android.support.v7.widget.Toolbar
        xmlns:android="http://schemas.android.com/apk/res/android"
        android:id="@+id/toolbar3"
        android:layout_height="wrap_content"
        android:layout_width="match_parent"
        android:elevation="0dp"
        android:minHeight="?attr/actionBarSize"
        android:background="@color/browserPrimary" />

    <WebView
        android:layout_width="match_parent"
        android:layout_height="match_parent"
        android:id="@+id/webView"
        android:layout_gravity="center_horizontal" />

</LinearLayout>
That completes entry of the required XML files. Now let us add the Java classes that will be required.
Edit the class file MainActivity.java to give
package <YourNamespace>.sharingintents;

import android.os.Build;
import android.os.Bundle;
import android.support.v4.view.MenuItemCompat;
import android.support.v7.app.AppCompatActivity;
import android.support.v7.widget.Toolbar;
import android.view.Menu;

import android.app.AlertDialog;
import android.content.ActivityNotFoundException;
import android.content.Context;
import android.content.DialogInterface;
import android.content.Intent;
import android.net.Uri;
import android.util.Log;
import android.view.MenuItem;
import android.view.View;
import android.view.View.OnClickListener;
import android.view.inputmethod.InputMethodManager;
import android.widget.EditText;
import android.support.v7.widget.ShareActionProvider;
import android.widget.Toast;

public class MainActivity extends AppCompatActivity implements OnClickListener {

    private static final String TAG = "SHARE";
    private static final int REQUEST_CODE = 1;
    private ShareActionProvider shareActionProvider;
    private EditText inputText;
    private boolean isBarcodeScan = false;

    @Override
    protected void onCreate(Bundle savedInstanceState) {

        super.onCreate(savedInstanceState);
        setContentView(R.layout.activity_main);

        // Create top toolbar.  This assumes a NoActionBar style in styles.xml
        // since it will be replaced by the following toolbar.

        Toolbar toolbar = (Toolbar) findViewById(R.id.toolbar);
        // Remove default toolbar title and replace with an icon
        if (toolbar != null) {
            toolbar.setNavigationIcon(R.mipmap.ic_launcher);
        }

        // Set background color.  Handle method getColor deprecated as of API 23
        if (Build.VERSION.SDK_INT >= Build.VERSION_CODES.M) {
            toolbar.setTitleTextColor(getResources().getColor(R.color.barTextColor, null));
        } else {
            toolbar.setTitleTextColor(getResources().getColor(R.color.barTextColor));
        }

        toolbar.setTitle("");
        setSupportActionBar(toolbar);

        // Identify buttons in XML layout and attach click  listeners to each
        View button01 = findViewById(R.id.button01);
        button01.setOnClickListener(this);
        View button02 = findViewById(R.id.button02);
        button02.setOnClickListener(this);
        View button03 = findViewById(R.id.button03);
        button03.setOnClickListener(this);
        View browserButton = findViewById(R.id.browserButton);
        browserButton.setOnClickListener(this);

        // Get handle to input text field
        inputText = (EditText) findViewById(R.id.editText1);

    }

    @Override
    public boolean onCreateOptionsMenu(Menu menu) {

        // Inflate the menu; this adds items to the action bar if it is present.
        getMenuInflater().inflate(R.menu.main, menu);

        // Get the share menu item
        MenuItem menuItem = menu.findItem(R.id.menu_share);
        // Get the provider
        shareActionProvider = (ShareActionProvider) MenuItemCompat.getActionProvider(menuItem);

        return true;
    }

    // Process button clicks
    @Override
    public void onClick(View v) {

        switch (v.getId()) {

            // For button 1, share string data
            case R.id.button01:
                isBarcodeScan = false;
                // Launch the text share intent and associate it with the ShareActionProvider
                Intent share = shareText(inputText.getText().toString());
                Log.i(TAG, "intent=" + share.toString());
                shareActionProvider.setShareIntent(share);

                // Force the soft keyboard closed so following Toast instructions easy to see
                InputMethodManager inputManager = (InputMethodManager)
                        getSystemService(Context.INPUT_METHOD_SERVICE);
                inputManager.hideSoftInputFromWindow(v.getWindowToken(),
                        InputMethodManager.HIDE_NOT_ALWAYS);

                // Display Toast with instructions
                Toast.makeText(this, getString(R.string.toaster),
                        Toast.LENGTH_LONG).show();
                break;

            // For button 2, share barcode data
            case R.id.button02:
                isBarcodeScan = true;
                shareActionProvider.setShareIntent(shareBarcode());
                break;

            // For button 3, pick an image from gallery or other sources and share
            case R.id.button03:
                Intent j = new Intent(this, PickAnImage.class);
                startActivity(j);
                break;

            // For browserButton, test the shared custom browser MyLittleBrowser.  If
            // no preferred browser has been set, this should display a list of
            // apps registered to display webpages, including MyLittleBrowser.  Choosing
            // MyLittleBrowser should display the url given below in MyLittleBrowser.

            case R.id.browserButton:
                String url = "http://developers.google.com";
                Intent k = new Intent(Intent.ACTION_VIEW);
                k.setData(Uri.parse(url));
                startActivity(k);
                break;
        }
    }

    // Method to allow app to share text through implicit intent.  It returns
    // the sharing intent that it creates for potential use in the
    // ShareActionProvider that is managing the share menu in the top action bar.

    public Intent shareText(String s) {

        // Create a sharing intent
        Intent sharingIntent = new Intent(android.content.Intent.ACTION_SEND);

        // Set its type to text
        sharingIntent.setType("text/plain");

        // These allow some custom addresses to be defined. They will be filled in
        // automatically if an email client is invoked for the share, for example.

        String addresses[] = {getString(R.string.address1), getString(R.string.address2)};
        String CCaddresses[] = {getString(R.string.CC1)};
        String BCCaddresses[] = {getString(R.string.BCC1)};

        // Add the text to be shared to the intent
        sharingIntent.putExtra(android.content.Intent.EXTRA_TEXT, s);

        // Following optional fields for email. Will be ignored by sharing app
        // if not appropriate. For example, non-email apps may use the SUBJECT
        // extra and ignore the others.

        // Hardwire in a default subject
        sharingIntent.putExtra(android.content.Intent.EXTRA_SUBJECT,
                getString(R.string.subject));

        // Add default addresses
        sharingIntent.putExtra(android.content.Intent.EXTRA_EMAIL, addresses);
        sharingIntent.putExtra(android.content.Intent.EXTRA_CC, CCaddresses);
        sharingIntent.putExtra(android.content.Intent.EXTRA_BCC, BCCaddresses);

        // If this is text from a barcode scan created by shareBarcode(), wrap
        // the intent in a chooser and start. If it is from input text, don't
        // start here (will be invoked from the task bar share menu in that case).

        if (isBarcodeScan) startActivity(Intent.createChooser(sharingIntent,
                getString(R.string.shareInvite)));

        return sharingIntent;
    }

    /**
     * Following method for scanning barcodes adapted from article by Alexander Lucas at
     *
     * http://android-developers.blogspot.com/2012/02/share-with-intents.html
     *
     * For this to work you must have an app installed on the device that can handle
     * the barcode scanning intent.  Barcode Scanner or Google Goggles are available for
     * free from the Google Play Store and will do the job.  Below we will check to see if
     * there is a barcode scanning app on the device and give the user a choice of installing
     * Barcode Scanner from the Play Store if not.
     */

    public Intent shareBarcode() {

        // Check for an app on the device to handle a barcode scan
        Intent intent = new Intent("com.google.zxing.client.android.SCAN");

        // Clear the app called with above intent from activity stack, so users arrive at
        // the main screen of the app rather than the barcode scanning screen when next
        // launched from the homescreen.

        intent.addFlags(Intent.FLAG_ACTIVITY_NEW_DOCUMENT);

        /** The following should scan most standard barcode formats but one can
         restrict the formats for particular applications by adding extras to the intent.
         Some examples:

         // QR codes (2D barcodes) only:
         intent.putExtra("SCAN_MODE", "QR_CODE_MODE");
         // 1D barcodes only:
         intent.putExtra("SCAN_MODE", "ONE_D_MODE");
         // Only UPC and EAN barcodes (appropriate for shopping apps):
         intent.putExtra("SCAN_MODE", "PRODUCT_MODE"

         For more info, see http://code.google.com/p/zxing/source/browse/trunk/android/src/
         com/google/zxing/client/android/Intents.java
         */

        // The essential piece of the following is the startActivityForResult method, but we
        // wrap it in a try-catch to address the case of no app installed on the device that
        // can handle the barcode intent. We don't take similar precautions with the image and
        // plain text share examples because we assume that most devices will have apps
        // installed that can handle those MIME types.

        try {

            // App to handle barcode is present, so start the scanning intent. When result is
            // is returned, the onActivityResult() callback below will be invoked.

            startActivityForResult(intent, REQUEST_CODE);

        } catch (ActivityNotFoundException e1) {
            // If no barcode scanning app on device, notify and give option to acquire one
            e1.printStackTrace();
            String errorTitle = getString(R.string.errorTitle1);
            String error = getString(R.string.errorString1);
            int icon = R.mipmap.ic_launcher;
            showTask(errorTitle, error, icon, this);
        }
        return intent;
    }

    // Will be called when the barcode scanning intent returns. It processes the
    // results into a string and calls shareText() to share the string.

    public void onActivityResult(int requestCode, int resultCode, Intent intent) {

        if (requestCode == REQUEST_CODE) {
            if (resultCode == RESULT_OK) {
                //  Results have been returned, so process them
                String contents = intent.getStringExtra("SCAN_RESULT");
                String format = intent.getStringExtra("SCAN_RESULT_FORMAT");
                Log.i(TAG, "scan string=" + contents + " scan format=" + format);
                shareText(contents);
            } else if (resultCode == RESULT_CANCELED) {
                String error = getString(R.string.barcode_cancel);
                Toast.makeText(this, error, Toast.LENGTH_SHORT).show();
            }
        }
    }

    /**
     * Method showTask() creates a custom  dialog that  presents a summary of the task
     * to the user and has buttons to either launch the task by executing the method launchTask()
     * or cancel the dialog.  In this case this dialog will be presented only if no app to handle the
     * barcode intent is found on the device. The dialog will give that warning and give the user
     * the option of going directly to the Android app market (asssuming a data connection exists)
     * to install the free app Barcode Scanner, which can handle the barcode intent, or to click
     * the Cancel button if the user wants to deal with the issue manually (for example, by
     * downloading a different barcode app like Google Goggles).
     */

    private void showTask(String title, String message, int icon, Context context) {
        AlertDialog alertDialog = new AlertDialog.Builder(context).create();
        alertDialog.setTitle(title);
        alertDialog.setMessage(message);
        alertDialog.setIcon(icon);

        int positive = AlertDialog.BUTTON_POSITIVE;
        int negative = AlertDialog.BUTTON_NEGATIVE;

        alertDialog.setButton(positive, "Get Barcode Scanner", new DialogInterface.OnClickListener() {
            public void onClick(DialogInterface dialog, int which) {
                launchTask();
            }
        });

        alertDialog.setButton(negative, "Cancel", new DialogInterface.OnClickListener() {
            public void onClick(DialogInterface dialog, int which) {

            }
        });

        alertDialog.show();
    }


    // Method launchTask() is invoked by the showTask dialog to retrieve the app Barcode
    // Scanner from the Android app market (Play Store) if the device doesn't have a barcode scanner
    // app installed.

    private void launchTask() {
        String marketString = getString(R.string.playStoreAddress) + getString(R.string.bsString);
        goToMarket(marketString);
    }

    // Go to Android Play Store for a specific app defined by its url address in Play Store.
    private void goToMarket(String appString) {
        Intent i = new Intent(Intent.ACTION_VIEW);
        i.addFlags(Intent.FLAG_ACTIVITY_NEW_DOCUMENT);
        i.setData(Uri.parse(appString));
        startActivity(i);
    }

}
Create the class file MyLittleBrowser.java and edit it to give
package <YourNamespace>.sharingintents;

import java.net.URL;

import android.content.Intent;
import android.net.Uri;
import android.os.Build;
import android.os.Bundle;
import android.support.v4.view.MenuItemCompat;
import android.support.v7.app.AppCompatActivity;
import android.support.v7.widget.Toolbar;
import android.util.Log;
import android.view.Menu;
import android.view.MenuItem;
import android.webkit.WebSettings;
import android.webkit.WebView;
import android.webkit.WebViewClient;
import android.support.v7.widget.ShareActionProvider;

public class MyLittleBrowser extends AppCompatActivity {

    private static final String TAG = "SHARE";
    private WebSettings wset;
    private ShareActionProvider shareActionProvider;
    private String urlString;

    /**
     * Called when the activity is first created.
     */
    @Override
    public void onCreate(Bundle savedInstanceState) {
        super.onCreate(savedInstanceState);
        setContentView(R.layout.mylittlebrowser);

        // Create top toolbar.  This assumes a NoActionBar style in styles.xml
        // since it will be replaced by the following toolbar.

        Toolbar toolbar = (Toolbar) findViewById(R.id.toolbar3);
        if (toolbar == null) Log.i(TAG, "Toolbar is null");
        // Remove default toolbar title and replace with an icon
        toolbar.setNavigationIcon(R.mipmap.ic_launcher);

        // Set background color.  Handle method getColor deprecated as of API 23
        if (Build.VERSION.SDK_INT >= Build.VERSION_CODES.M) {
            toolbar.setTitleTextColor(getResources().getColor(R.color.barTextColor, null));
        } else {
            toolbar.setTitleTextColor(getResources().getColor(R.color.barTextColor));
        }

        toolbar.setTitle("");
        setSupportActionBar(toolbar);


        // Set up the WebView display.  See the projects WebViewDemo and WebViewDemo2
        // for more detailed discussion.

        WebView webview = (WebView) findViewById(R.id.webView); //new WebView(this);

        if (webview == null) Log.i(TAG, "Webview is null");

        // The following prevents redirection out of MyLittleBrowser to another browser, forcing
        // redirects from pages displayed in MyLittleBrowser to stay in MyLittleBrowser.
        // See http://stackoverflow.com/questions/4066438/
        // android-webview-how-to-handle-redirects-in-app-instead-of-opening-a-browser

        webview.setWebViewClient(new WebViewClient() {
            public boolean shouldOverrideUrlLoading(WebView view, String url) {
                view.loadUrl(url);
                return false;
            }

            // This will fire when main webpage has finished loading.  We use it
            // to enable a text share of the page title and URL.

            public void onPageFinished(WebView view, String url) {

                // Get the title of the webpage once loaded
                String webpageTitle = view.getTitle();

                // Attach an intent to the ShareActionProvider that will share the title and
                // url of the webpage loaded.

                shareActionProvider.setShareIntent(shareText(webpageTitle + ":\n\n" + url));
            }
        });

        //setContentView(webview);
        wset = webview.getSettings();
        wset.setBuiltInZoomControls(true);
        wset.setJavaScriptEnabled(true);  // Turning on Javascript can introduce vulnerabilities

        /** This class is launched only by an implicit share intent from an app requesting that
         * a webpage be displayed because of the declaration in the manifest file of the
         * present app
         *
         * <activity android:name=".MyLittleBrowser" android:label="@string/little_browser_name">
             <intent-filter>
             <action android:name="android.intent.action.VIEW" />
             <category android:name="android.intent.category.DEFAULT" />
             <data android:scheme="http"/>
             </intent-filter>
         * </activity>
         *
         * Thus we must
         * first query the Intent that launched this class (very likely from a completely different app)
         * to retrieve the data that it contains. If all is well this will be the address of an HTML
         * page, which we shall display using WebView.
         */

        // Get the Intent that called this class (implicitly, probably from another app)
        Intent intent = getIntent();

        // Extract the action that the calling Intent used
        String intentAction = intent.getAction();

        // Extract the data from the Intent
        Uri intentData = intent.getData();

        // Wrap following in try-catch since URL constructor throws MalformedURLException
        try {
            String scheme = intentData.getScheme();
            String host = intentData.getHost();
            String path = intentData.getPath();
            String query = intentData.getQuery();
            urlString = new URL(scheme, host, path).toString();
            if (query != null) urlString = urlString + "?" + query;
            webview.loadUrl(urlString);
            Log.i(TAG, "scheme=" + scheme + " host=" + host + " path=" + path + " query=" + query);
            Log.i(TAG, "action=" + intentAction + " URL=" + urlString);
        } catch (Exception e) {
            e.printStackTrace();
        }
    }

    @Override
    public boolean onCreateOptionsMenu(Menu menu) {

        // Inflate the menu; this adds items to the action bar if it is present.
        getMenuInflater().inflate(R.menu.main, menu);

        // Get the share menu item.
        MenuItem menuItem = menu.findItem(R.id.menu_share);

        // Get the provider. We will invoke it in onPageFinished(webview, url) to
        // enable a text share of the page title and URL once a webpage is loaded.

        shareActionProvider = (ShareActionProvider) MenuItemCompat.getActionProvider(menuItem);

        return true;
    }

    // The class MyLittleBrowser is designed to display an html share from another app,
    // but we add to it the capability to do its own implicit share of the webpage title
    // and url that it processes. Very similar to textShare() in MainActivity. It
    // returns the text-sharing intent for use as an argument in populating the
    // ShareActionProvider menu when the webpage has finished loading; this is
    // invoked in the method onPageFinished() defined above.

    public Intent shareText(String s) {

        // Create a sharing intent
        Intent sharingIntent = new Intent(android.content.Intent.ACTION_SEND);

        // Set the type of the intent to text
        sharingIntent.setType("text/plain");

        // These allow some custom addresses to be defined. They will be filled in
        // automatically if an email client is invoked for the share, for example.

        String addresses[] = {getString(R.string.address1),
                getString(R.string.address2)};
        String CCaddresses[] = {getString(R.string.CC1)};
        String BCCaddresses[] = {getString(R.string.BCC1)};

        // Add the text to be shared to the intent
        sharingIntent.putExtra(android.content.Intent.EXTRA_TEXT, s);

        // Following optional fields for email. Will be ignored by sharing app
        // if not appropriate. For example, non-email apps may use the SUBJECT
        // extra and ignore the others.

        // Hardwire in a default subject
        sharingIntent.putExtra(android.content.Intent.EXTRA_SUBJECT,
                getString(R.string.websubject));

        // Add some pre-defined addresses
        sharingIntent.putExtra(android.content.Intent.EXTRA_EMAIL, addresses);
        sharingIntent.putExtra(android.content.Intent.EXTRA_CC, CCaddresses);
        sharingIntent.putExtra(android.content.Intent.EXTRA_BCC, BCCaddresses);

        return sharingIntent;
    }
}
Create the class file PickAnImage.java and edit it to give
package <YourNamespace>.sharingintents;

import java.io.FileNotFoundException;
import java.io.IOException;
import java.io.InputStream;

import android.app.Activity;
import android.content.Intent;
import android.graphics.Bitmap;
import android.graphics.BitmapFactory;
import android.net.Uri;
import android.os.Build;
import android.os.Bundle;
import android.support.v4.view.MenuItemCompat;
import android.support.v7.app.AppCompatActivity;
import android.support.v7.widget.Toolbar;
import android.util.Log;
import android.view.Menu;
import android.view.MenuItem;
import android.view.View;
import android.view.View.OnClickListener;
import android.widget.Button;
import android.widget.ImageView;
import android.support.v7.widget.ShareActionProvider;

public class PickAnImage extends AppCompatActivity implements OnClickListener {

    private static final String TAG = "SHARE";
    private static final int REQUEST_CODE = 1;
    private Bitmap bitmap;
    private ImageView imageView;
    private Button shareButton;
    private Uri uri;
    private ShareActionProvider shareActionProvider;

    /**
     * Called when the activity is first created.
     */

    @Override
    public void onCreate(Bundle savedInstanceState) {
        super.onCreate(savedInstanceState);
        setContentView(R.layout.pickanimage);

        // Create top toolbar.  This assumes a NoActionBar style in styles.xml,
        // since it will be replaced by the following toolbar.

        Toolbar toolbar = (Toolbar) findViewById(R.id.toolbar2);
        // Remove default toolbar title and replace with an icon
        if (toolbar != null) {
            toolbar.setNavigationIcon(R.mipmap.ic_launcher);
        }

        // Set background color.  Handle method getColor deprecated as of API 23
        if (Build.VERSION.SDK_INT >= Build.VERSION_CODES.M) {
            toolbar.setTitleTextColor(getResources().getColor(R.color.barTextColor, null));
        } else {
            toolbar.setTitleTextColor(getResources().getColor(R.color.barTextColor));
        }
        // Note: getColor(color) deprecated as of API 23
        //toolbar.setTitleTextColor(getResources().getColor(R.color.barTextColor));
        toolbar.setTitle("");
        setSupportActionBar(toolbar);
        imageView = (ImageView) findViewById(R.id.theImage);
        shareButton = (Button) findViewById(R.id.button04);
        shareButton.setOnClickListener(this);
        chooseImage();
    }

    @Override
    public boolean onCreateOptionsMenu(Menu menu) {

        // Inflate the menu; this adds items to the action bar if it is present.
        getMenuInflater().inflate(R.menu.main, menu);

        // Get the share menu item
        MenuItem menuItem = menu.findItem(R.id.menu_share);
        // Get the provider
        shareActionProvider = (ShareActionProvider) MenuItemCompat.getActionProvider(menuItem);

        return true;
    }

    // This will allow you to choose an image from the device by selecting it in a file chooser
    // such as Gallery.  It will be displayed in an ImageView once selected.

    public void chooseImage() {
        Intent intent = new Intent();
        intent.setType("image/*");
        intent.setAction(Intent.ACTION_GET_CONTENT);
        intent.addCategory(Intent.CATEGORY_OPENABLE);

        startActivityForResult(intent, REQUEST_CODE);

        /** Alternative: Preceding line can be replaced by the following commented-out line,
         * which may give the user some say in the form of the chooser for some devices.  See the
         * API documentation of the Intent static string constant ACTION_GET_CONTENT for
         * discussion of the difference.
         */

        //startActivityForResult (Intent.createChooser(intent, "Message"), REQUEST_CODE);
    }

    // Executed when the activity started from chooseImage() with startActivityForResults
    // returns a result.  Uses a content resolver to retrieve an image from the device,
    // assign it to a bitmap, and display the bitmap. The Uri of the image file that is displayed
    // in the bitmap is saved in the variable uri to be passed to the method shareImage(uri),
    // which shares the bitmap.

    @Override
    protected void onActivityResult(int requestCode, int resultCode, Intent intent) {
        InputStream inStream = null;
        if (requestCode == REQUEST_CODE && resultCode == Activity.RESULT_OK)
            try {
                uri = intent.getData();
                inStream = getContentResolver().openInputStream(uri);
                bitmap = BitmapFactory.decodeStream(inStream);
                imageView.setImageBitmap(bitmap);
            } catch (FileNotFoundException e) {
                e.printStackTrace();
            } finally {
                if (inStream != null)
                    try {
                        inStream.close();
                    } catch (IOException e) {
                        e.printStackTrace();
                    }
            }
        super.onActivityResult(requestCode, resultCode, intent);
    }

    // Share the bitmap that was selected from the local filesystem using the chooseImage()
    // method by using an implicit intent.  When launched with
    // shareActionProvider.setShareIntent(shareImage(uri)) in the onClick method below,
    // this will populate the top Toolbar with an adaptive sharing menu (most used apps
    // will float to the top and the current default will appear as a separate icon), and
    // will open the sharing menu (if the startActivity line below is not commented out).

    public Intent shareImage(Uri uri) {
        Intent shareIntent = new Intent(Intent.ACTION_SEND);
        shareIntent.setType("image/*");
        // Clear activity stack if reset
        shareIntent.addFlags(Intent.FLAG_ACTIVITY_NEW_DOCUMENT);
        //shareIntent.setAction(Intent.ACTION_SEND);
        Log.i(TAG, "shareImage:  Uri=" + uri);
        shareIntent.putExtra(Intent.EXTRA_STREAM, uri);

        // Comment out following line to populate top ActionBar with adaptive sharing menu
        // but not open the sharing menu until selected by user. With this line present
        // the menu will be added and will be opened by default, which is likely the most
        // user-friendly workflow.

        startActivity(Intent.createChooser(shareIntent, getString(R.string.shareImage)));

        return shareIntent;
    }

    @Override
    public void onClick(View v) {

        switch (v.getId()) {

            case R.id.button04:
                Log.i(TAG, "uri=" + uri.toString());
                Intent temp = shareImage(uri);
                Log.i(TAG, "intent=" + temp.toString());

                shareActionProvider.setShareIntent(shareImage(uri));
                break;
        }
    }
}
Edit the AndroidManifest.xml file to give
<?xml version="1.0" encoding="utf-8"?>
<manifest xmlns:android="http://schemas.android.com/apk/res/android"
    package="<YourNamespace>.sharingintents">

    <uses-permission android:name="android.permission.INTERNET" ></uses-permission>

    <application
        android:allowBackup="true"
        android:icon="@mipmap/ic_launcher"
        android:label="@string/app_name"
        android:supportsRtl="true"
        android:theme="@style/AppTheme">
        <activity android:name=".MainActivity">
            <intent-filter>
                <action android:name="android.intent.action.MAIN" />

                <category android:name="android.intent.category.LAUNCHER" />
            </intent-filter>
        </activity>
        <activity
            android:name=".PickAnImage"
            android:label="@string/displayPick" />
        <activity
            android:name=".MyLittleBrowser"
            android:label="@string/little_browser_name"
       android:theme="@style/BrowserTheme">
            <intent-filter>
                <action android:name="android.intent.action.VIEW" />
                <category android:name="android.intent.category.DEFAULT" />
                <data android:scheme="http" />
            </intent-filter>
        </activity>
    </application>

</manifest>
where the material added to the default file created by Android Studio is indicated in red.
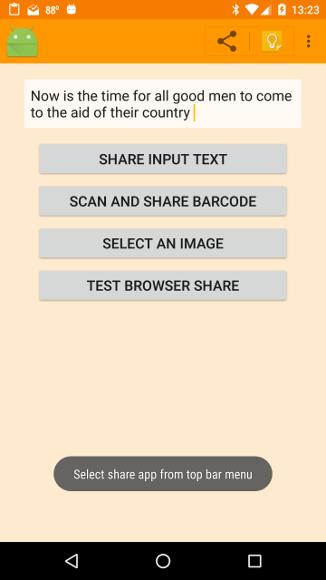
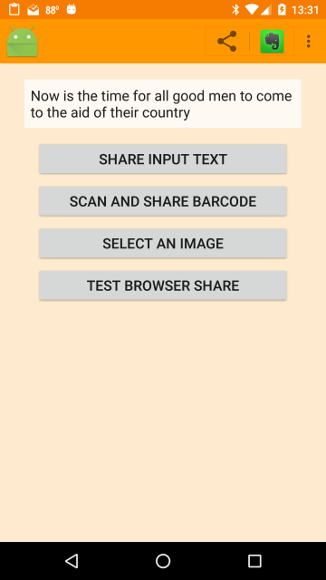
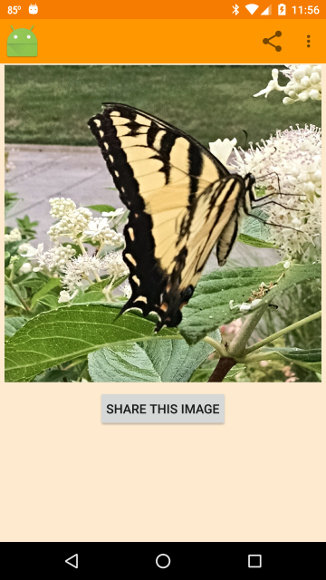
Launch the app on a device or on an emulator to give the following main screen, with an editable textfield, four buttons, and a toolbar with menu.

|
Notice that in the top toolbar there is a share icon (three dots connected by straight lines), but if you click it you will see that its dropdown menu is not yet populated with anything. Also, if you click the overflow menu (three vertical dots to the right of the toolbar) you will see that there is a Settings category, but we won't be populating it with anything in this project so nothing happens if you click it.
After filling in the EditText field with some text, clicking the Share Input Text button gives the image shown below,
|
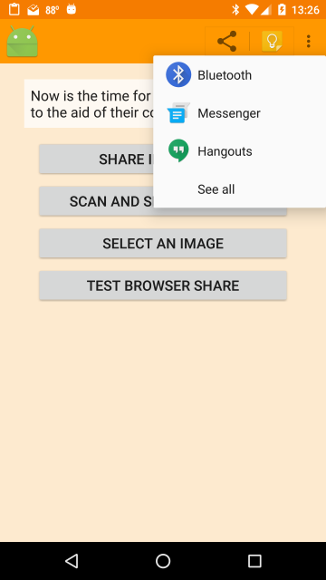
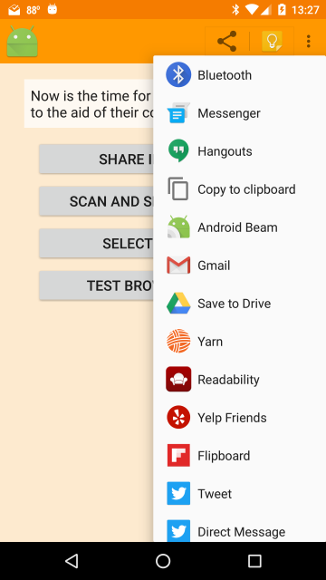
where a transient Toast prompts us to choose an app from the top menu bar. Indeed, the share icon dropdown menu is now populated, as is confirmed by clicking it, which gives the image below left, with a primary set of entries and a "See all" choice. If one clicks See all on the sharing dropdown menu, the menu expands into the full menu shown below right.
 |
 |
These new features correspond to options that are available for sharing our text, and display a list of all apps running on the device that have declared in their manifests that they can handle a text share. These sharing options have some powerful features that are being managed under the hood by Android:
| Note that the default app icon might not appear in the top bar until one app share choice had been made (see the figure below left). The adaptive behavior noted above implies that Android is maintaining a history of apps used to share with our app. In this example we are using the default, which is to keep that history in one file. However, it is possible to customize further and specify separate history files for different kinds of shares within an app. See Share With Intents for further discussion of this option. |
We may now choose one of the apps in the list with which to share our text.
Using the menu shown below left and choosing Evernote-Create Note from the options gives the screen shown below right, with the subject and text that we have shared pasted into the Evernote app (Evernote is available in a free version from Google Play). At this point we are in the Evernote app and can perform any of the functions it is capable of on text content.
 |
 |
Since plain text is a format that many apps can handle, you will likely have many other options in the sharing choice menu; In the above example the total list of apps competing to handle my shared text included 31 options (the above images show only part of the scrolling list). You can investigate other options for sharing text by choosing them rather than Evernote from the list. You will probably find that many are useful, others not so much.
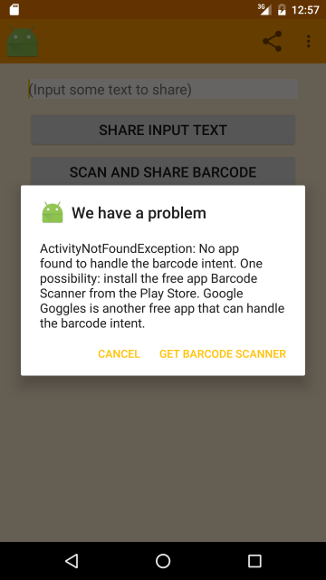
The action associated with clicking the Share Barcode button depends on whether your device has a barcode scanning app installed that can handle our intent. Let us first assume that it does not. The following two screens illustrate actions on a device where no barcode scanning app is found.
 |
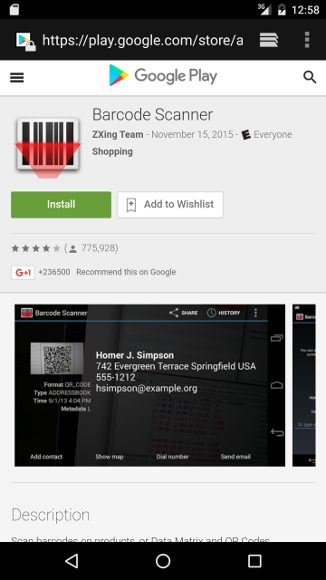 |
On the left screen the app has detected no appropriate app to handle the barcode scan on the device and opened a dialog window giving the user the choice of going to the Android app market (Google Play) to install the free app Barcode Scanner. In the right image the user has clicked the Get Barcode Scanner button and has been taken to the installation screen in the Google Play store for the Barcode Scanner app. Alternatively, you can hit Cancel on the screen in the left image and install a barcode scanning app manually.
| To test the procedure outlined above you will need a device with no barcode apps installed, or remove them temporarily from the device, or use an emulator with no barcode scanner installed. The above screens will not appear if at least one app registered to handle barcodes is installed on the device or emulator. |
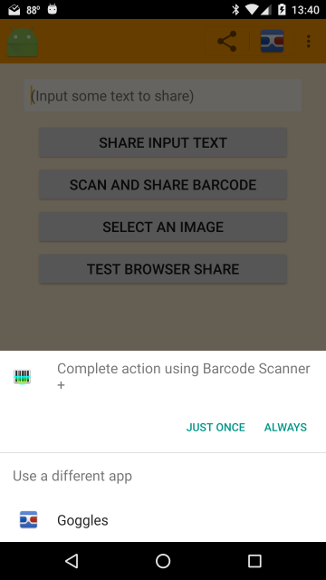
Assuming that your device has at least one barcode scanning app installed, clicking the Share Barcode button brings up a sharing choice menu for barcode scanners (notice also that the top bar has been populated with barcode scanner sharing options, with the symbol for Barcode Scanner being displayed as the default in this example):
|
Selecting one should open a barcode scanning window. Placing a 1D or 2D (QR) barcode in the window causes the code to be scanned and opens the sharing choice window corresponding to the image below left. Choosing Gmail from the list of apps gives the mail app shown in the image below right, with the To, Cc, Bcc, Subject, and text body fields already populated with our shared information (you may have to use the options menu in Gmail to display all these fields if they are not set to display by default).
 |
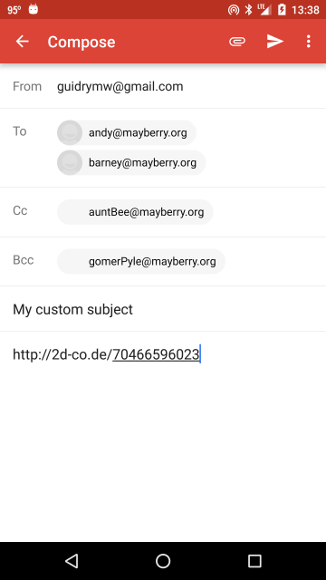 |
We are now in the Gmail app, so we can perform any of its normal functions, such as editing, adding attachments, or sending. In this example the scan was of a 2D QR barcode on a brochure, containing a Web address (for a hotel chain in this case). You can explore the action of other options in the share choice menu by repeating the procedure and choosing one of them in the share choice menu instead of Gmail.
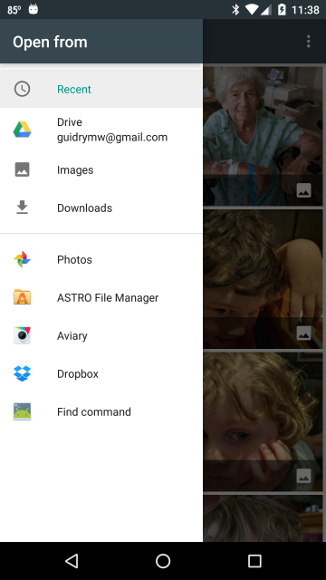
Clicking the Select an Image button gives a screen similar to the one below left, where apps on the device that have file managing capability for image files appear in the share menu. (Exactly what the screen will look like depends somewhat on the version of Android; this screenshot is from a device running Android 6.0.1.) The screen below right resulted from selecting (Google) Photos in this case and then selecting an image from there.
 |
 |
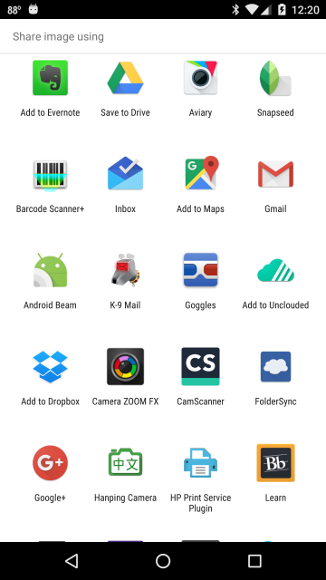
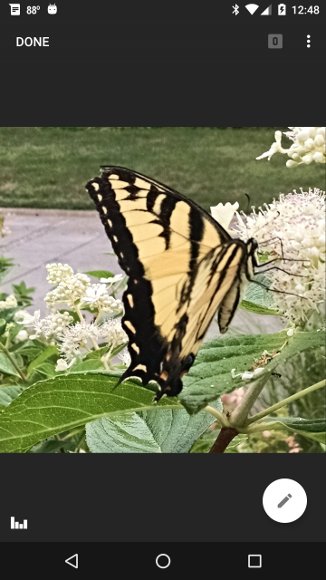
Clicking the Share this Image button invokes the method chooseAnImage() from the class PickAnImage, giving the screen below left, where we see that many apps have declared that they can handle a bitmap image. (Note that all options also are available from the dropdown sharing menu at the top.) Selecting Google+ from the app list displayed there gives the screen below right, with our previously-chosen image inserted into the editing interface.
 |
 |
This is now ready to add any additional information desired before posting. For the other options appear in the share choice menu their actions can be explored by repeating the procedure and selecting them from the share choice menu instead of Google+. For example, choosing Android Beam instead gives the figure below left, ready to share by touching another Android device (if Beam is turned on for both phones), and choosing Snapseed instead opens the image in the Snapseed photo editor, as illustrated below right, ready to edit.
 |
 |
|
In the file pickanimage.xml that controls the layout of the selected image and Share this Image button, we have departed from our usual practice of letting Android control the screen layout and hardwired in a height for the picture through the ImageView attribute
android:layout_height="400dp".
This is because the user may choose to display images of different sizes and aspect ratios, and we want to be certain that the image and button both fit on the screen.
You may want to adjust this height depending on the screen size for your device, and in a more realistic application you might want to do some diagnostics concerning the size of the image to determine how to lay the screen out. Alternatively, you could consider putting the entire layout in a ScrollView container, so that the image and button widget can be seen even if they occupy more than the default screen size. |
Finally, close the application SharingIntents and open another application that contains web links. Provided that you have disabled any default browser choice (as described above in the first box), you will be presented with a choice screen similar to that displayed below left, with My Little Browser as one of the options to display the HTTP request.
|
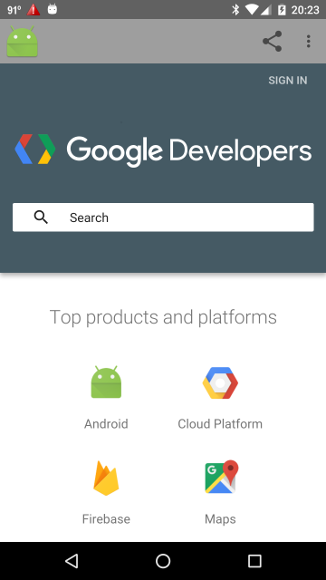 |
Selecting My Little Browser from this list displays the webpage corresponding to the link, as illustrated in the above right figure (which in this case resulted ultimately from a link displayed in a page).
| For convenience in testing the HTTP share response, a button Test Browser Share has been included on the main interface of the present app. Pressing it will invoke an explicit intent to open a specified webpage, which should trigger the response noted above if no default app has been specified to respond to HTTP requests. However, this response should be triggered by any HTTP request, not just one from out app. Note also that some apps may handle their own HTTP requests internally, or may limit the apps that they will accept for an HTTP response. In those cases out class My Little Browser will not be presented as an option. |
Five important functionalities are demonstrated in this application:
A brief summary of how the code listed above implements each of these will be given now, with more detail to be found in the extensive comments for the Java code.
The rather impressive management of the sharing menu implemented in the top tool bar in the above examples is done almost entirely by Android in response to a few lines of code. Let's illustrate by how it behaves in MainActivity.java. The toolbar menu is inflated in the method onCreateOptionsMenu(Menu menu) by the statements
// Get the share menu item
MenuItem menuItem = menu.findItem(R.id.menu_share);
// Get the provider
shareActionProvider = (ShareActionProvider) MenuItemCompat.getActionProvider(menuItem);
where we have defined a ShareActionProvider object called shareActionProvider, and the sharing menu items are implemented by the tag marked in red in res/menu/menu.xml
<menu xmlns:android="http://schemas.android.com/apk/res/android"
    xmlns:app="http://schemas.android.com/apk/res-auto">

    <item android:id="@+id/menu_share"
     android:title="@string/shareInvite"
     app:showAsAction="ifRoom"
     app:actionProviderClass="android.support.v7.widget.ShareActionProvider"/>

    <item
        android:id="@+id/action_settings"
        android:orderInCategory="100"
        app:showAsAction="never"
        android:title="@string/action_settings"/>

</menu>
with the ShareActionProvider referenced from the Java code by R.id.menu_share. The only essential additional action is that when we wish to populate and invoke the ShareActionProvider menus a statement of the form
shareActionProvider.setShareIntent(shareIntent)
must be executed, where shareIntent is the Intent that will implement the share. Specific examples of this will be given below.
This functionality is implemented in the method shareText(String s) of the class MainActivity, where s is the text to be shared. The key points:
| Notice that the argument for the Intent constructor must be in a namespace, because the system uses intents globally. Thus the argument for the Intent constructor in the method shareText is specified by the fully-qualified android.content.Intent.ACTION_SEND. |
The setType(String mimetype) method of Intent is used to set an explicit MIME data type of text/plain for sharingIntent. This method is used to create intents that specify only a data type and not actual data. Restricting the share intent to a specific data type has the advantage that only apps registered (through their manifest files) to handle that data type will respond to the share request.
A MIME (Multipurpose Internet Mail Extensions)
type is an internet standard that extends basic email to include
but there are many others; here is a more complete list.
If the exact data type is unknown beforehand, less restrictive MIME types may be specified. For example, if you know that you want to share a bitmap but its precise format might possibly be PNG, JPEG, GIF, ... in a given instance, the MIME type could be specified as simply image/*, with the expectation that the application responding to the share request will be able to interpret the specific image format. |
Now, in the onClick(View v) method, we use
Intent share = shareText(inputText.getText().toString());
shareActionProvider.setShareIntent(share);
to launch the sharing intent and associate it with the ShareActionProvider, which will populate the sharing menu in the top toolbar with sharing options that can be chosen to complete the text share. The images shown above illustrate these features of the method shareText(String s) in action.
The method shareBarcode() of MainActivity implements a barcode scan and then shares the result of that scan as a string with other applications. The method is laced heavily with comments and is based on the excellent example and discussion given in Share With Intents, by Lucas Alexander. The reader is referred to both for a deeper understanding of how the method works and we shall only make some general comments here.
to launch the barcode scanner and to invoke the ShareActionProvider to manage the share menu in the action bar.shareActionProvider.setShareIntent(shareBarcode());
Once the string has been returned corresponding to the scan result, the method shareText(String s) documented above is used to share it with other applications. Note that since shareText(String s) is being used both to share text generated in the input EditText and to share text generated by the barcode scanner method, a boolean isBarcodeScan is required to distinguish the two uses.
Setting the
Intent.FLAG_ACTIVITY_NEW_DOCUMENT constant, as in the statement
marks a point in the activity stack to be cleared if the task is reset. Then, when the task is next brought to the foreground by re-launching it from home, this activity and all on top of it will be finished and the user will be returned to whatever activity came before it.
This can be useful when the application has logical breaks in its subset of functionalities, as illustrated by
the following example from the API documentation:
|
In this example implicit intents are used to retrieve a bitmap stored on the device, and then another implicit intent is used to share that image. Both are implemented in the class PickAnImage. The first is discussed in this section and the second in the next section. The work for the image retrieval is done in the methods chooseImage() and onActivityResult(...). In chooseImage() we
Notice that this is different from
Intent.ACTION_PICK, which would specify a URI of existing data from which the user can pick. Here we only specify the type of data in which we are interested, not specific locations. There are two general ways in which this action can be used:
In the example being discussed here we have used the first choice above, indicating an interest in general bitmap images but letting the system decide how to present the choices to us. |
Categories add detail about the action the intent is to perform. The argument category can be one of the predefined Intent categories such as Intent.CATEGORY_OPENABLE, or can be a custom category in your own namespace.
As discussed in the documentation for
IntentFilter, when a filter is resolving an intent three conditions must be met in comparing the intent and the intent filter:
(See IntentFilter for definitions of precisely what a match entails in each case.) Thus, specifying categories is one way to delimit the apps that will respond to your intent. |
The above actions are wrapped in try-catch-finally structures because openInputStream(uri) throws FileNotFoundException and the close() method of InputStream throws IOException.
Content providers, which are
discussed systematically in the
Content Providers developer document,
are Android's framework for managing access to structured data. Content providers both encapsulate the data and provide mechanisms for defining data security, and represent a standard interface for connecting data in one process with code executing in another process.
Android includes content providers that manage commonly-used data such as audio, video, images, and personal contact information. For example, see the Read Your Contacts project, where we used a ContentResolver to access contact information from the contacts list. The reference documentation for the android.provider package contains information on some of these existing providers, which are accessible to any Android application, subject to a few restrictions. If existing Android data providers do not meet your needs, see the document Creating a Content Provider for instructions on how to create your own. |
In the method shareImage(Uri uri) in the class PickAnImage we do something similar to the earlier example of sharing text except that we now share the bitmap image that was retrieved using the chooseImage() method, whose Uri has been passed to shareImage() as the variable uri. First we create an Intent called shareIntent. Then,
Finally, in the onClick(View v) method, we use
shareActionProvider.setShareIntent(shareImage(uri));
to initiate the image share and invoke the ShareActionProvider to manage the share menu.
Now we shift emphasis from exporting content to other apps to registering our own app to receive and process shares from other apps. There are two basic steps in setting up the class MyLittleBrowser to handle implicit HTTP requests from other applications.
in which the tag marked in red declares that the class MyLittleBrowser can handle HTTP data.<activity android:name=".MyLittleBrowser" android:label="@string/little_browser_name" > <intent-filter> <action android:name="android.intent.action.VIEW" /> <category android:name="android.intent.category.DEFAULT" /> <data android:scheme="http" /> </intent-filter> </activity>
|
If a WebViewClient is not provided,
WebView will ask the Activity Manager to choose a handler for the url.
|
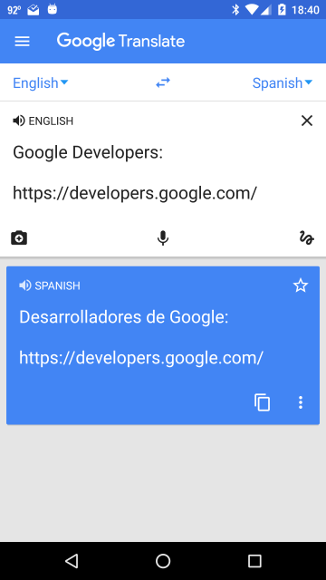
MyLittleBrowser has been constructed to receive and process HTML shares from other apps. But as an illustration we have also built into it the capability to share itself. In particular, by clicking its sharing menu in the task bar it can share as text the title and URL of the webpage loaded by MyLittleBrowser, as illustrated in the following share of a MyLittleBrowser webpage to Google Translate
|
This MyLittleBrowser capability is implemented much like the text share described in MainActivity, except that
Of course, our browser as presently implemented is fairly minimal (but spunky!). Nevertheless, it is now registered and provisioned to handle requests to display webpages for other apps on the device, just like any other installed browser app. And it would not be hard to make it much more capable using the APIs of the WebView and WebViewClient classes; see Exercise 4 below.
Intents, particularly of the implicit pursuasion, provide extremely flexible and therefore often extremely useful interoperability among applications that need know little directly about each other. Let us illustrate with several examples using the present application.
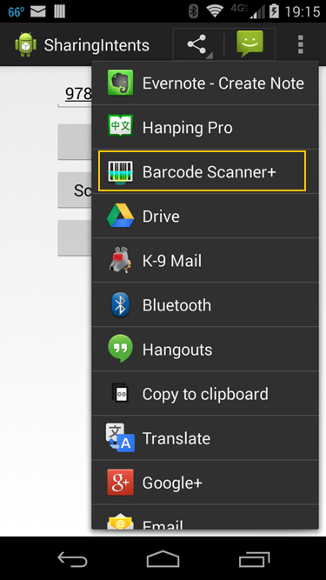
Notice that if you choose Barcode Scanner to handle the share intent when sharing text/plain data (assuming Barcode Scanner is installed on the device), this will produce a QR code corresponding to the shared text, as illustrated in the following two figures.
 |
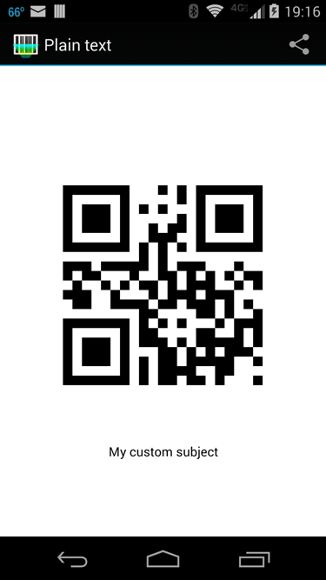 |
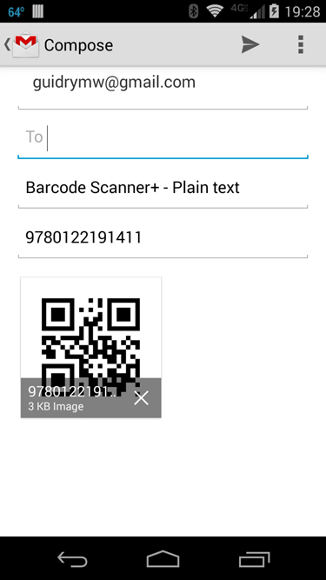
The image above right is the 2D QR code corresponding to a book number 9780122191411 that was scanned with this app from a 1D barcode (and note that Barcode Scanner has also appended our default subject line as plain text in the image.) You can verify this by scanning this QR code with a barcode scanning app, or even more directly by noting that in the right figure above there is a share icon. If you click it you will get a dropdown menu of apps that our share to Barcode Scanner can itself share with. Choosing Gmail from the options gives
|
confirming our interpretation of the QR code as representing the number 9780122191411. Thus, you could use SharingIntents to
These possibilities suggest once again the power and utility of the Android implicit intents sharing model.
An interesting sharing option for an image is that if Google Goggles is chosen from the share menu as the app to handle the image, it will scan it and attempt to identify it by matching it against images in its database. If it is unable to match, it will present a set of images that it believes to be closest to your image, but if it detects what it believes to be a match it identifies the image and provides links to further information. The following figures illustrate.
In the figure lower left the Select an Image button of MainActivity has been used to select an unknown image from the SD card of the phone. (The actual image in this example was accessed from the /mnt/sdcard/.kayakimages/airlines subdirectory on a phone, which corresponds to resource images used by the travel app Kayak. The image is fuzzy because it is of low-resolution and intended for use only as an icon in the app.) Clicking on the Share this Image button gives a share menu shown below right, from which we choose Goggles.
 |
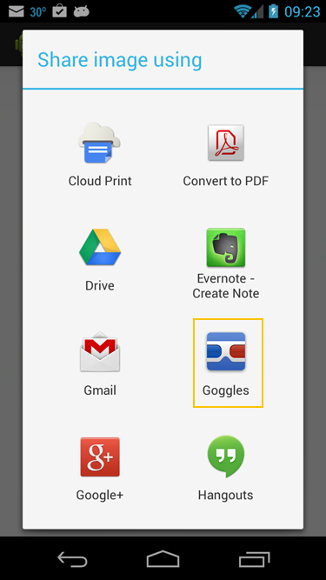 |
After scanning and analyzing the image, Goggles returns the screen below left, indicating that it believes our image matches the logo of Sichuan Airlines. Clicking on the lower panel of this image returns the set of weblinks shown in the image below right, which confirms that this is a (low-resolution) image of the Sichuan Airlines logo, and gives us a set of links to information about the airline.
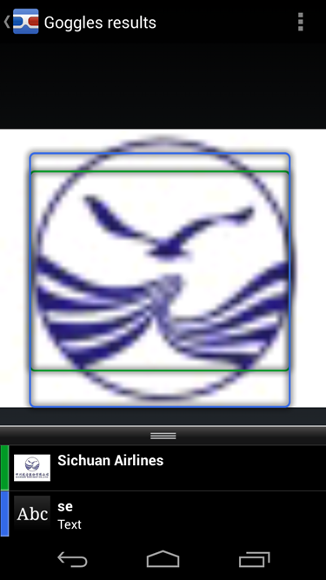 |
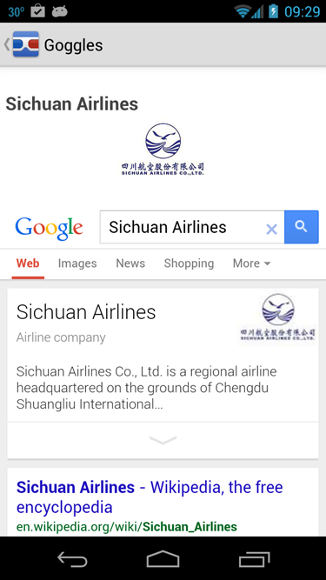 |
Clicking on the Wikipedia link takes us to an article about the airline, where you would learn that it is a subsidiary of China Southern Airlines that began operations in 1988, that it has 81 planes that fly to more than 60 destinations (at the time this screenshot was made) with a main hub in Chengdu, China, and that it has a frequent flyer program with the seriously cool name Golden Panda.
As another example of sharing an image to Goggles using our app, the figure below left shows an image selected from the cloud (Google Photos) on my phone using the Select an Image button of our app, along with a share menu. Choosing Goggles from the menu causes the image to be scanned and identified as San Sebastian Cathedral in Donostia (San Sebastian) Spain, as illustrated in the middle figure below. Clicking the information window at the bottom produced the webpage shown below right, with information, links, and maps concerning this landmark.
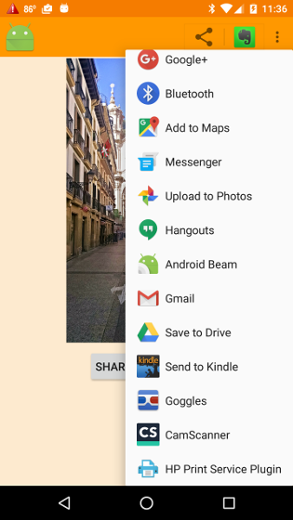 |
 |
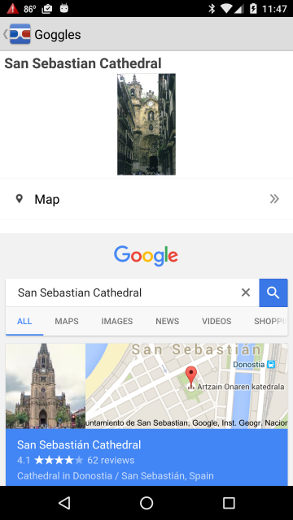 |
These examples illustate potentially useful deductions and information that interoperability among our app, Google Goggles, a Google search backend, a Web browser, and Wikipedia has facilitated, all enabled smoothly and seamlessly by a series of Android intents interconnecting independent applications that require only minimal prior knowledge of each other.
A useful illustration of the principle that in sharing using implicit intents the app that the user chooses to handle the data may deal with the same data in different ways is afforded by considering what happens if different choices are made for the app to handle the share in the chooser window. Here are some illustrative examples of how different apps installed on my phone deal with the text sharing example discussed above. (All apps listed are available in free versions from Google Play, if you want to check this yourself.)
In some of these cases the app has used the text simply as English text. In others like Barcode Scanner, Dropbox, Hanping Pro, or Translate the app has played to its unique strengths and processed the text string into something different.
| The complete project for the application described above is archived on GitHub at the link SharingIntents. Instructions for installing it in Android Studio may be found in Packages for All Projects. |
Last modified: July 22, 2016