Android offers a very useful programming feature called AppWidgets (widgets for short; see this introduction and here is a concise tutorial). These are visual components that can be hosted by another application, most commonly by the homescreen or the lockscreen, and can receive periodic updates. The application that holds the AppWidget (for example, the homescreen) is called the AppWidget host. Thus AppWidgets can provide a level of application functionality directly from the desktop or other host, without having to open the full application.
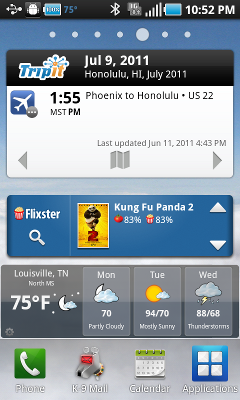
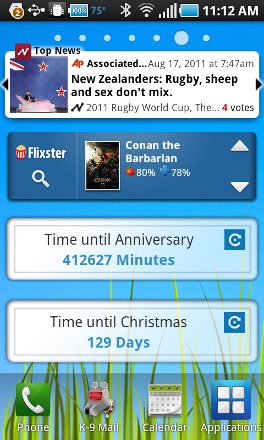
The following image shows three widgets associated with applications available in the Play Store hosted on a pane of the homescreen for an Android device (screen shot taken in 2011; current versions of these appwidgets may differ slightly in functionality and looks).
|
These provide nice illustrations of how useful AppWidgets can be.
|
The procedure to determine what AppWidgets are available on your Android device depends on the device and the version of Android. The most common variants are a long-press on an open part of the homescreen, which brings up some kind of display with access to the app widgets, or the app widgets are shown as a separate category from the apps in the app drawer. To be definite in the following discussion, I will assume a Nexus 6P running Android 6, for which the procedure is to long-press an open part of the homescreen, which displays a screen with a Widgets button giving access to the available app widgets.
Beginning with Android 4.2, appwidgets with appropriate designations could also be put on the device lockscreen. However, this was discontinued with Android 5.0 and the standard API does not support widgets on the lockscreen (there are workarounds). Since Android 4.2, appwidgets can be designated resizable (by the developer). If that option is enabled, long-pressing on an installed appwidget will display resizing controls that permit the widget to be resized, subject to resizing rules implemented by the developer. Moving and deleting AppWidgets is the same as for any homescreen icon: long-press the icon and drag to the new position or to the trash can. (Note: for lockscreen widgets, only one can be put per lockscreen pane, so the only choice is to drag it to the trash.) |
The three preceding examples illustrate nicely some of the important features of AppWidgets:
Because App widgets will normally sit on a panel of the homescreen for a device, there are some design issues that are more acute than for normal applications; we address this in the next section.
Design issues for app widgets fall into two categories:
We now elaborate briefly on these points. A more extensive discussion may be found in the AppWidget Design document.
App widgets must conform to some strict size rules if they are to display properly on the homescreen. The homescreen is divided up into cells and AppWidgets need to fill an integral number of cells horizontally and vertically.
A rough rule of thumb is that to convert to dp for the appwidget layout the number of cells desired should be multiplied by 70 and then 30 subtracted from that. Thus, an AppWidget that is to be 4 cells wide and 2 cells high should have the nominal XML layout attributes
|
To ensure portability across devices, AppWidgets should generally not be more than 4 cells high and 4 cells wide. A more extensive discussion of appwidget geometry may be found at AppWidget Sizes.
Fortunately, some basic images and Photoshop design templates for widget frames are available from the AppWidget design page. The simplest option, and the one that we shall follow for the present example, is to copy the Photoshop file from this page for the size widget that you desire, save it as a PNG, and then use it as a background image for your AppWidget. But for more ambitious custom design, this page contains technical details about how to use Photoshop to make widget containers that are compatible in design with the Android desktop.
Following the general procedure in Creating a New Project, either choose Start a new Android Studio project from the Android Studio homepage, or from the Android Studio interface choose File > New > New Project. Fill out the fields in the resulting screens as follows,
|
Application Name:
AppWidgetDemo
Company Domain:< YourNamespace > Package Name: <YourNamespace> . appwidgetdemo Project Location: <ProjectPath> AppWidgetDemo Target Devices: Phone and Tablet; Min SDK API 17 Add an Activity: Empty Activity Activity Name: MainActivity (check the Generate Layout File box) Layout Name: activity_main |
where you should substitute your namespace for <YourNamespace> (com.lightcone in my case) and <ProjectPath> is the path to the directory where you will store this Android Studio Project (/home/guidry/StudioProjects/ in my case). If you have chosen to use version control for your projects, go ahead and commit this project to version control.
First let's put the artwork that we shall need in the appropriate place. Go to the images and icons directory and copy the files frame.png, widget_icon, update_blue_small.png, and appwidget_preview.png into the res/drawable directory of this project. The first of these is the container that we shall use for our AppWidget (obtained from the AppWidget design page). The second is the icon that will display with our AppWidget when the user is selecting from the list of AppWidgets to install on the phone (it is a simple green square in our example; for a real application you would obviously use something a little more snazzy). The third is a button that we shall display on the AppWidget that will allow an immediate update. the fourth is the image that will be displayed as a preview of our app widget. (You may have to refresh the project panel display to get it to list the new images that you added to the directory.)
An AppWidget has three required pieces and one optional piece:
Because our AppWidget will be set up for user configuration and will be updated from a Service run on a background thread, we shall have to create or edit several XML and Java files to implement its functionality. We first list all the required code for these files, and try it out once the code is implemented. Then we will give a detailed explanation of how the code works.
1. We are going to need some strings for various things so first edit strings.xml and add the string definitions.
<resources>

	<string name="app_name">AppWidgetDemo</string>
	<string name="action_settings">Settings</string>
	<string name="hello">AppWidgetDemo</string>
	<string name="widget_title">App Widget Demo</string>
	<string name="request_update">Request update</string>
	<string name="event_name_hint">(Event: 24 chars max)</string>
	<string name="unitsPrompt">Time units</string>
	<string name="ok_text">OK</string>
	<string name="cancel_text">Cancel</string>
	<string name="widget_describe">App widget demonstration. Close this main activity and
	open the widgets list (depending on the device, this usually involves a long-press on an
	open part of the homescreen or accessing the widgets category in the app drawer).
	In the resulting menu, select App Widget Demo. This will open a configuration
	window. Fill out the information and click OK to place the corresponding instance of the
	AppWidgetDemo on the homescreen. Multiple instances may be placed in this manner, each
	configured separately.

	\n\nThe button below will update any current instances of AppWidgetDemo  (they
	will be regularly updated by the system but this will force an
	immediate update). There is also a button on each AppWidgetDemo instance that will force an
	update for all instances, and pressing on the body of an AppWidgetDemo will open this screen. \n </string>

</resources>
2. We shall create a main Activity associated with the AppWidget (mostly to display instructions for installing the widget on the screen), so edit the layout file res/layout/activity_main.xml to give
<?xml version="1.0" encoding="utf-8"?>
<RelativeLayout xmlns:android="http://schemas.android.com/apk/res/android"
      xmlns:tools="http://schemas.android.com/tools"
      android:layout_width="match_parent"
      android:layout_height="match_parent"
      android:paddingBottom="@dimen/activity_vertical_margin"
      android:paddingLeft="@dimen/activity_horizontal_margin"
      android:paddingRight="@dimen/activity_horizontal_margin"
      android:paddingTop="@dimen/activity_vertical_margin"
      tools:context=".MainActivity" >

<TextView
	android:id="@+id/widget_describe"
	android:layout_width="fill_parent"
	android:layout_height="wrap_content"
	android:padding="10dp"
	android:text="@string/widget_describe"
	android:textColor="#ff000000"
	android:textSize="13.5sp"
	android:textStyle="normal" >
</TextView>

<Button
	android:id="@+id/update_request"
	android:layout_width="wrap_content"
	android:layout_height="wrap_content"
	android:layout_alignLeft="@+id/widget_describe"
	android:layout_below="@+id/widget_describe"
	android:layout_marginTop="5dp"
	android:onClick="requestUpdate"
	android:text="@string/request_update" />

</RelativeLayout>
3. Next we need to specify the layout of the AppWidget. Create a file res/layout/widget_layout.xml and edit it to read
<?xml version="1.0" encoding="utf-8"?>
<LinearLayout
xmlns:android="http://schemas.android.com/apk/res/android"
android:orientation="horizontal"
android:background="@drawable/frame"
android:minHeight="60dp"
android:layout_width="fill_parent"
android:layout_height="wrap_content">

	<LinearLayout
	android:orientation="vertical"
	android:paddingTop = "14dp"
	android:paddingLeft = "20dp"
	android:layout_weight = "90"
	android:layout_width="wrap_content"
	android:layout_height="wrap_content">
		<TextView
			android:id="@+id/widget_title"
			android:textColor="#ff333333"
			android:background="#00339933"
			android:padding="0dp"
			android:textStyle="normal"
			android:textSize="14sp"
			android:layout_width="fill_parent"
			android:layout_height="wrap_content"
			android:gravity="center"
			android:text="@string/widget_title">
		</TextView>
		<TextView
			android:id="@+id/widget_text"
			android:textColor="#cc0d77b5"
			android:textStyle="bold"
			android:textSize="13sp"
			android:gravity="center"
			android:background="#00ffffdd"
			android:layout_width="fill_parent"
			android:layout_height="wrap_content">
		</TextView>
	</LinearLayout>

	<ImageView
		android:id="@+id/ImageView01"
		android:layout_width="wrap_content"
		android:layout_height="wrap_content"
		android:layout_weight = "10"
		android:gravity="top|right"
		android:background="#00339933"
		android:paddingRight="18dp"
		android:paddingTop="20dp"
		android:src="@drawable/update_blue_small">
	</ImageView>
</LinearLayout>
4. We are going to pop up a configuration screen for the user when the AppWidget is installed on the homescreen, so we will need a layout file to specify what that configuration screen looks like. Create the file res/layout/configwidget.xml and edit it to read
<?xml version="1.0" encoding="utf-8"?>
<LinearLayout xmlns:android="http://schemas.android.com/apk/res/android"
android:layout_width="wrap_content"
android:layout_height="wrap_content"
android:orientation="vertical"
android:paddingTop="10dip" >

	<LinearLayout
		android:id="@+id/LinearLayout01"
		android:layout_width="wrap_content"
		android:layout_height="wrap_content"
		android:orientation="vertical" >

		<EditText
		android:id="@+id/edit01"
		android:layout_width="fill_parent"
		android:layout_height="wrap_content"
		android:hint="@string/event_name_hint"
		android:inputType="text"
		android:maxLength="24" >
		</EditText>

		<DatePicker
		android:id="@+id/datepicker01"
		android:layout_width="wrap_content"
		android:layout_height="wrap_content"
		android:paddingBottom="5dip" >
		</DatePicker>

		<Spinner
		android:id="@+id/unitsSpinner"
		android:layout_width="wrap_content"
		android:layout_height="wrap_content"
		android:prompt="@string/unitsPrompt" >
		</Spinner>
	</LinearLayout>

	<LinearLayout
		android:id="@+id/LinearLayout04"
		style="android:attr/buttonBarStyle"
		android:layout_width="fill_parent"
		android:layout_height="wrap_content"
		android:orientation="horizontal" >

		<Button
		android:id="@+id/cancelbutton"
		style="?android:attr/buttonBarButtonStyle"
		android:layout_width="wrap_content"
		android:layout_height="wrap_content"
		android:layout_weight="1"
		android:text="@string/cancel_text" >
		</Button>

		<Button
		android:id="@+id/okbutton"
		style="?android:attr/buttonBarButtonStyle"
		android:layout_width="wrap_content"
		android:layout_height="wrap_content"
		android:layout_weight="1"
		android:text="@string/ok_text" >
		</Button>
	</LinearLayout>

</LinearLayout>
5. The configuration screen specified by res/layout/configwidget.xml has a Spinner embedded in it to give the user choices in configuring the AppWidget. Create the file res/values/arrays.xml by right-clicking on res/values, selecting New > File, and giving it the name arrays.xml (with the extension specified). Open the file res/values/arrays.xml and edit it to add an appropriate String array that will hold the Spinner choice labels.
<?xml version="1.0" encoding="utf-8"?>
<resources>
	<string-array name="units">
		<item>Time units: Minutes</item>
		<item>Time units: Hours</item>
		<item>Time units: Days</item>
	</string-array>
</resources>
6. We must specify some metadata about the AppWidget such as size and preferred update rate. Create the directory res/xml if it doesn't exist, and then right-click on res/xml and choose File > New to create the file res/xml/widget_info.xml (with the .xml extension specified) and edit it to read
<?xml version="1.0" encoding="utf-8"?>
<appwidget-provider xmlns:android="http://schemas.android.com/apk/res/android"
	android:configure="<YourNamespace>.appwidgetdemo.ConfigWidget"
	android:initialLayout="@layout/widget_layout"
	android:minHeight="60dp"
	android:minWidth="294dp"
	android:previewImage="@drawable/appwidget_preview"
	android:resizeMode="none"
	android:updatePeriodMillis="1800000"
	android:widgetCategory="keyguard|home_screen" >

</appwidget-provider>
7. Finally, we have to do some special things in the manifest file so that Android knows that what we are creating is an AppWidget, that it will be updated by a Service that we shall define, and that it will offer a configuration activity to the user. So, edit the AndroidManifest.xml file so that it reads
<?xml version="1.0" encoding="utf-8"?>
<manifest xmlns:android="http://schemas.android.com/apk/res/android"
package="<YourNamespace>.appwidgetdemo">

  <application
        android:allowBackup="true"
        android:icon="@mipmap/ic_launcher"
        android:label="@string/app_name"
        android:supportsRtl="true"
        android:theme="@style/AppTheme">
        <activity android:name=".MainActivity">
            <intent-filter>
                <action android:name="android.intent.action.MAIN" />

                <category android:name="android.intent.category.LAUNCHER" />
            </intent-filter>
        </activity>

	<activity
		android:name=".ConfigWidget"
		android:label="@string/app_name">
		<intent-filter>
		<action android:name="android.appwidget.action.APPWIDGET_CONFIGURE" />
		</intent-filter>
	</activity>

	<receiver
		android:name="SimpleWidgetProvider"
		android:icon="@drawable/widget_icon"
		android:label="@string/widget_title">
		<intent-filter>
		<action android:name="android.appwidget.action.APPWIDGET_UPDATE" />
		</intent-filter>

		<meta-data
		android:name="android.appwidget.provider"
		android:resource="@xml/widget_info" />
	</receiver>

	<service android:name=".MyUpdateService" />

    </application>

</manifest>
where the lines added to the default implementation are indicated in red.
1. Although it isn't essential to do so, we are going to associate a main activity with the AppWidget, and use it to display installation instructions. Edit the java file MainActivity.java to read
package <YourNamespace>.appwidgetdemo;

import android.os.Bundle;
import android.support.v7.app.AppCompatActivity;
import android.appwidget.AppWidgetManager;
import android.content.Intent;
import android.util.Log;
import android.view.View;

public class MainActivity extends AppCompatActivity {

	public static final String TAG = "APP_WIDGET";

	@Override
	protected void onCreate(Bundle savedInstanceState) {
		super.onCreate(savedInstanceState);
		setContentView(R.layout.activity_main);
	}

	/*  This method is invoked by a click on the Request Update button in the main
activity (see the file activity_main.xml for the button definition).  Events are handled
using the android:onClick attribute of the Button rather than by defining an event
handler here. This requires that the method invoked (requestUpdate here)
in the Activity for which activity_main.xml defines the view must be public, and accept
a View as its only parameter. The View passed in to the method references
the object that was clicked. */

	public void requestUpdate (View v){
		startTheService();
	}

	/*  Manually start the service to update widgets using button in main activity
(if any widget instances exist).  If there is more than one instance of the
AppWidget on the homescreen, this will force an update for all of them. */

	public void startTheService(){
		if(SimpleWidgetProvider.appid == null) {
			Log.i(TAG, "No widget instances to update");
			return;
		}
		Log.i(TAG, "Manually Updating Widgets from button in main activity");
		Intent serviceIntent = new Intent(this, MyUpdateService.class);
		serviceIntent.putExtra(AppWidgetManager.EXTRA_APPWIDGET_IDS,SimpleWidgetProvider.appid);
		this.startService(serviceIntent);
	}

}
2. Next, we shall create a class that extends AppWidgetProvider (which is a convenience class that extends BroadcastReceiver and receives only the event broadcasts relevant to the AppWidget). Create the class file SimpleWidgetProvider.java and edit it to give
package <YourNamespace>.appwidgetdemo;

import android.appwidget.AppWidgetProvider;
import android.app.PendingIntent;
import android.appwidget.AppWidgetManager;
import android.content.Context;
import android.content.Intent;
import android.util.Log;
import android.widget.RemoteViews;

public class SimpleWidgetProvider extends AppWidgetProvider {

	public static final String TAG = "APP_WIDGET";
	public static int appid[];
	public static RemoteViews rview;
	public static Long refTimeMS;

	// Called to update the AppWidget at intervals defined by the updatePeriodMillis
	// attribute in the AppWidgetProviderInfo. Also called when the user
	// adds the AppWidget (unless a configuration Activity has been declared, in which
	// case it is not called when the the AppWidget is added, but is called for all
	// updates after that).

	@Override
	public void onUpdate(Context context, AppWidgetManager appWidgetManager,
			int[] appWidgetIds){

		super.onUpdate(context, appWidgetManager, appWidgetIds);
		Log.i(TAG, "onUpdate of SimpleWidgetProvider called");
		// Store following arg for later use
		appid = appWidgetIds;

		// Following shows how to make different parts of the widget clickable, leading
		// to different actions for clicking on different parts. This must be done with a
		// PendingIntent, because the widget is a RemoteViews, hosted by the homescreen.
		// Thus we can't just add a click listener as we would for a normal activity.

		rview = new RemoteViews(context.getPackageName(), R.layout.widget_layout);

		// Add click handling for the widget text that will open the main activity when pressed
		Intent launchAppIntent = new Intent(context, MainActivity.class);
		PendingIntent pendingActivity = PendingIntent.getActivity(context, 0,
				launchAppIntent, PendingIntent.FLAG_UPDATE_CURRENT);
		rview.setOnClickPendingIntent(R.id.widget_text, pendingActivity);

		// Add click handling for the widget update icon that will update widgets by starting a
		// Service.  Note that a click on the update icon for one instance of the widget will update
		// all instances if there is more than one instance of the same AppWidget on the
		// homescreen.

		Intent intent = new Intent(context, MyUpdateService.class);
		intent.putExtra(AppWidgetManager.EXTRA_APPWIDGET_IDS, appWidgetIds);
		PendingIntent pendingService = PendingIntent.getService(context,
				0, intent, PendingIntent.FLAG_UPDATE_CURRENT);
		rview.setOnClickPendingIntent(R.id.ImageView01, pendingService);

		// Tell widget manager to update with information about the two click listeners
		appWidgetManager.updateAppWidget(appWidgetIds, rview);

		Log.i(TAG, "Click listeners added in onUpdate");

		// Update the widget displayed content using the Service MyUpdateService
		context.startService(intent);
	}

	// Called when first instance of AppWidget is added to AppWidget host (normally the
	// home screen).

	@Override
	public void onEnabled(Context context){
		super.onEnabled(context);
		Log.i(TAG, "onEnabled of SimpleWidgetProvider called. refTimeMS = "
				+MyUpdateService.refTimeMS);
	}

	// Called each time an instance of the AppWidget is removed from the host

	@Override
	public void onDeleted(Context context, int [] appWidgetId){
		super.onDeleted(context, appWidgetId);
		Log.i(TAG, "Removing instance of AppWidget");
	}

	// Called when last instance of AppWidget is deleted from the AppWidget host.

	@Override
	public void onDisabled(Context context) {
		super.onDisabled(context);
		Log.i(TAG, "Removing last AppWidget instance.");
	}
}
3. Next, we create a new Java class that will implement the functionality for our widget configuration Activity. Create the class file ConfigWidget.java and modify it to give
package <YourNamespace>.appwidgetdemo;

import java.util.GregorianCalendar;
import android.app.Activity;
import android.app.PendingIntent;
import android.appwidget.AppWidgetManager;
import android.content.Context;
import android.content.Intent;
import android.content.SharedPreferences;
import android.net.Uri;
import android.os.Bundle;
import android.util.Log;
import android.view.View;
import android.view.View.OnClickListener;
import android.widget.AdapterView;
import android.widget.ArrayAdapter;
import android.widget.Button;
import android.widget.DatePicker;
import android.widget.EditText;
import android.widget.RemoteViews;
import android.widget.Spinner;

// Activity to configure widget before installation (launched automatically when user tries to install
// widget on the homescreen).  See
// http://developer.android.com/guide/topics/appwidgets/index.html#Configuring

public class ConfigWidget extends Activity implements AdapterView.OnItemSelectedListener{

	private int appWidgetId;
	private Context context;
	public EditText titleText;
	public String unitsString;
	public String titleString;
	public GregorianCalendar date;
	public static final String TAG = "APP_WIDGET";

	@Override
	public void onCreate(Bundle savedInstanceState){
		super.onCreate(savedInstanceState);
		Log.i(TAG, "\nBegin configuration with ConfigWidget");
		setContentView(R.layout.configwidget);

		// This prevents widget from being installed if user backs out of configuration
		// activity before completion (returning RESULT_CANCELED causes the AppWidget
		// to not be installed)
		this.setResult(RESULT_CANCELED);

		context = this.getApplicationContext();

		// Get the ID for the AppWidget being configured from the Intent that launched the Activity
		Intent intent = getIntent();
		Bundle extras = intent.getExtras();
		if (extras != null) {
			appWidgetId = extras.getInt(AppWidgetManager.EXTRA_APPWIDGET_ID,
					AppWidgetManager.INVALID_APPWIDGET_ID);
		}

		// Set an intent for the Cancel button  (returning RESULT_CANCELED causes the AppWidget
		// to not be installed)
		Intent cancelIntent = new Intent();
		cancelIntent.putExtra(AppWidgetManager.EXTRA_APPWIDGET_ID, appWidgetId);
		setResult(RESULT_CANCELED, cancelIntent);

		// Identify and set listener for units spinner
		Spinner unitsSpinner = (Spinner) findViewById(R.id.unitsSpinner);
		unitsSpinner.setOnItemSelectedListener(this);

		// Populate the units spinner with options defined in the array res/values/arrays.xml
		ArrayAdapter<CharSequence> aa = ArrayAdapter.createFromResource (this,
				R.array.units, android.R.layout.simple_spinner_item);
		aa.setDropDownViewResource(android.R.layout.simple_spinner_dropdown_item);
		unitsSpinner.setAdapter(aa);

		// Click handling for the Cancel button
		Button cancel = (Button) findViewById(R.id.cancelbutton);
		cancel.setOnClickListener(new OnClickListener() {
			@Override
			public void onClick(View v) {
				finish();
			}
		});

		// Click handling for the OK button
		Button ok = (Button) findViewById(R.id.okbutton);
		ok.setOnClickListener(new OnClickListener() {

			@Override
			public void onClick(View v) {

				// Get the edit text input
				titleText = (EditText) findViewById(R.id.edit01);
				titleString = "Until "+titleText.getText().toString();

				// Get the date from DatePicker
				DatePicker dp = (DatePicker) findViewById(R.id.datepicker01);
				date = new GregorianCalendar(dp.getYear(), dp.getMonth(), dp.getDayOfMonth());

				// Save input data in SharedPreferences so that it persists
				SharedPreferences prefs = context.getSharedPreferences("prefs", 0);
				SharedPreferences.Editor edit = prefs.edit();
				edit.putLong("targetDate_" + appWidgetId, date.getTime().getTime());
				edit.putString("title_" + appWidgetId, titleString);
				edit.putString("units_"+appWidgetId, unitsString);
				edit.commit();

				// Do the intial update after configuration
				initialUpdate();

				// Return OK result and app widget id; see
				// http://developer.android.com/guide/topics/appwidgets/
				// index.html#UpdatingFromTheConfiguration. (Returning RESULT_OK causes the
				// AppWidget to be installed.)

				Intent resultValue = new Intent();
				resultValue.putExtra(AppWidgetManager.EXTRA_APPWIDGET_ID, appWidgetId);
				setResult(RESULT_OK, resultValue);
				Log.i(TAG, "End of configuration");
				finish();
			}
		});
	}

	// Method to perform the initial update after the widget is configured. Necessary
	// because if there is a configuration activity the System skips the initial update and
	// it is the responsibility of the programmer to provide it (the System automatically
	// supplies updates after the first one though).

	public void initialUpdate(){
		Log.i(TAG, "  Starting initial update after configure, this id = "+appWidgetId);
		AppWidgetManager apw = AppWidgetManager.getInstance(context);

		// Find the time until the event in the chosen units
		Long milliseconds = System.currentTimeMillis();
		Long refTimeMS = date.getTime().getTime();
		int timeTil = 0;
		if(unitsString.compareTo("Minutes")==0){
			Log.i(TAG, "  Units are minutes");
			timeTil = (int) ((refTimeMS - milliseconds)/60000);
		} else if(unitsString.compareTo("Hours")==0){
			Log.i(TAG, "  Units are Hours");
			timeTil = (int) ((refTimeMS - milliseconds)/3600000);
		} else if(unitsString.compareTo("Days")==0){
			Log.i(TAG, "  Units are Days");
			timeTil = (int) ((refTimeMS - milliseconds)/86400000);
		}
		CharSequence updateText = timeTil + " " +unitsString;
		Log.i(TAG,"  Event: "+titleText.getText().toString());
		Log.i(TAG,"  Time until: "+updateText);

		// Construct remote view that will define look of widget
		RemoteViews rview = new RemoteViews(getPackageName(),R.layout.widget_layout);
		rview.setTextViewText(R.id.widget_title, titleString);
		rview.setTextViewText(R.id.widget_text, updateText);

		// Add click handling for the widget text that will open the main activity when pressed
		Intent launchAppIntent = new Intent(context, MainActivity.class);
		PendingIntent pendingActivity = PendingIntent.getActivity(context, 0,
				launchAppIntent, PendingIntent.FLAG_UPDATE_CURRENT);
		rview.setOnClickPendingIntent(R.id.widget_text, pendingActivity);

		// Add click handling for the widget update icon that will update widgets by starting a
		// service.

		int [] ids = SimpleWidgetProvider.appid;
		Log.i(TAG, "  List of current AppWidgets:");
		for(int i=0; i<ids.length; i++){
			Log.i(TAG, "    ids = "+ids[i]);
		}
		Intent intent = new Intent(context, MyUpdateService.class);
		intent.putExtra(AppWidgetManager.EXTRA_APPWIDGET_IDS, ids);

		// Following hack suggested by comments of "Snailer" at
		// http://stackoverflow.com/questions/4011178/multiple-instances-of-widget
		// -only-updating-last-widget
		// See also http://www.bogdanirimia.ro/android-widget-click-event-multiple-instances/269
		// If the following two lines are not included and more than one instance of the AppWidget
		// is added to the desktop, clicking update on any of them will update only the last one
		// added, until the System does the first update on the AppWidgets.  After that, clicking
		// any instance will update all, as expected.  The issue appears to be Android reuse of
		// Intents.  The purpose of the hack is to allow the PendingIntents to be distinguishable
		// for different instances (since their Intent arguments carry different data). With this hack,
		// now before the first System update each instance of the AppWidget will update separately
		// if its update button is clicked. After first System update, clicking any instance will update all.
		// It appears that if you add several AppWidget instances after a System update on
		// already existing instances, until the next System update each of the new instances will
		// update separately if you click on it, but clicking on one of the old instances will update
		// only the last new instance added (until the next System update, when again clicking on any
		// widget will cause all to update). Note: the "xxx" in the following is an arbitrary string.

		Uri data = Uri.withAppendedPath(Uri.parse("xxx" + "://widget/id/"),String.valueOf(appWidgetId));
		intent.setData(data);

		PendingIntent pendingService = PendingIntent.getService(context,
				0, intent, PendingIntent.FLAG_UPDATE_CURRENT);
		rview.setOnClickPendingIntent(R.id.ImageView01, pendingService);

		// Tell widget manager to update with the new information
		apw.updateAppWidget(appWidgetId, rview);
	}

	// Spinner events
	@Override
	public void onItemSelected(AdapterView<?> parent, View view, int position, long id) {
		Log.i(TAG,"  Spinner, position="+position+" id="+view.getId()+" id="+R.id.unitsSpinner);
		switch(position){
		case 0:
			unitsString = "Minutes";
			break;
		case 1:
			unitsString = "Hours";
			break;
		case 2:
			unitsString = "Days";
			break;
		}
	}

	@Override
	public void onNothingSelected(AdapterView<?> arg0) {

	}
}
4. Finally, we are going to run a Service on a background thread to update the AppWidget, either in response to a regular system broadcast, or because of a direct request by the user. So create the class file MyUpdateService.java and edit it such that it reads
package <YourNamespace>.appwidgetdemo;

import android.app.Service;
import android.appwidget.AppWidgetManager;
import android.content.Intent;
import android.content.SharedPreferences;
import android.os.IBinder;
import android.util.Log;
import android.widget.RemoteViews;

public class MyUpdateService extends Service {

	public static final String TAG = "APP_WIDGET";
	private BackgroundThread background;
	private CharSequence updateText;
	private String titleText;
	private String units;
	public Intent savedIntent;
	public static long refTimeMS;

	@Override
	public void onCreate() {
		super.onCreate();
	}

	@Override
	public void onDestroy() {
		super.onDestroy();
		background.interrupt();
	}

	@Override
	public int onStartCommand(Intent intent, int flags, int startId) {
		super.onStartCommand( intent, flags, startId);
		Log.i(TAG,"Starting the AppWidget update service");
		savedIntent = intent;
		doThreadStart();
		// Want this service to continue running until explicitly stopped, so return sticky.
		return START_STICKY;
	}

	// Method to update the string displayed in the AppWidget.  Get the system time,
	// subtract it from the target time, and put the results with appropriate units into
	// a CharSequence and return it.

	private CharSequence returnUpdate(int id){
		Long milliseconds = System.currentTimeMillis();
		SharedPreferences sp = getApplicationContext().getSharedPreferences("prefs", 0);
		long refTimeMS = sp.getLong("targetDate_" + id, 0);
		titleText = sp.getString("title_"+id, "");
		units = sp.getString("units_"+id, "");
		Log.i(TAG, "  Service: refTimeMS="+refTimeMS);
		int timeTil = 0;
		if(units.compareTo("Minutes")==0){
			Log.i(TAG, "  Units are minutes");
			timeTil = (int) ((refTimeMS - milliseconds)/60000);
		} else if(units.compareTo("Hours")==0){
			Log.i(TAG, "  Units are Hours");
			timeTil = (int) ((refTimeMS - milliseconds)/3600000);
		}  else if(units.compareTo("Days")==0){
			Log.i(TAG, "  Units are Days");
			timeTil = (int) ((refTimeMS - milliseconds)/86400000);
		}
		CharSequence updateText = timeTil + " " +units;
		Log.i(TAG,"  returnUpdate: Update Text = "+updateText);
		return updateText;
	}

	// We won't bind anything to our service, so just return null for onBind
	@Override
	public IBinder onBind(Intent intent) {
		return null;
	}

	// Start the background thread to do the widget update as an instance of
	// the class BackgroundThread
	private void doThreadStart() {
		background = new BackgroundThread();
		background.start();
	}

	// Class to run background thread for updates.  Not essential for this example since
	// the update is very fast, but good general practice if the update involves
	// blocking operations like web access because otherwise this would run on
	// the main UI thread.  We override the run() method inherited from Thread to
	// perform the update.

	private class BackgroundThread extends Thread {
		public void run() {
			Log.i(TAG, "  Begin background thread");
			updateText = "";
			// Retrieve a widget manager and get the IDs of any widget instances from the
			// intent that started this service
			AppWidgetManager apw = AppWidgetManager.getInstance(getApplicationContext());
			int [] ids = savedIntent.getIntArrayExtra(AppWidgetManager.EXTRA_APPWIDGET_IDS);
			if(ids.length > 0){
				// Loop through all widget instances and update
				final int num = ids.length;
				for(int i=0; i<num; i++){
					int id = ids[i];
					updateText = returnUpdate(id);
					Log.i(TAG, "  Update App id = "+id +", Value = "+updateText);
					// Construct remote view with updated time until event
					RemoteViews rview = new RemoteViews(getPackageName(),R.layout.widget_layout);
					rview.setTextViewText(R.id.widget_title, titleText);
					rview.setTextViewText(R.id.widget_text, updateText);
					// Tell the widget manager to update with the new info
					apw.updateAppWidget(id, rview);
				}
				// This update is now finished, so stop the service
				Log.i(TAG,"Stopping the AppWidget update service");
				stopSelf();
			}
		}
	}
}
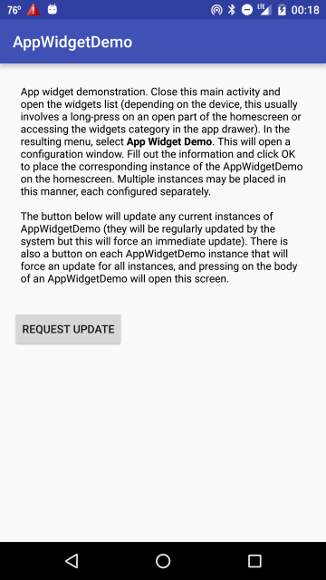
Once you have inserted all the code listed above, try running the application on a device or emulator. The main Activity should launch, giving the following information screen.
|
This screen is for information only, and results because we have (optionally) associated a main Activity with the AppWidget that displays this screen. (It also contains a button that demonstrates how to programmatically force an update to installed instances of AppWidgets.) Now let's install an instance of our AppWidget. (The following procedure is independent of whether the main application is open or not.)
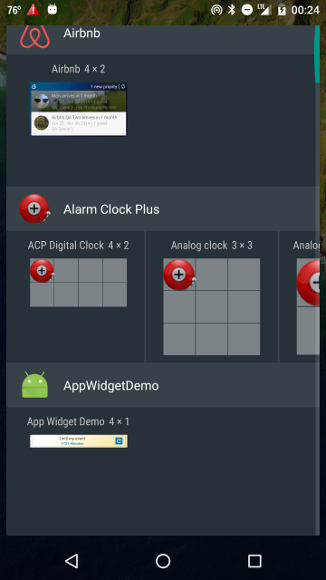
Locate the widgets on your device and Under the WIDGETS category scroll through available AppWidgets. For each both its symbol and relative display size when installed are indicated. For example, we see in the figure below that our AppWidgetDemo example is displaying a preview image indicating what it will look like, and also indicates that its size installed on the homescreen will be 4 x 1..
|
Selecting AppWidgetDemo (or any other widget) by holding down continuously on its symbol displays all the available desktops panels, allowing you to drag the widget to the desired position on a panel and release to install it there.
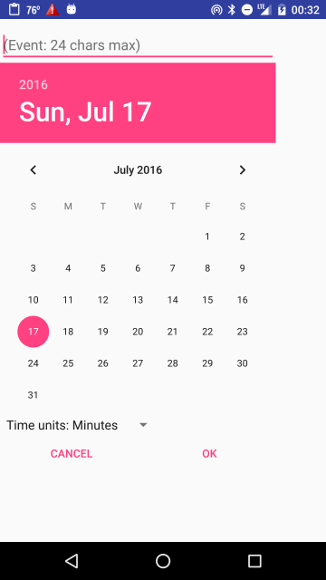
When AppWidgetDemo is released at the desired position a configuration screen shown below left will be displayed, which permits you to choose (1) a short event name, (2) the event date, and (3) the time units that the AppWidget should display (days, hours, or minutes). Making your choices and clicking OK, you then should find the AppWidget installed on your homescreen, as illustrated at the top of the figure below right (for an option that may be useful for all you husbands out there).
 |
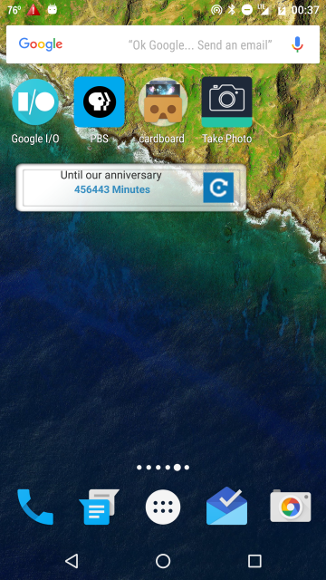 |
The AppWidget instance will now begin counting down to the chosen event date in the units chosen, with the display updated automatically about every 30 minutes. (NOTE: If you are of the husband pursuasion, you can earn serious husband-points by counting the time to your anniversary in MINUTES!)
Note several significant points about our AppWidget installation:
|
| In debugging AppWidgets, basic visual changes will usually be reflected in the widget as you test new versions of it on a device or emulator, without having to delete it and reinstall. But if you change the geometry of the widget, you may have to delete the former version and then reinstall it to get it to resize properly. |
Let's now examine the details of how our 7 XML files and 4 Java files interact to produce the functionality of our AppWidget.
We have chosen to include a main activity with our widget, though it is not essential to do so (an appwidget can be installed without having an activity associated with it). It is implemented by MainActivity.java, with activity_main.xml specifying the corresponding layout. The main activity included with this AppWidget serves two functions:
More generally, an AppWidget (or several different AppWidgets) may be part of an application that has its main functionality in a set of Activities, but provides a desktop window into those Activities through the AppWidgets (the AppWidget examples discussed in the Introduction fall into that category). For those cases one would certainly have a main Activity as the entry to the core functionality of the application.
The implementation of the main activity is similar to various examples that we have already discussed except for two features:
The file widget_layout.xml defines the visual layout of the AppWidget. Because an AppWidget is is intended to be a lightweight component hosted in another application, it is limited to the subset of layout classes supported by RemoteViews (RemoteViews is a class describing a view hierarchy that can be displayed in another process). As of Android 4.4, only the following layouts are supported:
and only the following component classes:
AnalogClockButtonChronometerImageButtonImageViewProgressBarTextViewViewFlipperListViewGridViewStackViewAdapterViewFlipperViewStubThus, the usual design pattern for an AppWidget is to keep it simple and lightweight, but to add click handlers that launch activities containing more extensive functionality. For example, in the present example we will embed a button to force an update of the widget, and also respond to clicks on the body of the widget by opening an Activity screen.
| Classes descended from those listed above are not supported by AppWidgets. For example, editable text fields implemented by the TextView subclass EditText are not allowed. (But you could put an EditText field in an activity that is launched by clicking an AppWidget displayed on the homescreen.) |
For our AppWidget we use LinearLayouts enclosing two TextViews and one ImageView.
Our class SimpleWidgetProvider extends AppWidgetProvider and implements the key functionality of the AppWidget (updating in response to periodic System broadcasts). The class AppWidgetProvider is a convenience class extending BroadcastReceiver. It receives only broadcasts relevant to the AppWidget. For those broadcast events, AppWidgetProvider receives the following method calls (which we can override in our subclass SimpleWidgetProvider):
| Note: If a configuration Activity has been declared (as described below), onUpdate() is not called when the AppWidget is added, since it is expected that the configuration Activity will perform the first update when it is finished. (onUpdate() will be called automatically for all subsequent updates though.) |
Normally it isn't necessary to implement onReceive(Context, Intent) because the default AppWidgetProvider implementation filters all AppWidget broadcasts and calls the other methods as needed.
In our implementation of SimpleWidgetProvider, the only AppWidgetProvider callback that we override (other than to add some diagnostic logging statements for the others) is onUpdate(). In onUpdate() there are several key things that are a little different from our usual applications because of the AppWidget being hosted as a RemoteView in a different application.
This code leads to different actions for clicking on different parts of the widget. This must be done with a PendingIntent, because the widget is a RemoteViews, hosted by the homescreen. To attach a click listener to the AppWidget that will launch the main Activity when the user presses on it:rview = new RemoteViews(context.getPackageName(), R.layout.widget_layout); // Add click handling for the widget text that will open the main activity when pressed Intent launchAppIntent = new Intent(context, MainActivity.class); PendingIntent pendingActivity = PendingIntent.getActivity(context, 0, launchAppIntent, PendingIntent.FLAG_UPDATE_CURRENT); rview.setOnClickPendingIntent(R.id.widget_text, pendingActivity); // Add click handling for the widget update icon that will update widgets by starting a // Service. Note that a click on the update icon for one instance of the widget will update // all instances if there is more than one instance of the same AppWidget on the // homescreen. Intent intent = new Intent(context, MyUpdateService.class); intent.putExtra(AppWidgetManager.EXTRA_APPWIDGET_IDS, appWidgetIds); PendingIntent pendingService = PendingIntent.getService(context, 0, intent, PendingIntent.FLAG_UPDATE_CURRENT); rview.setOnClickPendingIntent(R.id.ImageView01, pendingService); // Tell widget manager to update with information about the two click listeners appWidgetManager.updateAppWidget(appWidgetIds, rview); Log.i(TAG, "Click listeners added in onUpdate"); // Update the widget displayed content using the Service MyUpdateService context.startService(intent);
Some AppWidgets implement a rather fixed functionality and can simply be placed on the screen. The standard Google search bar is an example:

|
But many AppWidgets will be most useful if the user can customize an instance of the widget when it is installed on the homescreen. To do so you can create an AppWidget configuration Activity that will be launched automatically by the AppWidget host when a user installs an instance of the widget. Instructions for creating an AppWidget configuration activity are available in this configuration activity document, and the configuration possibilities are summarized in the AppWidgetProviderInfo documentation. (Note: some of the more advanced configuration possibilities, such as resizable AppWidgets, are available only for API level 12 or later.)
| If a configuration activity is provided with an AppWidget, it is the responsibility of the programmer to update the widget when the configuration is finished, since the system will not automatically initialize the AppWidget if a configuration activity is provided. Instructions on how to do so may be found at Updating from the configuration activity, and will be illustrated below. |
That our AppWidget has a configuration activity associated with it is specified by the following lines from the AndroidManifest.xml file:
<activity
android:name=".ConfigWidget"
android:label="@string/app_name">
<intent-filter>
	<action  android:name="android.appwidget.action.APPWIDGET_CONFIGURE" />
</intent-filter>
</activity>
This is a normal Activity declaration, except that it will be launched by the AppWidget host with the ACTION_APPWIDGET_CONFIGURE action, so the intent filter is used to declare that the Activity will accept this Intent. The ACTION_APPWIDGET_CONFIGURE action is not sent as a broadcast to the AppWidget provider, but as a startActivity to the activity specified in the AppWidgetProviderInfo metadata xml file res/xml/widget_info.xml with the android:configure attribute. The relevant line from widget_info.xml is highlighted below in red:
<appwidget-provider xmlns:android="http://schemas.android.com/apk/res/android"
android:configure="<YourNamespace>.appwidgetdemo.ConfigWidget"
	android:initialLayout="@layout/widget_layout"
	android:minHeight="60dp"
	android:minWidth="294dp"
	android:previewImage="@drawable/appwidget_preview"
	android:resizeMode="none"
	android:updatePeriodMillis="1800000"
	android:widgetCategory="home_screen" >

</appwidget-provider>
where your namespace will be substituted for <YourNamespace>.
| Notice the full declaration <YourNamespace>.appwidgetdemo.ConfigWidget for the configuration activity class, which is necessary because it will be referenced outside package scope. |
The preceding entries in the AndroidManifest.xml and widget_info.xml files will cause the Activity specified by ConfigWidget.java (which has the associated layout file configwidget.xml) to be launched automatically by the AppWidget host when a user installs the AppWidget on the homescreen. The configuration activity defined in ConfigWidget.java accomplishes basically four things:
There are several things of interest in the ConfigWidget.java file and its associated layout file res/layout/configwidget.xml:
The layout of the configuration screen has been shown in an image above. It is specified in res/layout/configwidget.xml and consists of a LinearLayout wrapping
where// Get the ID for the AppWidget from the Intent that launched the Activity Intent intent = getIntent(); Bundle extras = intent.getExtras(); if (extras != null) { appWidgetId = extras.getInt(AppWidgetManager.EXTRA_APPWIDGET_ID, AppWidgetManager.INVALID_APPWIDGET_ID); }
The hack defined by the lines
is described in the code comments for ConfigWidget.java. It uses the setData(Uri) method to add instance-specific data to the Intents that are passed as arguments to the PendingIntents. This appears to be necessary to force the PendingIntents for different instances to be treated as distinguishable, in order to get separate instances of the AppWidget to respond separately to clicks before the first System update. It only matters if there are multiple instances, and then only before the first System update. |
It is good practice to launch a background service to perform the AppWidget update because
BroadcastReceivers are subject to the Application Not Responding (ANR) timer.
Generally, an application not responding to user input in 5 seconds, or a broadcast receiver not completing in 10 seconds, opens a Forced Close dialog indicating that the system is unresponsive.
Obviously, this is not a desirable action for an app and your goal should be for a user never to see this message while running your applications. |
New programmers may experience some confusion over the difference between threads and services.
It is important to understand that, by default, a service still runs on the main UI thread. Thus, even though a service is designed to run independent of user interaction, it can still lock up the main UI thread for the user if it runs tasks that either take a lot of computing resources or that must wait for indeterminate lengths of time, such as when making web accesses. Hence, even within a service it is advisable to perform such tasks on a background thread to keep the UI responsive. |
The class MyUpdateService extends Service, and has the following significant functionality:
The metadata that let Android know that our application contains an AppWidget and about its properties are contained in the files AndroidManifest.xml and res/xml/widget_info. In AndroidManifest.xml, there are three pieces within the appkication tag that relate to the AppWidget; the relevant lines are shown in the following listing.
<activity
	android:name=".ConfigWidget"
	android:label="@string/app_name" >
	<intent-filter>
	<action android:name="android.appwidget.action.APPWIDGET_CONFIGURE" />
	</intent-filter>
</activity>

<receiver
	android:name="SimpleWidgetProvider"
	android:icon="@drawable/widget_icon"
	android:label="@string/widget_title" >
	<intent-filter>
	<action android:name="android.appwidget.action.APPWIDGET_UPDATE" />
	</intent-filter>

	<meta-data
	android:name="android.appwidget.provider"
	android:resource="@xml/widget_info" />
</receiver>

<service android:name=".MyUpdateService" />
1. Applications that publish AppWidgets are called AppWidget providers. To let the Android system know that your application provides an AppWidget it is essential to use a <receiver> </receiver> tag in the manifest file to register the application as an AppWidget provider. In the present example, the relevant lines from the AndroidManifest.xml file are
<receiver
	android:name="SimpleWidgetProvider"
	android:icon="@drawable/widget_icon"
	android:label="@string/widget_title" >
	<intent-filter>
	<action android:name="android.appwidget.action.APPWIDGET_UPDATE" />
	</intent-filter>

	<meta-data
	android:name="android.appwidget.provider"
	android:resource="@xml/widget_info" />
</receiver>
The icon attribute specifies the icon to be shown in association with the AppWidget when it is displayed in the list of available widgets on the phone; in our example it is a simple green square that is stored as the image res/drawable/widget_icon.png. If the android:icon attribute is not specified for the broadcast receiver the icon for the AppWidget installer defaults to the standard Android icon. It may also be overridden by a custom preview image that shows what the appwidget will look like, as we demonstrate above. The preceding is a little different from the usual declaration of a receiver because of the meta-data tag that references the XML file widget_info.xml to be described further below.
The receiver declares that it can accept the action ACTION_APPWIDGET_UPDATE, which is sent when it is time to update the AppWidget. This may be in response to instantiation of a new instance for the AppWidget (if there is no configuration activity), the requested update interval having lapsed, or a system boot. The intent will contain an int array of AppWidget instance IDs in an EXTRA_APPWIDGET_IDS extra. These IDs can be accessed as follows:
Bundle extras = intent.getExtras();
int[] appWidgetIds = extras.getIntArray(AppWidgetManager.EXTRA_APPWIDGET_IDS);
2. Since we have chosen to update our AppWidget from a Service, it must be declared through the AndroidManifest.xml line
<service android:name=".MyUpdateService" />
3. Finally, we have chosen to offer a configuration activity for the AppWidget and the configuration activity must be declared in the manifest file,
<activity
android:name=".ConfigWidget"
android:label="@string/app_name">
<intent-filter>
	<action  android:name="android.appwidget.action.APPWIDGET_CONFIGURE" />
</intent-filter>
</activity>
and must accept the APPWIDGET_CONFIGURE intent, as described previously.
The file res/xml/widget_info.xml referenced from the receiver declaration in the manifest contains the metadata that specify basic properties of the AppWidget:
<?xml version="1.0" encoding="utf-8"?>
<appwidget-provider xmlns:android="http://schemas.android.com/apk/res/android"
android:configure="<YourNamespace>.appwidgetdemo.ConfigWidget"
android:initialLayout="@layout/widget_layout"
android:minHeight="60dp"
android:minWidth="294dp"
android:previewImage="@drawable/appwidget_preview"
android:resizeMode="none"
android:updatePeriodMillis="1800000"
android:widgetCategory="keyguard|home_screen" >

</appwidget-provider>
Attributes in the appwidget-provider tag correspond to fields in AppWidgetProviderInfo. (See Adding Metadata for further discussion of the XML attributes.)
| The complete project for the application described above is archived on GitHub at the link AppWidgetDemo. Instructions for installing it in Android Studio may be found in Packages for All Projects. |
Last modified: July 16, 2016