Playing video in Android from a file or from a stream over the network is relatively simple as long as the video is in an acceptable format. The MediaPlayer that we used to play audio in Animal Sounds can be used to play video, but the simplest implementation of video playback is through the class VideoView.
| If a device has the requisite hardware, one can also record video (and audio) using the MediaRecorder class. Here we shall assume that the video is already available to us in a file and concentrate on implementing methods to play it. |
In this project we illustrate how to use VideoView to play video from a file on the external storage (SD card) of the device or emulator. Many devices no longer have physical external SD cards; instead they have a dedicated portion of device memory that behaves as if it were an external storage device as far as the programming logic is concerned. Whether a device has a physical SD card or not will be irrelevant in the following, as long as we address the emulated external storage correctly (see the discussion in Accessing the File System).
Following the general procedure in Creating a New Project, either choose Start a new Android Studio project from the Android Studio homepage, or from the Android Studio interface choose File > New > New Project. Fill out the fields in the resulting screens as follows,
|
Application Name:
PlayingVideo
Company Domain:< YourNamespace > Package Name: <YourNamespace> . playingvideo Project Location: <ProjectPath> PlayingVideo Target Devices: Phone and Tablet; Min SDK API 15 Add an Activity: Empty Activity Activity Name: MainActivity (check the Generate Layout File box) Layout Name: activity_main |
where you should substitute your namespace for <YourNamespace> (com.lightcone in my case) and <ProjectPath> is the path to the directory where you will store this Android Studio Project (/home/guidry/StudioProjects/ in my case). If you have chosen to use version control for your projects, go ahead and commit this project to version control.
To test our code we need to copy a video file to the external memory of the device or emulator. The video LIGOchirp.mp4 used for this example may be obtained from the Audio-Video resource directory, or you can use your own (but change the name appropriately in MainActivity.java if you use a different file).
By analogy with what we did in the project Accessing the File System, the root of the data directory for this project where files can be stored without special permission may be expected to be
/storage/emulated/0/Android/data/<YourNamespace>.playingvideo/files
Use WiFi Explorer (described in Tranferring Files) to create this directory (or the corresponding equivalent) on your device. Then transfer the video file (LIGOchirp.mp4, or a file of your own) to this directory. You can do this easily with WiFi Explorer, or you can also do it with the ADB. For example, on my phone the command
adb -d push /home/guidry/LIGOchirp.mp4 /storage/emulated/0/Android/data/<YourNamespace>.playingvideo/files/
will transfer the file from the directory /home/guidry on my computer to the phone. For my phone,
adb -d push /home/guidry/LIGOchirp.mp4 /sdcard/Android/data/<YourNamespace>.playingvideo/files/
will also work, because the sdcard directory has been logically linked to /storage/emulated/0/. Now that we have our media resource in place on the device or emulator, we are ready to write the code required to play and control it.
Edit colors.xml to give
<?xml version="1.0" encoding="utf-8"?>
<resources>
    <color name="colorPrimary">#3F51B5</color>
    <color name="colorPrimaryDark">#303F9F</color>
    <color name="colorAccent">#FF4081</color>
    <color name="black">#000000</color>
</resources>
Open styles.xml and edit it to read
<resources>

    <!-- Base application theme. -->
    <style name="AppTheme" parent="Theme.AppCompat.Light.NoActionBar">
        <!-- Customize your theme here. -->
        <item name="colorPrimary">@color/colorPrimary</item>
        <item name="colorPrimaryDark">@color/colorPrimaryDark</item>
        <item name="colorAccent">@color/colorAccent</item>

        <!-- Full-screen, no title-->
        <item name="android:windowNoTitle">true</item>
        <item name="android:windowFullscreen">true</item>
    </style>

</resources>
Edit activity_main.xml to give
<?xml version="1.0" encoding="utf-8"?>
<RelativeLayout xmlns:android="http://schemas.android.com/apk/res/android"
    xmlns:tools="http://schemas.android.com/tools"
    android:layout_width="match_parent"
    android:layout_height="match_parent"
    android:paddingBottom="0dp"
    android:paddingLeft="0dp"
    android:paddingRight="0dp"
    android:paddingTop="0dp"
    tools:context="com.lightcone.playingvideo.MainActivity"
    android:background="@color/black">

    <VideoView
        android:id="@+id/videoPlayer"
        android:layout_width="match_parent"
        android:layout_height="match_parent"
        android:layout_gravity="center" />

</RelativeLayout>
and finally edit the class file MainActivity.java to give
package <YourNamespace>.playingvideo;

import android.media.MediaMetadataRetriever;
import android.os.Build;
import android.os.Bundle;
import android.support.v7.app.AppCompatActivity;
import android.util.Log;
import java.io.File;

import android.media.MediaPlayer;
import android.media.MediaPlayer.OnCompletionListener;
import android.media.MediaPlayer.OnPreparedListener;
import android.os.Environment;
import android.view.MotionEvent;
import android.widget.VideoView;

public class MainActivity extends AppCompatActivity
        implements OnCompletionListener, OnPreparedListener {

    // Video source file
    private static final String fileName = "LIGOchirp.mp4";

    private VideoView videoPlayer;
    private static final String TAG="VIDEO";

    @Override
    public void onCreate(Bundle savedInstanceState) {
        super.onCreate(savedInstanceState);
        setContentView(R.layout.activity_main);

        // Assign a VideoView object to the video player and set its properties.  It
        // will be started by the onPrepared(MediaPlayer vp) callback below when the
        // file is ready to play.

        videoPlayer = (VideoView) findViewById(R.id.videoPlayer);
        videoPlayer.setOnPreparedListener(this);
        videoPlayer.setOnCompletionListener(this);
        videoPlayer.setKeepScreenOn(true);

        // Find and log the root of the external storage file system.  We assume file system is
        // mounted and writable (see the project WriteSDCard for ways to check this). This is
        // to display information only, since we will find the full path to the external files
        // directory below using getExternalFilesDir(null).

        File root = Environment.getExternalStorageDirectory();
        Log.i(TAG, "Root external storage="+root);

        /**
         Must store video file in external storage.  See
         http://developer.android.com/reference/android/content
         /Context.html#getExternalFilesDir(java.lang.String)
         File stored with
         adb -d push /home/guidry/Bawwlllll.mp4 /storage/emulated/0/Android/data
         /com.lightcone.playingvideo/files
         or equivalently
         adb -d push /home/guidry/Bawwlllll.mp4 /sdcard/Android/data
         /com.lightcone.playingvideo/files
         Can also be transferred with a graphical interface using WiFi Explorer
         (https://play.google.com/store/apps/details?id=com.dooblou.WiFiFileExplorer)/
         */

        // Get path to external video file and point videoPlayer to that file
        String externalFilesDir = getExternalFilesDir(null).toString();
        Log.i(TAG,"External files directory = "+externalFilesDir);
        String videoResource = externalFilesDir +"/" + fileName;
        Log.i(TAG,"videoPath="+videoResource);
        videoPlayer.setVideoPath(videoResource);

        MediaMetadataRetriever mdr = new MediaMetadataRetriever();

        // For reference, find the original orientation of the video (if API 17 or later).  We
        // won't use it here, but it is potentially useful information

        mdr.setDataSource(videoResource);
        if (Build.VERSION.SDK_INT >= 17) {
            String orient = mdr.extractMetadata(MediaMetadataRetriever.METADATA_KEY_VIDEO_ROTATION);
            Log.i(TAG, "Orientation="+orient+" degrees");
        }
    }

    /** This callback will be invoked when the file is ready to play */
    @Override
    public void onPrepared(MediaPlayer vp) {

        // Don't start until ready to play.  The arg of seekTo(arg) is the start point in
        // milliseconds from the beginning. Normally we would start at the beginning but,
        // for purposes of illustration, in this example we start playing 1/5 of
        // the way through the video if the player can do forward seeks on the video.

        if(videoPlayer.canSeekForward()) videoPlayer.seekTo(videoPlayer.getDuration()/5);
        videoPlayer.start();
    }

    /** This callback will be invoked when the file is finished playing */
    @Override
    public void onCompletion(MediaPlayer  mp) {
        // Statements to be executed when the video finishes.
        this.finish();
    }

    /**  Use screen touches to toggle the video between playing and paused. */
    @Override
    public boolean onTouchEvent (MotionEvent ev){
        if(ev.getAction() == MotionEvent.ACTION_DOWN){
            if(videoPlayer.isPlaying()){
                videoPlayer.pause();
            } else {
                videoPlayer.start();
            }
            return true;
        } else {
            return false;
        }
    }
}
In the later sections we shall describe how this code functions, but let's first try it out.
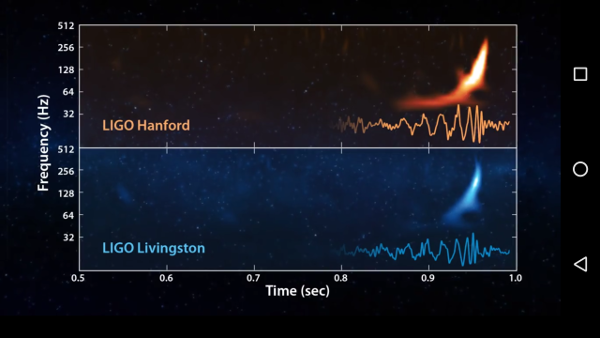
Remember: this app will function only if you have copied the relevant video file to the device or emulator, as described above. The following figure illustrates a frame of the sample video in action on a phone.
|
We see that the video is displaying on all the available phone screen, without the usual information bars, because of the theme that we set. You should find that you can start and stop the video by tapping the screen.
The functionality of the code is documented in a number of comment statements in the code itself, but we give a more extensive discussion here.
The only thing new in activity_main.xml relative to earlier projects is the use of a VideoView wrapped in a RelativeLayout to center the video on the screen.
The Android class
VideoView
|
In the styles.xml file we have set themes and attributes to display the video on the full available screen.
In MainActivity.java, the class extends AppCompatActivity and thus inherits its fields and methods, but we would also like for it to have some base capabilities beyond those offered by Activity. In particular, we would like to know when the video file is ready to play and when it has completed playing. Thus, we have the class implement the
OnPreparedListener
and
OnCompletionListener
interfaces,
public class MainActivity extends ApCompatActivity
      implements OnCompletionListener, OnPreparedListener{
   ...
}
where the implements keyword means that the interfaces in the list that follows are to be implemented in the class and
Next, in the onCreate() method,
The
this keyword
in Java is a reference to the current instance of a class. In the statements
this is a reference to the present instance of MainActivity, which extends AppCompatActivity, which is a subclass of Activity. The argument of setOnPreparedListener() requires an OnPreparedListener object, not an AppCompatActivity, and the argument of setOnCompletionListener() requires an OnCompletionListener object, not an AppcompatActivity, so if our class only extended AppCompatActivity the two lines of code above would be illegal. However, our class implements the two interfaces in addition to extending AppCompatActivity, so its instantiations are in fact OnPreparedListener and OnCompletionListener objects and this is a valid type for the argument in the above two statements. |
|
The preceding manipulations define access to the primary external file system, where the application can place files that it owns. These files are private to the application (for example, they will not show up as general media available to the user on the device). With some exceptions, these files will be deleted if the app is uninstalled. There is no security enforced on these files, meaning that any other application holding the
WRITE_EXTERNAL_STORAGE permission can write to them.
Beginning with Android 4.4, no permissions are required to read or write to the path returned by getExternalFilesDir() if it is in the same package as the calling app. (To access paths to private storage in other packages an app still must hold the WRITE_EXTERNAL_STORAGE and READ_EXTERNAL_STORAGE permissions.) If devices have multiple users, each user has their own isolated external storage and applications have access only to the external storage for their specific user. Notice that this directory to private storage for an app is not the same as the directory path returned by getExternalStoragePublicDirectory(String type), which defines a public directory that is shared between apps. A more extensive discussion of private and public external storage with useful coding examples may be found in the documentation for getExternalFilesDir() and getExternalStoragePublicDirectory(). |
The next step is to override the onPrepared(MediaPlayer mp) method of the OnPreparedListener interface to define a callback that will run when the video file is ready to play. The relevant methods used here are
Thus, in our implementation of the onPrepared(MediaPlayer mp) method we seek to a position 1/5 of the way through the video and begin playing.
In a similar way the
onCompletion(MediaPlayer mp) method
of the OnCompletionListener interface is overridden to define a callback that will execute when the video has completed playing. Since at this point the video is finished and VideoView is managing the media player, we just call the
finish() method of Activity to return to the screen being displayed when we launched this app.
Finally, we build in some simple controls for the video by overriding the onTouchEvent(MotionEvent ev) method of VideoView to define touch events on the screen that we use to start and stop the video. The relevant methods here are
Thus, the net effect of our onTouchEvent(MotionEvent ev) method will be to listen for finger taps on the screen displaying the video and to toggle the video between playing and not playing with each successive tap.
|
This project serves as a simple example of the multitasking and lifecycle issues discussed in
Application Lifecycles
and
Lifecycle Methods. For example, if you receive a phone call while playing the video with this app, the video will be paused and in most circumstances should resume automatically from the paused point when you terminate the phone call. Then, at the end of the app the finish() method is called on the main activity and the screen should revert to what it was displaying when you launched the app.
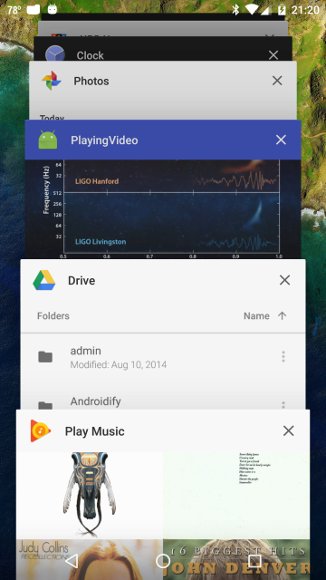
If at that point you press the multitasking button of the phone (The rectangle or overlapping rectangles displayed at the bottom right of the screen for stock Android), you should get a popup screen of the most recently-used applications like the following.
If you now tap the PlayingVideo icon (third from the bottom in this figure), the video should re-initialize and play from the original starting point. |
| The complete project for the application described above is archived on GitHub at the link PlayingVideo. Instructions for installing it in Android Studio may be found in Packages for All Projects. Important: To execute the project in its present form you must also store the video file LIGOchirp.mp4 on the device (or substitute your own video file, with appropriate changes for the name in the code), as described above in the section Storing the Video File on the Device. |
Last modified: July 25, 2016