This short project will introduce some additional aspects of screen views, widgets, and associated event handlers that are commonly used in Android. In the process, we shall learn something about
These skills, added to those already developed in WebView Demo, will provide a strong foundation for developing more ambitious Android interfaces.
Following the general procedure in Creating a New Project, either choose Start a new Android Studio project from the Android Studio homepage, or from the Android Studio interface choose File > New > New Project. Fill out the fields in the resulting screens as follows,
|
Application Name:
ClickTester
Company Domain:< YourNamespace > Package Name: <YourNamespace> . clicktester Project Location: <ProjectPath> ClickTester Target Devices: Phone and Tablet; Min SDK API 15 Add an Activity: Empty Activity Activity Name: MainActivity (check the Generate Layout File box) Layout Name: activity_main |
where you should substitute your namespace for <YourNamespace> (com.lightcone in my case) and <ProjectPath> is the path to the directory where you will store this Android Studio Project (/home/guidry/StudioProjects/ in my case). If you have chosen to use version control for your projects, go ahead and commit this project to version control.
Edit the file app/res/values/colors.xml to define the colors
<?xml version="1.0" encoding="utf-8"?>
<resources>
   <color name="redback" >#aaff0000</color>
   <color name="greenback">#aa00ff00</color>
   <color name="blueback">#aa0000ff</color>
   <color name="yellowback">#aaffff00</color>
</resources>
Then add strings to the file app/res/values/strings.xml to give
<?xml version="1.0" encoding="utf-8"?>
<resources>
   <string name="app_name">Click Tester</string>
   <string name="buttonString">Button</string>
   <string name="shortclick">Short click:</string>
   <string name="longclick">Long Click:</string>
   <string name="redString">Top left block</string>
   <string name="greenString">Top right block</string>
   <string name="yellowString">Bottom left block</string>
   <string name="blueString">Bottom right block</string>
</resources>
Now we are ready to define the layout for our main screen.
Open the file app/res/layout/activity_main.xml and edit it to read.
<?xml version="1.0" encoding="utf-8"?>
<LinearLayout xmlns:android="http://schemas.android.com/apk/res/android"
   android:orientation="vertical"
   android:layout_width="fill_parent"
   android:layout_height="fill_parent" >

   <Button
      android:id="@+id/button1"
      android:layout_width="fill_parent"
      android:layout_height="wrap_content"
      android:text="@string/buttonString"
      android:textSize="18sp" />

   <LinearLayout
      android:orientation="horizontal"
      android:layout_width="fill_parent"
      android:layout_height="fill_parent" android:layout_weight="1">
            <View android:id="@+id/redblock" android:layout_width="wrap_content"
               android:layout_height="wrap_content" android:background="@color/redback"
               android:layout_weight="1"></View>
            <View android:id="@+id/greenblock" android:layout_width="wrap_content"
               android:layout_height="wrap_content" android:background="@color/greenback"
               android:layout_weight="1"></View>
   </LinearLayout>

   <LinearLayout
      android:orientation="horizontal"
      android:layout_width="fill_parent"
      android:layout_height="fill_parent" android:layout_weight="1">
            <View android:id="@+id/yellowblock" android:layout_width="wrap_content"
               android:layout_height="wrap_content" android:background="@color/yellowback"
               android:layout_weight="1"></View>
            <View android:id="@+id/blueblock" android:layout_width="wrap_content"
               android:layout_height="wrap_content" android:background="@color/blueback"
               android:layout_weight="1"></View>
   </LinearLayout>
</LinearLayout>
Much of this should be familiar from the layout for the previous WebViewDemo project (except that there we used a RelativeLayout but here a LinearLayout will be employed):
For an overview of layouts, see Common Layouts.
If you now run the project in an emulator or on a device by clicking the Run button, the layout that results should look like the following figure.

|
This is pretty (at least in a tacky sort of way), but it doesn't yet do anything. Let's fix that.
A major theme in most applications will be that the user must interact with widgets displayed on the screen, and the app must respond in an appropriate way. Let's now demonstrate that it is relatively easy to get each of the five objects that we have put on the screen (four Views and one Button---which is a subclass of View) to respond to basic user interactions. Open app/java/<YourNamespace>.clicktester/MainActivity.java (where you should substitute your namespace for <YourNamespace>) and edit it to read
package <YourNamespace>.clicktester;

import android.support.v7.app.AppCompatActivity;
import android.os.Bundle;
import android.view.Menu;
import android.view.View;
import android.view.View.OnClickListener;
import android.view.View.OnLongClickListener;
import android.widget.Toast;

public class MainActivity extends AppCompatActivity implements OnClickListener, OnLongClickListener{

   View view;

   @Override
   public void onCreate(Bundle savedInstanceState) {
      super.onCreate(savedInstanceState);
      setContentView(R.layout.activity_main);

      // Set click and long-click listeners

      View button1 = findViewById(R.id.button1);
      button1.setOnClickListener(this);
      button1.setOnLongClickListener(this);

      View redblock = findViewById(R.id.redblock);
      redblock.setOnClickListener(this);
      redblock.setOnLongClickListener(this);

      View greenblock = findViewById(R.id.greenblock);
      greenblock.setOnClickListener(this);
      greenblock.setOnLongClickListener(this);

      View yellowblock = findViewById(R.id.yellowblock);
      yellowblock.setOnClickListener(this);
      yellowblock.setOnLongClickListener(this);

      View blueblock = findViewById(R.id.blueblock);
      blueblock.setOnClickListener(this);
      blueblock.setOnLongClickListener(this);
   }

   // Handle short clicks
   @Override
   public void onClick(View v) {
      String whichOne = whichWidget(v);
      Toast.makeText(this, getString(R.string.shortclick) + " "+whichOne,
            Toast.LENGTH_SHORT).show();
   }

   // Handle long clicks
   @Override
   public boolean onLongClick(View v) {
      String whichOne = whichWidget(v);
      Toast.makeText(this, getString(R.string.longclick) +" "+ whichOne,
            Toast.LENGTH_SHORT).show();
      return true;
   }

   // Method to determine which widget was pressed
   private String whichWidget(View v){
      String whichOne = "";

      switch(v.getId()){
            case R.id.button1:
                  whichOne = getString(R.string.buttonString);
                  break;
            case R.id.redblock:
                  whichOne = getString(R.string.redString);
                  break;
            case R.id.greenblock:
                  whichOne = getString(R.string.greenString);
                  break;
            case R.id.yellowblock:
                  whichOne = getString(R.string.yellowString);
                  break;
            case R.id.blueblock:
                  whichOne = getString(R.string.blueString);
                  break;
      }
      return whichOne;
   }
}
In this code, some things should be familiar from our earlier WebViewDemo discussion and some are new.
| A Java class is permitted to implement any number of interfaces. Syntax: the implements keyword is followed by a comma-separated list of interfaces implemented by the class. If the class subclasses another class, by convention the implements clause follows the extends clause. Interfaces are "functionality contracts"; this generally requires that a user employing an interface must provide explicit definitions for methods that are abstract (without bodies) in the interface definition. |
| An overview of how external resources are accessed in Android may be found in the appendix Managing Android Resources. |
Now if you execute the app a long or short press on any of the five widgets in our layout should produce an appropriate Toast display indicating the nature of the action. The figure below illustrates.
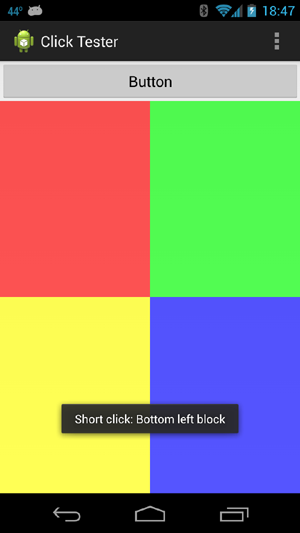 |
A short finger tap on the yellow block at the lower left has just been completed. So we see that by this basic approach of laying out widgets and attaching event listeners we can listen for short and long finger taps on the display, sort out which widget was tapped, and take a corresponding action.
In the preceding example we have been content to put a transient message on the screen indicating which screen widget was short-pressed or long-pressed, but in a realistic application we would often want to use such an event to elicit a user response. One way to do that is to pop up a dialog window floating over the original window into which we could place new widgets with which the user can interact. Let's demonstrate how to do that by giving an option of using a long-press on a block to pop up a window allowing the color of that block to be changed. First let's define some new strings that we will need. Open app/res/values/strings.xml and add
<string name="white_label">White</string>
    <string name="black_label">Black</string>
    <string name="gray_label">Gray</string>
    <string name="red_label">Red</string>
    <string name="green_label">Green</string>
    <string name="processMenu_title">Change Color</string>
inside the <resources></resources> tag. Next, let us create a string array that we shall need. Right-click on app/res/values, select New > XML > Values XML File, and give it the name arrays (no .xml extension; AS will add that). Edit the new file app/res/values/arrays.xml so that it reads
<?xml version="1.0" encoding="utf-8"?>
<resources>
   <array name="colornames">
         <item>@string/white_label</item>
         <item>@string/black_label</item>
         <item>@string/gray_label</item>
         <item>@string/red_label</item>
         <item>@string/green_label</item>
   </array>
</resources>
This defines an array of strings that can be addressed by the name colornames, and that references the strings just created in strings.xml using the @ syntax.
Now we do some editing of MainActivity.java. First add some imports that will be needed:
import android.app.AlertDialog;
import android.content.DialogInterface;
import android.graphics.Color;
then add after the method whichWidget(View v) the method stub
// Menu with list of color options
private void doMenu(View v, int index){

}
(which will be filled out shortly) and then add the following method
// Open AlertDialog holding color options menu and process with anonymous inner class
private void processMenu(final View v){
   new AlertDialog.Builder(this).setTitle(R.string.processMenu_title)
      .setItems(R.array.colornames,
      new DialogInterface.OnClickListener(){
            public void onClick(DialogInterface dialoginterface, int i){
               doMenu(v, i);
            }
   }).show();
}
The content within the method processMenu(View) will probably seem a little unusual
if you are new to Java. This is an example of an anonymous inner class, which means exactly what the name says:
|
In this method we use AlertDialog.Builder to construct an AlertDialog window in which the user will be able to choose some colors.
|
A dialog is a small window prompting for a decision or additional information. It is normally used for modal events (events that require user action before proceeding). Dialogs are objects of the
Dialog
class.
An AlertDialog subclasses Dialog and creates a dialog window of particular form that is well-suited to display an alert (WARNING! This action will arm the nuclear weapon!), and to accept a user decision on how to respond to the alert. A more extensive discussion of using dialogs may be found in the Dialogs developer guide. |
Finally, modify the onLongClick(View v) method to add a call to the new method processMenu():
// Handle long clicks
@Override
public boolean onLongClick(View v) {
   String whichOne = whichWidget(v);
   // If it wasn't the button
   if(whichOne != getString(R.string.buttonString)){
      processMenu(v);
   // If it was the button
   } else {
   Toast.makeText(this, getString(R.string.longclick) +" "+ whichOne,
      Toast.LENGTH_SHORT).show();
   }
   return true;
}
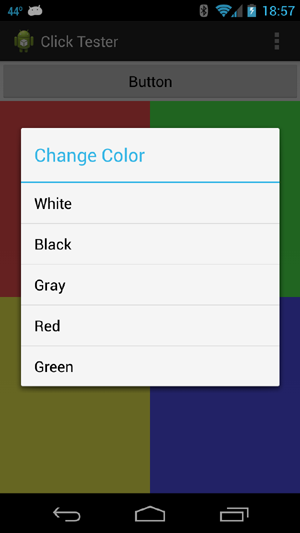
where the logic allows changing the color of the blocks but prevents changing the background color of the Button. if you run the app and long-press one of the color blocks you should get a popup window with color choices that looks like the following figure
 |
Now fill in the doMenu method stub in MainActivity.java so that choosing one of these colors changes the color of the background for the view that was pressed. Edit doMenu(View v, int index) to read
// Menu with list of color options
private void doMenu(View v, int index){
   switch(index){
      case 0:     // Android White
            v.setBackgroundColor(Color.WHITE);
            break;
      case 1:     // Android Black
            v.setBackgroundColor(Color.BLACK);
            break;
      case 2:     // Android Gray
            v.setBackgroundColor  (Color.GRAY);
            break;
      case 3:    // Original red, user-defined in colors.xml
            v.setBackgroundColor(Color.parseColor(getString(R.color.redback)));
            break;
      case 4:    // Original green, user-defined in colors.xml
            v.setBackgroundColor(Color.parseColor(getString(R.color.greenback)));
            break;
   }
}
In this method index is an integer counting from zero that defines which choice from the array colornames the user selected, and the View method setBackgroundColor (Color c) is used to change the background color of the selected View. We have given two examples of how to specify a color:
Now you should find that long-pressing one of the blocks and choosing a color from the resulting popup menu changes the color of that block to the new color, but long-pressing the button will only pop up a message with no color change.
| The complete project for the application described above is archived on GitHub at the link ClickTester. Instructions for installing it in Android Studio may be found in Packages for All Projects. |
Last modified: July 25, 2016