This project will implement a very simple first app. We will go step by step, and mostly emphasize how to do it, with minimal explanation of why. The details of "why" will be explored extensively in later projects, but our purpose here is to show you that an app that does something at least a little non-trivial requires very few steps to produce.
We will assume that you have already installed the required software according to the instructions in Installing Software. If you have not done so already, create an Android Virtual Device (AVD) running Android 4.4 or later according to the instructions in Configuring an AVD. Once you have an AVD configured, you can start it using the window opened by Tools > Android > AVD Manager if you would like, since we will need it later.
| The following instructions for creating a new Android project in Android Studio are based on the Linux version of Android Studio 2.2.1 current in mid-2016, as installed following the instructions in Installing Software. For other versions of Android Studio similar information will be required, but the format for entering it may differ somewhat from that in the current instructions. |
To create a new Android project with the Android Studio interface open, select File > New > New Project (or select Start a new Android Studio project from the AS homescreen). This should give a window that looks similar to the following figure:

|
Fill out the fields as indicated, except substitute for lightcone.com an appropriate package identifier for you, as described in Creating a New Project. For now you can just use something like myname.examples.com, where myname is your name, but it is better to come up with a unique identifier to use systematically for all of your projects. Note that Android Studio has selected a default location to store the project in the last field. This can be changed if you desire but let's use the default location. Once this screen is filled out, click Next, which should give a screen like the following figure.
|
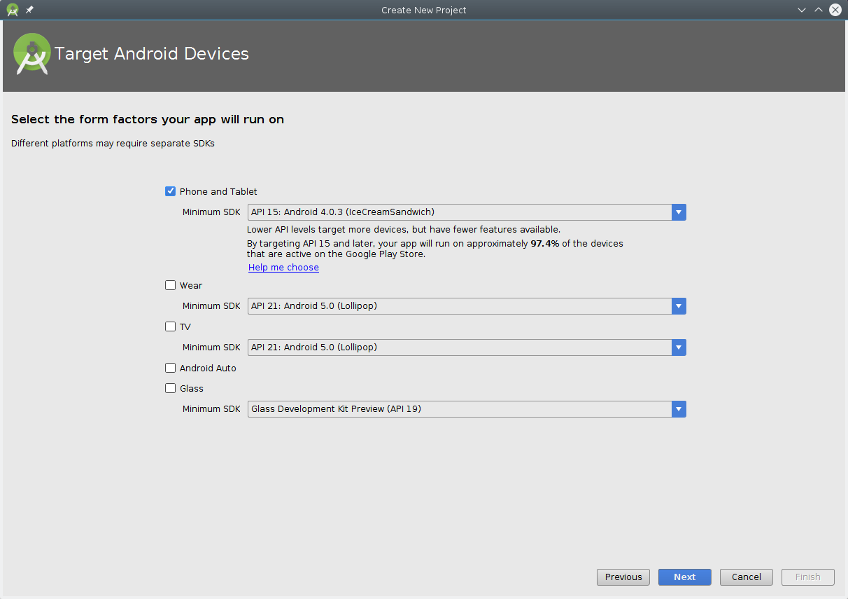
This screen specifies the devices for which we will develop the app, and the minimum version of the Android SDK that will be supported. Set the values on this screen as displayed above and click Next, which should give a screen similar to the following image.
|
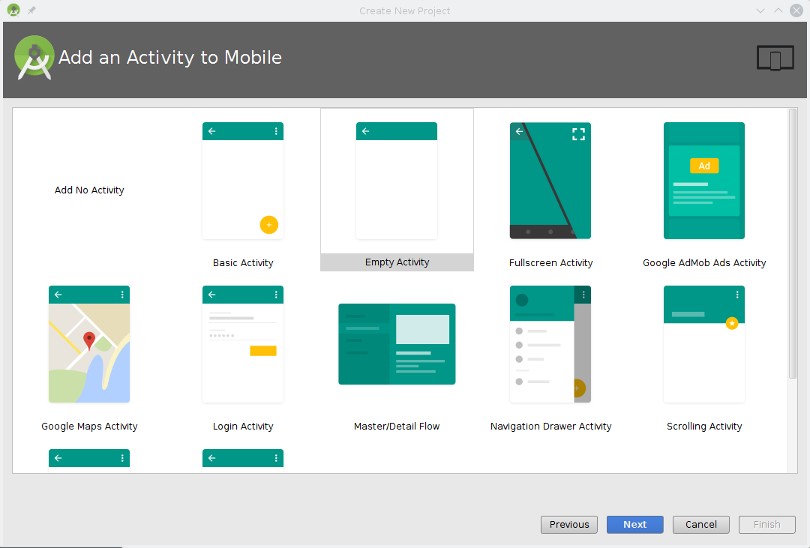
Select Empty Activity on this screen and click Next, which gives a screen similar to the following.
|
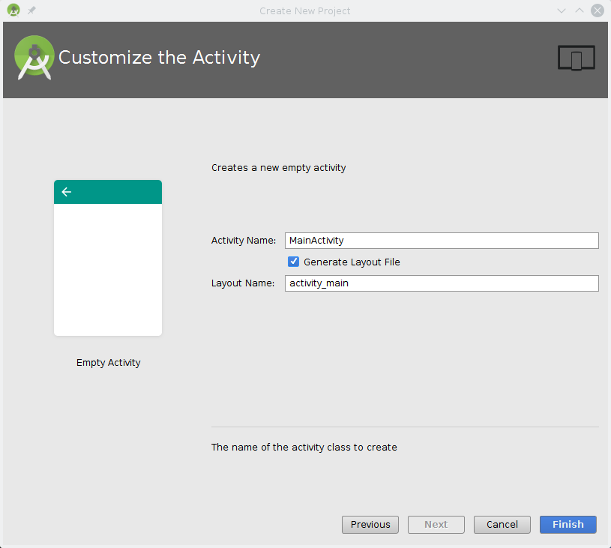
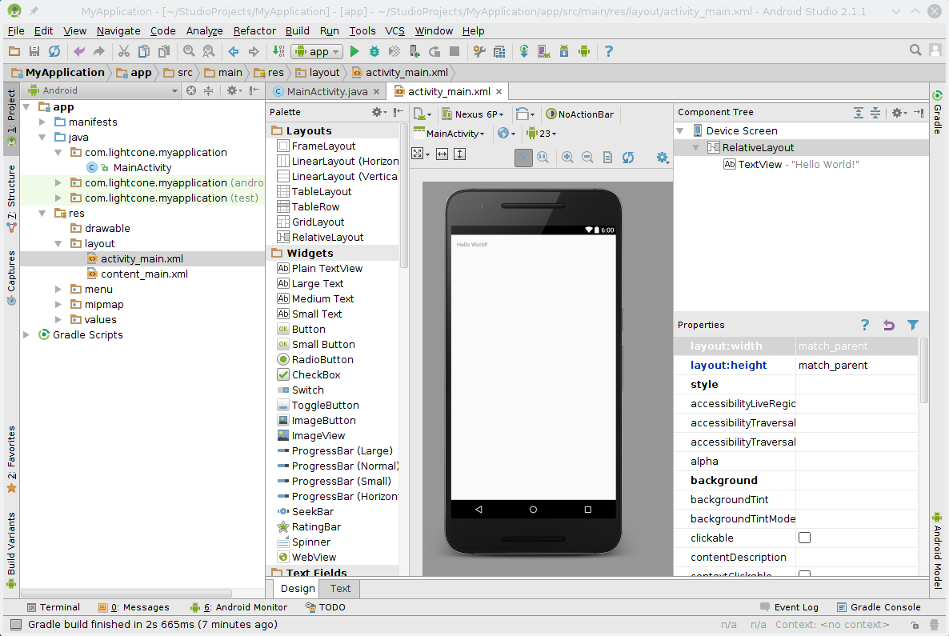
Leave this screen as displayed above and click Finish. This should create a new project with the name MyApplication, which will appear in the Package panel on the left of Android Studio, ready for you to begin editing, as illustrated in the following figure.

|
In this figure tabs for two files have been displayed in the right editing window. The file activity_main.xml is the main layout file that will control the look of our app, and the file MainActivity.java is the main file that will implement the functionality of our app. If you select the activity_main.xml upper tab, you will notice that there are two lower tabs associated with it: Design and Text. Clicking the Design tab gives a graphical view of the layout, as in the following image,
|
while clicking the Text tab gives the corresponding XML code, as illustrated in the following image.
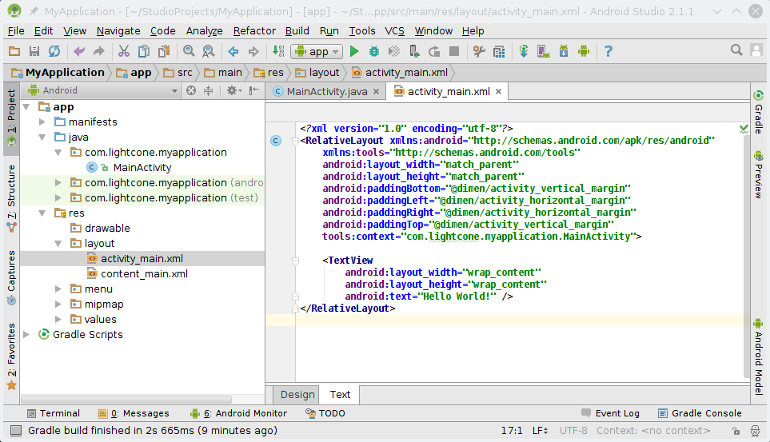
|
We have created what might be termed a shell project; it contains the scaffolding for an app, but doesn't yet have any significant functionality. Let's now expand this shell project created by Android Studio into a simple app.
Let's begin by defining a string resource that will be needed. In the left Package Explorer panel, double click on app > res > values > strings.xml to open the corresponding XML file in the editing window. Edit it to read as in the following figure:
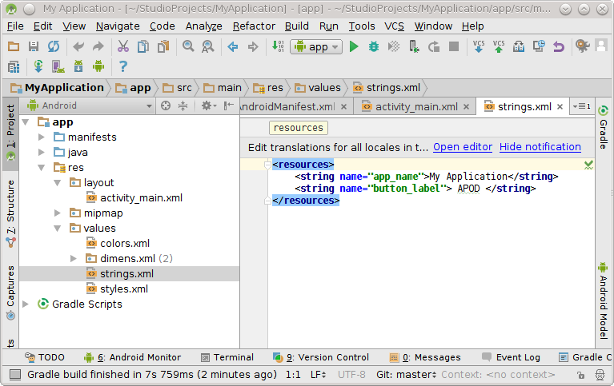
|
which indicates that a definition for a string named button_label with a value "APOD" has been added to the file.
Click the activity_main.xml upper tab and select Design for it in the lower tab. Right-click on the "Hello World" text on the screen and select Delete to remove it. Then in the menu to the left select and drag a Button under the category Widgets to the stage and position it in the middle of the phone image. At this point the graphical layout should look like the following.
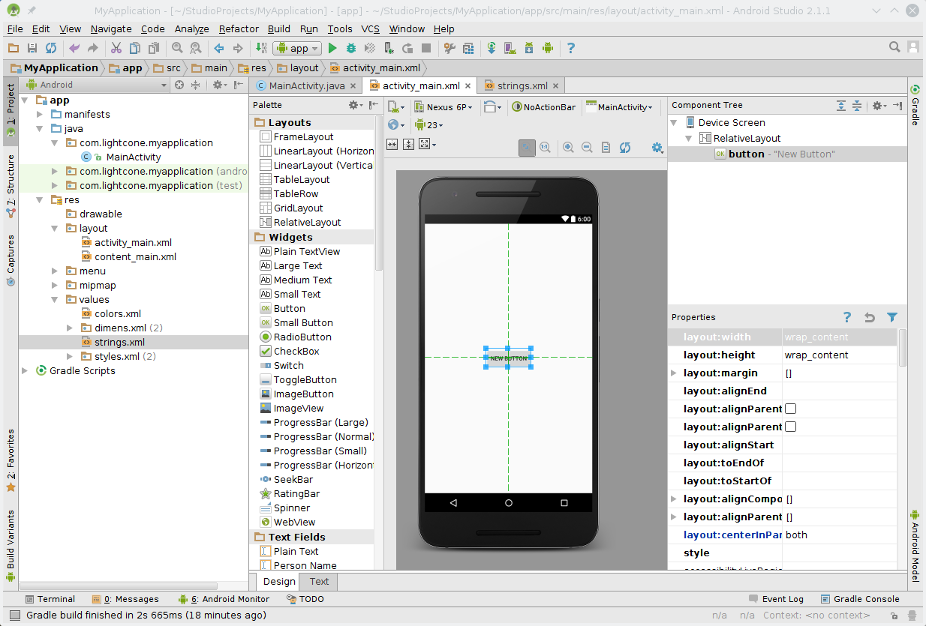
|
Select the upper tab activity_main.xml and then click the lower tab Text to get its XML code display. Edit the line that defines android:text in the resulting code to read android:text = "@string/button_label", so that your XML layout looks like
<RelativeLayout xmlns:android="http://schemas.android.com/apk/res/android"
   xmlns:tools="http://schemas.android.com/tools"
   android:layout_width="match_parent"
   android:layout_height="match_parent"
   android:paddingBottom="@dimen/activity_vertical_margin"
   android:paddingLeft="@dimen/activity_horizontal_margin"
   android:paddingRight="@dimen/activity_horizontal_margin"
   android:paddingTop="@dimen/activity_vertical_margin"
   tools:context=".MainActivity" >

   <Button
      android:id="@+id/button1"
      android:layout_width="wrap_content"
      android:layout_height="wrap_content"
      android:layout_alignParentTop="true"
      android:layout_centerHorizontal="true"
      android:layout_marginTop="91dp"
      android:text="@string/button_label" />

</RelativeLayout>
where the single line that has been changed is highlighted in red.
| By default, Android Studio is configured to save all changes automatically, so there is no need for explicit saves on your part (though a save can always be forced by File > Save All if there is any doubt). Likewise, AS is configured by default to build on the fly (though a recompile can always be forced by Build > Clean), so any changes made are quickly recompiled and any errors introduced by those changes will be flagged almost immediately. |
This change now has linked the string button_label that was defined above in strings.xml to the button label. This may be confirmed by clicking on the lower Design tab for the file activity_main.xml, which should give
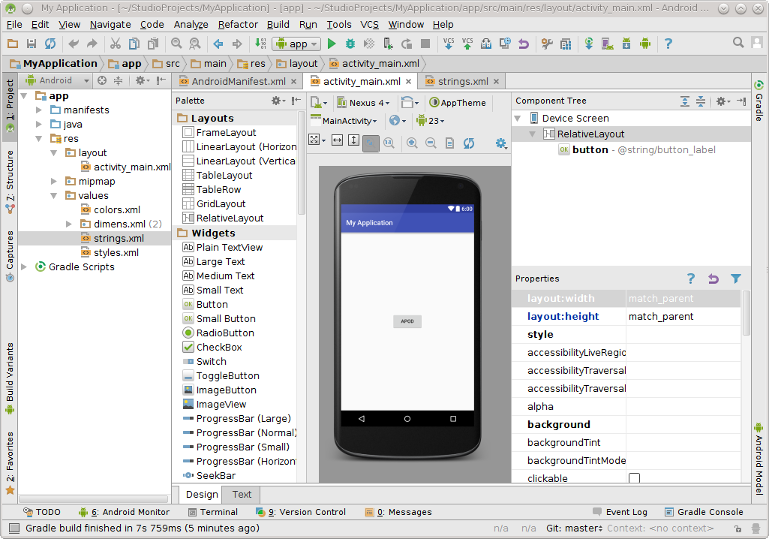
|
where the button label is now "APOD". Let's see what this looks like on an emulator. Execute the app by selecting Run > Run 'app', or click the Run button (green right-pointing triangle) in the toolbar at the top. You likely will then get a window that asks you to choose a device. If you have no actual device attached to the computer by USB, the window should look something like the following,
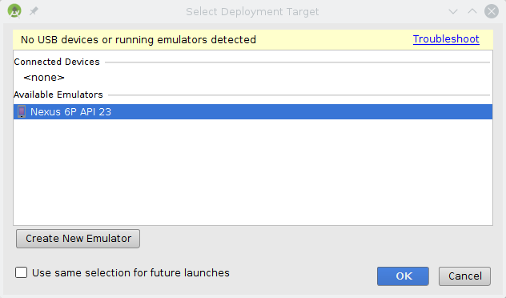
|
where the highlighted line specifies an AVD that has been previously configured.
| In this example no AVD is currently running but there is an available AVD corresponding to an emulation of a Nexus 6P phone implementing Android API 23 (Android 6.0 or Marshmallow). If you configured more than one AVD there will be a line for each in this window, and if an actual device were connected by USB, or you have already launched an emulator as suggested at the beginning, it would appear under Connected Devices in this window. |
Select an AVD from the list and click OK. Android Studio will install the executable for your app on the AVD and launch it in the AVD window. After a little while (be patient; AVDs are often slower than actual devices and are especially slow to initialize when first opened) you should see a screen display of your app at its current stage of development that looks like:
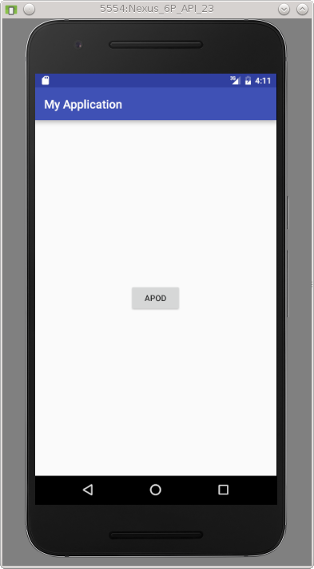
|
If you use the mouse to click the button (equivalent to pressing the button on the touchscreen of an actual phone or tablet) the button should change color briefly, indicating that it knows you have clicked it, but nothing else should happen. Now we will teach the button to do more.
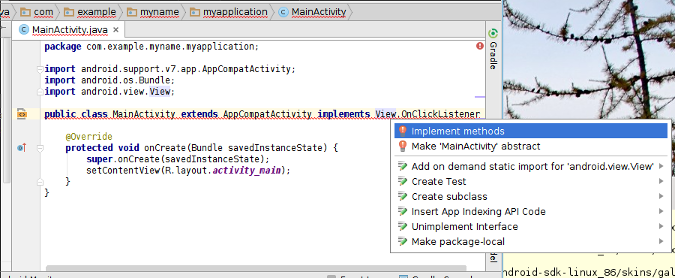
Click on the tab MainActivity.java (if the file isn't already open in the editing window, you can open it by double-clicking it in the left Package Explorer pane). Edit the line of the file that begins public class to add to it implements OnClickListener. Your code now should read
package <YourNamespace>.myapplication;

import android.support.v7.app.AppCompatActivity;
import android.os.Bundle;

public class MainActivity extends AppCompatActivity implements OnClickListener {

   @Override
   protected void onCreate(Bundle savedInstanceState) {
            super.onCreate(savedInstanceState);
            setContentView(R.layout.activity_main);
   }

}
where for your project <YourNamespace> is replaced by your package identifier (e.g., myname.examples.com), and where the code just added is indicated in red. Now you should see that OnClickListener is highlighted in red (and may have a line under it and there may be a red lightbulb above the line). This indicates a compile error associated with OnClickListener. Click on the red-highlighted word to give it focus and execute Alt-Enter from the keyboard, which should give the following popup with suggested fixes.
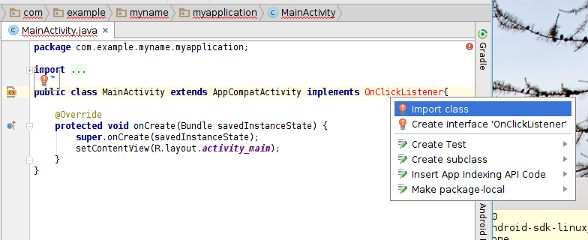
|
The first choice (to import a missing class) is the one we want. Click it to give choices of classes to import (note that in some cases Alt-Enter will jump directly to this popup without first displaying the previous one):
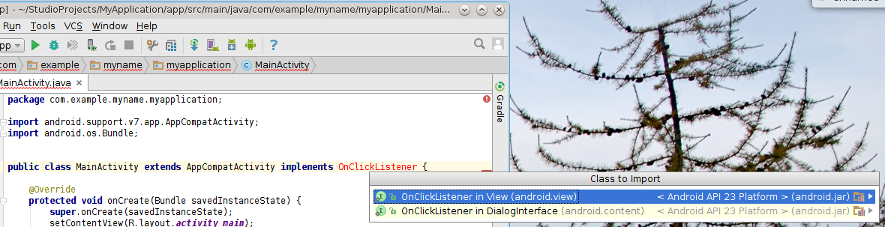
|
The first choice, OnClickListener in View is the one we need, because it will import some code that will define OnClickListener. Click on it with the mouse and Android Studio should add some code to the project (a new line import android.view.View;) and the red color of OnClickListener should disappear. But this seems to have made matters even worse: now there is a wavy red line under the entire line (and a red lightbulb above it, if you click on the line). But Android Studio can help! Click the line to give focus and execute again from the keyboard Alt-Enter, which should give the following popup window with choices to fix the problem:
|
The choice that we want is "Implement methods", which will implement a method that is required by OnClickListener. Select that and the following window should appear:
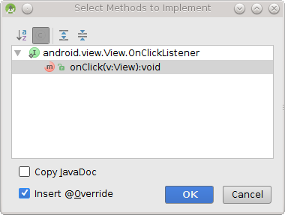
|
The choice onClick(v:View):void is the method required, so select it and click OK. Android Studio will add some more code, and now the errors should disappear, indicating that the project has compiled successfully.
Our project compiles now without error, which is something, but it doesn't do anything. Let's remedy that. First, insert the line
import android.widget.Toast;
in the imports at the top (it may be necessary to click the + to the left to display all imports, since AS will often fold up the list of imports), and then insert the lines
// Add Click listener for the button
View theButton = findViewById(R.id.button1);
theButton.setOnClickListener(this);
inside the method onCreate (inside its curly brackets), and finally insert the lines
Toast.makeText(this, "You clicked the button!", Toast.LENGTH_LONG).show();
inside the method onClick. The code in MainActivity.java should read now
package <YourNamespace>.myapplication;

import android.support.v7.app.AppCompatActivity;
import android.os.Bundle;
import android.view.View;
import android.widget.Toast;

public class MainActivity extends AppCompatActivity implements View.OnClickListener {

   @Override
   protected void onCreate(Bundle savedInstanceState) {
      super.onCreate(savedInstanceState);
      setContentView(R.layout.activity_main);

      // Add Click listener for the button
      View theButton = findViewById(R.id.button);
      theButton.setOnClickListener(this);
   }

   @Override
   public void onClick(View v) {

      Toast.makeText(this, "You clicked the button!", Toast.LENGTH_LONG).show();
   }
}
where the new code that has been added in the previous step is indicated in red. If the app is now executed on the AVD and the APOD button is clicked, it should display something like the following,
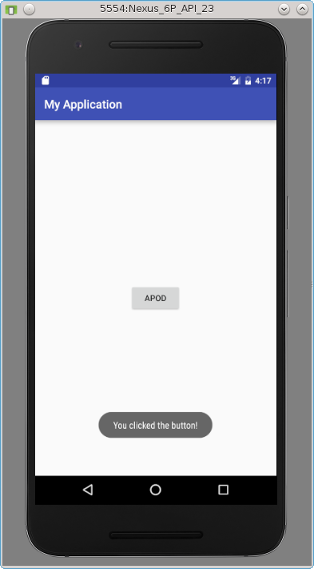
|
where the message is displayed on the screen for only a few seconds (this display of a transient message is called a ``toast''). So the button is causing something to happen! Now let's make it do something useful. Add to the imports
import android.net.Uri;
import android.content.Intent;
and in the onClick method, comment out the Toast command (highlight it with the mouse and select Code > Comment with Block Comment) and then add in the onClick method
String address = "http://apod.nasa.gov";
Intent link = new Intent(Intent.ACTION_VIEW);
link.setData(Uri.parse(address));
startActivity(link);
Your final code should now read,
   package <YourNamespace>.myapplication;

import android.support.v7.app.AppCompatActivity;
import android.os.Bundle;
import android.view.View;
import android.widget.Toast;
import android.net.Uri;
import android.content.Intent;

public class MainActivity extends AppCompatActivity implements View.OnClickListener {

   @Override
   protected void onCreate(Bundle savedInstanceState) {
      super.onCreate(savedInstanceState);
      setContentView(R.layout.activity_main);

      // Add Click listener for the button
      View theButton = findViewById(R.id.button);
      theButton.setOnClickListener(this);
   }

   @Override
   public void onClick(View v) {
      /* Toast.makeText(this, "You clicked the button!", Toast.LENGTH_LONG).show(); */
      String address = "http://apod.nasa.gov";
      Intent link = new Intent(Intent.ACTION_VIEW);
      link.setData(Uri.parse(address));
      startActivity(link);
   }
}
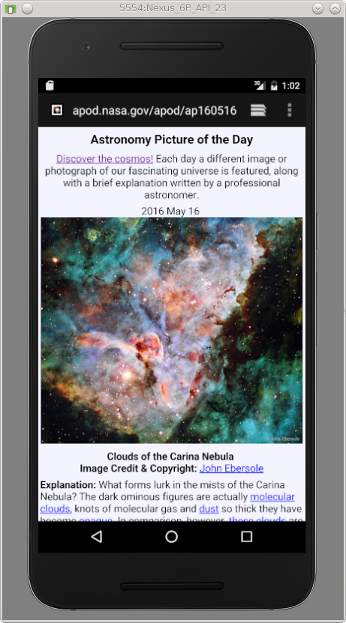
where the changes just made are highlighted in red. If you execute this on the emulator and press the APOD button on the AVD display you should now get a mobile website displayed on the screen (assuming that your computer is connected to the internet):
|
Congratulations! You have completed your first simple app. Admittedly it isn't that sophisticated, but it does something non-trivial and is a prototype of how one can construct apps that do much more complex things. We have not really explained the justification for each step taken in any depth, but the following projects will remedy that.
| The complete project for the application described above is archived at the link MyApplication. Instructions for installing it in Android Studio may be found in Packages for All Projects. |
Last modified: July 25, 2016